Pages

Saturday, December 31, 2011

Clear Peace Card - Happy New Year!

Stamp from CTMH Snow Flurries set  Stamped with White Staz-On Ink

This is my last post for 2011.  Clear cards are always difficult for me to photograph. However, I wanted to share this card with you so please excuse any wonky angles and lighting. :-)

CTMH Clear Card with Bracket Edge
 After stamping the front of the card with white ink, I embossed just the front using the Swiss Dots Cuttlebug folder.  The top layer of the card is one of the Top Coats Icing Overlays from CTMH attached with two brads.  To see more detail, click on any of the photos.
CTMH Top Coats Icing Overlay "Peace"
 I traced around the Overlay onto Crystal Blue paper and cut it out to layer it on the inside front cover.  I wanted more depth underneath so I freehand cut a piece of the Wonderland paper to layer onto the cardstock.  On the inside (back) of the card, I adhered another freehand cut shape of Grey Flannel cardstock for the message.  Usually the Vellum adhesive from Therm O Web works pretty well.  Because of the embossed front and hidden brad prongs, it didn't adhere as well.


Have a Peaceful and Happy New Year!  Wishing you all the best for 2012!
Beverly

Friday, December 30, 2011

Silhouette Cameo Snowflakes Card - No Patterned Paper!

Crystal Blue and White Cardstock
 The Silhouette Cameo cuts beautiful and intricate designs. I wanted to showcase the  pretty cuts by making a clean and simple card.    This card uses 2 colors of plain cardstock, one ink color, one stamp, and some ribbon and bling.  Easy!

CTMH Snow Flurries stamp used as a background stamp
 The card base is Crystal Blue CTMH Cardstock stamped with Crystal Blue ink using one stamp from the Snow Flurries set.  White Daisy cardstock was cut using a blade depth of 4 at a speed of 3 using the double cut option through the software linked to the Cameo.  For even more intricate cuts that I've used on upcoming projects, I slowed the speed to 2. This was with a new blade, btw.

Create A Shade Pearl Paint sprayed on White Cardstock
 After cutting the shapes, I sprayed them with a paint and water mixture to give the snowflakes a shimmery effect.  The picture above was taken with a flash to show off the pearlized look.


The final touch was to add some CTMH Clear and Bitty Sparkles to the snowflakes. The white organdy ribbon was threaded through a ribbon slide and  adhered to the front of the card.

Thank you for stopping by today!
Beverly

Monday, December 19, 2011

Frosted Designs Tuesday Card Sketch #8


Welcome to another Frosted Designs Card Sketch Challenge!  This week Diana Gonzalez has a fun sketch to follow.  You can see that I flipped the sketch 90 degrees to make the label area horizontal. I exchanged the birdcage for a Christmas tree.


There are a lot of layers in Diana's sketch and I kept with that idea by using Spellbinders die cuts under a layered label from Silhouette.  On top of that I used a Hambly transparency overlay called Holiday Deer.  The final layer is the tree that I made using an EK Success edge punch and Tim Holtz tissue tape.


The top of the tree is a punched star that was covered in white embossing powder.  This beautiful sentiment is a CTMH stamp that I embellished with some Holiday Red brads. 

Merry Christmas!


Phone Pictures

I have not posted much lately because I have been on vacation for almost two weeks.

We went to the mountains in Northeastern Arizona about two weeks ago so that my dd2 could play in the snow and visit Santa Claus at the North Pole.(http://www.northpoleexperience.com)
First Time She Ever Saw Snow

Then we came home for a day and drove to Southern California. We vacationed there for a week.  The ocean is so beautiful.  It was a very relaxing trip. And so good to get away!


The last photo is in a Michael's store in Tucson, AZ from November.  Dd2 was walking in front of me and saw this sign and said, "This is so true!"  I had to take her picture with her new excuse!

These pictures were taken with my phone.  I am amazed at the quality of the pictures considering they are from a relatively old phone!

Soon I will start posting some of the things that I worked on prior to our trips.  Thank you for stopping by today!
Beverly

Rock The Block! Close To My Heart Campaign


When you place a minimum order of $25 from the Autumn/Winter 2011 Idea Book, you can get two valuable new products for just $15: the My Creations® Collage Cubes (a Spring/Summer 2012 sneak-peek product!) and the exclusive My Acrylix® Rock the Block E-size stamp set (available only during this promotion). This Rock the Block promotion represents a retail savings of almost $30! You're going to love the collage cubes and the Rock the Block stamp set, which work together for interactive, fashionable fun!

Watch the video below for more information.


Click here to shop now.

Tuesday, December 13, 2011

Visiting Santa at the North Pole

Jessica Sprague layout from Holiday Memories Class
Last week we drove up to Greer, AZ to visit Santa at the North Pole Experience.  It was fun, cold and a very long drive!  After driving 4+ hours each direction, I was thrilled to use the fabulous freebie layout from JessicaSprague.com for the picture we got from the NPX elves.  I have some cute tags that I made that I think will look great on here once it is printed. Many of my layouts are becoming hybrid creations with a mixture of digital and traditional scrapping.

The photo isn't the best because we'd been in Santa's workshop for about an hour by the time it was shot.  At that point, we were all a little overheated in our warmest clothes that we had donned specifically for this cold-weather outing. The important thing is that dd had a great time and I think that shows by her expression in the picture.

Thank you for stopping by today!
Beverly

Sunday, December 11, 2011

Vintage Christmas Card


Just a quick card today.  I made this tree awhile ago and have been waiting to use it on something with a vintage-y vibe.  I love the overlay black damask transparency which looks like wallpaper to me.  


The tree was made with a paper edger punch.  The post showing the original tree along with how to make some other ones is here. Thanks for stopping by today!
Beverly

Monday, December 5, 2011

Frosted Designs Card Sketch Challenge # 7


Silhouette Cameo Star of David Lace Pattern
This great sketch from Diana Gonzalez seemed like a perfect one for me to try some new (to me) techniques using the Silhouette Cameo and software.  I purchased the Star of David Lace Pattern through the Silhouette store and resized it to make three different background papers.  I also captured the blue color and made the two large rings using their free software.  It is so awesome to be able to match colors exactly!

Card Sketch by Diana Gonzalez
Diana's sketch is so pretty!  I know this will be a sketch that I'll use in the future.  It is always fun to see how the other people on the design team use the sketch and I hope that you will visit their blogs to see what they came up with, too!  Many of them used some of the digital stamps from the prize sponsor, Sassy Studio.  Please visit Frosted Designs and enter in the challenge this week.

This standard size card is easy to mail
All of the shapes are popped off the card base with foam tape.  The oval with the stamped sentiment is a SU! punch.  The rest of the shapes were printed on my HP printer from the Silhouette software onto plain white cardstock.  After the printer puts registration marks onto the page, the Cameo can accurately line up the cutting lines to make perfect circles or whatever shapes you draw in the software.  Or it can cut purchased cut files very quickly.  On this card, I didn't use any purchased cut files.  I ended up fussy-cutting the large Star of David, but the rest were all cut with the Cameo.

Sentiment from CTMH set - Say It In Style Stamp Set D1283
The sentiment was stamped using Versamark Ink and then embossed with silver powder.  There are little self-adhesive jewels from CTMH called Clear Sparkles on the oval sentiment and on two of the edges, as shown on the sketch.  The hatpins were made by me using purchased beads.  The dark blue ones were pearls that I colored using Adirondack Alcohol ink as well coloring the top of the corsage pin.


Thank you so much for stopping by today!  
Beverly


Sunday, December 4, 2011

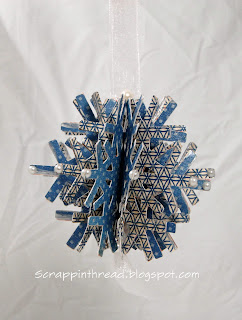
3-D Ornament From Cricut Art Philosophy Cartridge - Version 2 Patterned Paper

This ornament is very similar to the one posted here yesterday.  I doubled the number of shapes cut, which made it a lot fuller.  If I make another one, I would probably make it with 8 or 9 cuts instead of 12. It got a little harder to manage the gluing as the number of pieces grew.  It was still do-able, but an extra hand or two would have come in handy to hold everything together!  The good thing about all that glue is that it makes for a very sturdy ornament!

Adhesive backed pearls used on the spokes to add a little texture
The ornament I showed yesterday had glitter glue on it.  I wanted this one to not be sparkly, but still have a bit of glam, so I opted for pearls.    It would be easy to get carried away with adding the pearls, so it is good that I ran out!  Actually, when I get some more, I'll probably put more on.  For each pearl, it really becomes 24 because of the double-sided nature of each spoke.

Snowflakes cut from two different CTMH B & T papers
The shapes were cut at 4 inches.  After folding each flake in half, one half was glued to the back of two of the alternating paper.  Then those two halves were glued to the backs of the other color and so on.  Before gluing it as one big ball, I ran a piece of organdy ribbon down through the center for the loop.


The organdy ribbon is hard to see, but I like the effect of using something that doesn't draw attention away from the ornament.

Saturday, December 3, 2011

Cardstock 3-D Ornament Using Cricut Art Philosophy Cartridge

Solid color cardstock with glitter glue embellisments
 About a month ago I made several different ornaments using scrapbook paper and cardstock.  Unfortunately, I forgot all about them when everyone in the family took ill.  I recently discovered a few pictures in my camera and realized that I never posted the pictures or the instructions to make them.
View from the bottom of the ornament showing where the spines meet
 This ornament was made using the snowflake shape on page 30 of the Art Philosophy cartridge's guide book.  The paper is CTMH cardstock.  The glitter glue and embellishment jewel at the bottom are also from CTMH.

Each piece of cardstock is folded in half
 The shapes are cut at 4".  After folding each piece in half, the pieces are glued on to the other with a piece of ribbon running down through the center of the six segments.  This way the ribbon is encased in cardstock and is only visible on the top and the bottom of the ornament.

Cricut cuts 6 uniform pieces
 This ornament is very inexpensive to make because it uses one piece of cardstock, one bauble, glitter glue, a piece of ribbon and glue for sticking it all together.  It would be an easy project for a child who enjoys gluing!

Cookie Monster Cupcakes


These have been all over the internet, so it was no surprise to me that my 21 year-old daughter sent me a picture of them a couple of months ago.  She turned 22 this past week and I made them for her.  They were a big hit.


Like so many things, they look cuter in person!  They are very simple to make, though.

She likes marble cake, so I made marble cupcakes.  The eyes are Wilton Candy Melts with black icing.  Initially, I tried Wilton gel, which just ran after a bit and made Cookie Monster look pretty scary.  I wiped off all the gel and was more successful with the regular black icing that comes in a tube.  The learning process in the beginning is why the eyes are sorta wonky.  Of course, I didn't realize the gravitational problem with the gel stuff until I started placing the eyes into the cupcakes and realized they were weeping!  To make the cookies stay in/on his mouth/face, I cut a slit and stuck the little cookie into it.

Just something a little fun and different than my usual fiber/paper crafting.
Have a great day and thanks for stopping by!!
Beverly

Thursday, December 1, 2011

31 Days of December - Smash Book Type Journal


Mini book created with Silhouette Cameo

This little journal/scrapbook is for my seven year old daughter to record her December activities.  If she isn't sure what she wants to write about she can copy the corresponding item from the list at the bottom of this post for that particular day. Or she can write about something from her Countdown to Christmas/Advent Calendar. (Post with that list is here.)  Or she can write about something entirely different. It is hers to do as she wants.  She loves paper crafting and will do a job for which she will be proud.

We do "homeschooling light" in December. This gives us the opportunity to really enjoy this time of year and not feel so stressed about all the the things we want to do versus the things we Need To Do.

It is important for my dd to continue with some subjects, but we change it up a bit to make it fun and tie in with what we are doing.  This year she wants to celebrate Hanukkah.  Since we are not Jewish, we will spend some time learning about the holiday. We'll enjoy making crafts and foods to correspond with the holiday, too.

In a previous post I showed an activity board that I made.  We are using the board for this project.  Here is a picture of some of the little bags hanging with clothespins on baker's twine.


Original post explaining the bags here
Each little bag was filled with one of the following activities for my dd to do on the corresponding date.  For numbers 26-31, the suggested activity was placed in a box that corresponds to a day of the week. These are boxes that we have and sporadically use for homeschooling.
Day 1 = Assemble 31 Days of December Book
Day 2 = Paint a menorah (using handprints on paper)
Day 3 - Choose a recipe and make shopping list for the ingredients
Day 4 - Make and address Christmas cards
Day 5 - Paper craft
Day 6 - Make an apron
Day 7 - Glitter a pine cone
Day 8 - Make snowballs
Day 9 - Observe weather changes
Day 10 - Make a packing list
Day 11 - Find license plates from different places (we are going on a road trip)
Day 12 - Visit a wild animal (one in captivity, as we are going to the zoo - not the wild)
Day 13 - See a whale (Sea World)
Day 14 - Go on a safari (make believe at the safari park)
Day 15 - Hangout at the beach
What is the difference between Southern California and Southern Arizona
 
Day 17 - Alphabetical Order Game on the road

Family Time
Day 19 - Make a dreidel
Day 20 - Light the menorah
Day 21 - Make latkes
Day 22- Make a Hanukkah craft
Day 23 - Draw a self-portrait
Day 24 - Make Mandelbrot
Day 25 - Merry Christmas!
Day 26 - Play a Hanukkah song
Day 27 - Read Hanukkah stories
Day 28 - Sew something
Day 29 - Paint
Day 30 - Craft
Day 31 - Make something in the Babycakes book
 
Thanks for stopping by.  If you have any questions, please leave a comment.
Beverly

Sunday, November 27, 2011

House Rules Subway Art On Canvas

30" x 40" Canvas    
This is my latest Photoshop creation.  I gathered ideas from many different sources, but mainly Pinterest boards.  After creating this list of 'house rules', I ordered it to be printed on canvas so that it can be hung over our kitchen table.  Maybe it will encourage those who need a moment to reflect, to take it.  :-)

As we are moving full-swing into the hustle and bustle of the holiday season, I am constantly reminded of how fortunate I am when I look around and see my family - healthy and safe.  I wish the same for everyone. 

Thank you for stopping by today!  Beverly

Monday, November 21, 2011

Frosted Designs Card Sketch Challenge #6


Frosted Design's Tuesday Card Sketch Challenge

This gorgeous card sketch is from Jenny Evans for Frosted Designs.  I love how versatile it is. It would look great as a horizontal card as well.
All materials are from CTMH except the organdy flower, which is from Michaels.

Card Sketch for November 22, 2011 by Jenny Evans

 
Spellbinders die cuts layered together over leaves cut with Silhouette Cameo


Friday, November 18, 2011

Modified Tri-Fold Card

Inside of Tri-Fold Card
  
Everyone in the house has been sick sometime during the past three weeks, so I've not been able to work on much of anything.  I finally got a chance to play a little bit today and made this very quick card.  It was quick, mainly because I had several of the pieces done already.  Namely, the big flower on the front made with three cuts from a Spellbinders die that I cut, scored and folded into a chunky 3-d flower.

CTMH Dreamin' B & T

I love the thicker designer paper that CTMH came out with this summer.  It is beautiful on both sides, but I wanted to use the bold Autumn flowers on this side.  I should have taken a picture of the back of the card, the paper is so pretty!  The pattern on the opposite side was a little too busy for writing a long message, so I adhered a piece of Colonial White cardstock onto the center section of the inside of the card.

Flower made from Spellbinders die
There are a few tiny butterflies randomly placed on the front of the card and one on the sentiment.  It is so great that butterflies never go out of vogue!  The card also has two different colors of ribbon: the big, bold brown stripe and the orange-gold grosgrain.
Threaded Ribbon Strip made with MS Punch

Thursday, November 17, 2011

Subway Art Christmas Card

I've been having a lot of fun playing in Photoshop making Subway Art.  I'm going to print this out on different media and see which I like best.  Stay tuned for the finished project!

Tuesday, November 15, 2011

Personalized Subway Art

Eva's Whereabouts
I love this! Even if I do say so myself. Lol.  This little project didn't take very long to do.  However, prior to yesterday I would never have known how to do it!  Yesterday was Day 1 of the new class I am taking with Jessica Sprague and Heidi Swapp called Mouse, Paper, Scissors, Give.  Their classes are filled with amazing projects and solid instructional techniques.  It will be fun to share the other projects that we make over the next two weeks!  Stay tuned.

Monday, November 14, 2011

3-D Honeycomb Ornament From Cricut Art Philosophy Cartridge - Number 2

Top View of Ornament Made with 18 cuts using Cricut

This is another variation of the ornament I made last week.  That post goes into a little more detail and has the link to Becca Feeken's tutorial showing how to make one using a  Spellbinder die.  To view that post please scroll down or click here.

Art Philosophy Cricut Cartridge Ornament 2
Ornament 2 is listed on page 47 of the Cricut Art Philosophy guide book. I cut 18 of them from one 12 x 12 sheet of (retired) CTMH B & T paper.  These were cut at 3 1/2".  This ornament looks so pretty in real life.  My dh actually commented on how nice it turned out!

Thanks for stopping by!
Beverly