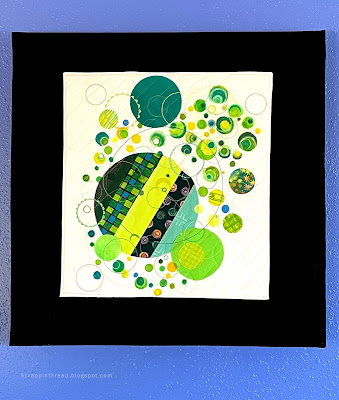
Very rarely do I abandon other projects to work on something new. Recently, an opportunity presented itself that caused me to work on something unexpected. This recently happened because of a challenge posed by the Improv group of the Portland Modern Quilt Guild. The July prompt was 'Surface Design'. My piece incorporated both improvisational quilting and surface design. This piece is mainly green because I am also working in a series with color as the focus. It felt like green should be used this time.
This project inspired me to try a bunch of different things in one piece. For me, this is part of the fun. What starts as an experiment with materials to learn how they work together becomes an exploration of techniques and outcomes.
The first step was to see how a variety of media would work with this stencil on a piece of PFD Kona cotton. The Stabilo chunky pencils and the Derwent Inktense pencils worked as expected with no bleeding. Once the Inktense pencils and Inktense blocks were activated with GAC 100 the color did move. The Crayola Fabric, Marvy, Sharpie Stained, and Jacquard Tee Juice markers bled slightly but were easy to control. The Dye-na Flow is more challenging to control. I use water brushes filled with the dye and this can saturate the fabric quickly.
I got a little carried away with adding circles and the finished quilt was too busy for my liking. It measures about 16 x 17 inches. The picture above shows it on my design wall.
 |
| Close up |
The busy little quilt needed to be mounted onto a solid background to give it some space. After auditioning a number of options, I decided to use a previously painted wood panel, measuring 24" square. The sides are now painted black. I layered a piece of batting and black fabric together and quilted it enough to hold it together. The edges were turned prior to quilting. Then I attached the small art quilt to it and glued the entire thing onto the wooden frame.
 |
| The finished piece on a blue wall in my kitchen |
THIS POST MAY CONTAIN AFFILIATE LINKS. BY CLICKING ON THEM AND PURCHASING PRODUCTS THROUGH MY LINKS, I RECEIVE A SMALL COMMISSION FOR THE REFERRAL. THE ITEM WILL NOT COST YOU ANY MORE BY GOING THROUGH THIS LINK.
Products Used:


No comments:
Post a Comment