

When making an Improv 9-Patch quilt, you will make many decisions. Each step will give you another chance to change the outcome. That is part of the fun of doing improvisational quilts. There is a level of uncertainty that keeps it interesting!
Start with a 9-Patch Block

There are a lot of ways to make a standard 9-patch. Some people like random fabric placement. Other people prefer to have a formula with 5 dark and 4 light-colored squares or 4 dark and 5 light-colored squares. There is no correct way. This can be freeing for some people and terrifying for others! The very short video below outlines my process while making this quilt. For the details about block sizes, etc. keep reading, below.
Video Explaining My Process in Making this Improv Quilt


Make a 9-Patch Block
Once you have decided upon the fabric for the blocks, determine approximately how big you want to make the blocks. I chose the size of my nine squares, (5") which dictated the size of the block. Sort of. Because the blocks were going to be cut apart and sewn back together using a variety of techniques and cuts, I ended up with blocks of different sizes. That is ok! Part of the improv fun is getting things to fit together how you want.
 |
| 5" squares are sewn into 9- Patch and cut apart |
Disappearing 9-Patch Blocks
One of my favorite 9-patch blocks is actually a Disappearing 9-Patch. There are many ways to make a Disappearing 9-Patch. Here are just two. One method is to cut the regular 9-patch in half horizontally and vertically and then move the pieces around, flipping and turning them until you find a design you like. Sew the pieces back together and make a squared block.
 |
| Disappearing 9-Patch |
 |
| Another Version of a Disappearing 9-Patch |
Another variation is to cut a standard 9-patch, twice, along two parallel lines an equal distance from the outside vertical edge. Flip flop the pieces and sew together. Cut the block twice, again along two parallel lines but on the horizontal this time. Rearrange those pieces and sew them back together to make a square block.

Improv Strips
The next step is to cut apart one of the blocks using an angled cut. A slight tip of the cutting ruler provides a good first cut. Insert a narrow strip of fabric. For small blocks, I use 3/4" wide strips. For larger blocks any size from 3/4" up to 1 3/4" wide works well. The strips do not have to be the same size. Nor do they have to be the same color. Choose colors that contrast well. Keep cutting and sewing the block with inserted strips. It is a good idea to have your strips be long enough to stick out at least 1/2" from the edge because they will be cut at an angle when squaring the block.
 |
| Use a Design Wall to Help with Placement |
Assemble the Blocks
It is helpful to see the blocks arranged before sewing all of them together. Try to lay them out on a bed, the floor, or better yet, a design wall. If something seems too tame, cut it and insert a strip. If things seem to be too chaotic, wait until you have completed all of the blocks before making a decision about using the block in your project.
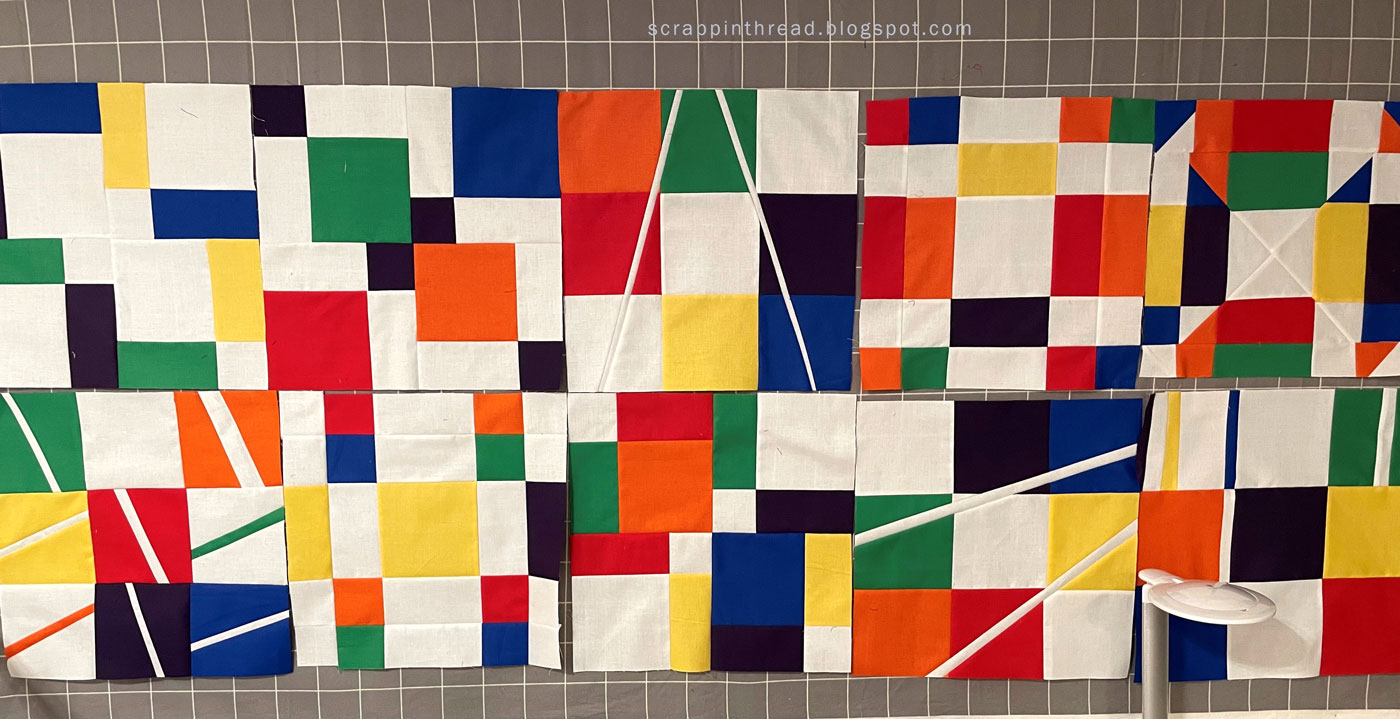
Rearrange as necessary
Move the blocks around until you find a pleasing arrangement. Think about your intended use for the quilt. How many blocks will you need? Do you want to include sashing and borders? The quilt (pictured) was for my couch so I needed it to be long and thin. I also knew that I needed some negative space for my own sanity. It turns out that I made it too long and should have cut the inside white pieces a little narrower. If I would have had a larger design wall, that would have been more obvious sooner.


Making Order from the Chaos
Some of the blocks were too busy. I didn't want to discard them, so I cut them into 10" circles and fused them onto a plain piece of white fabric cut the same size as most of the blocks. Then I machine appliqued the circles. The blocks that were a little small had white fabric sewn along the edges. The blocks that were larger than the average, were cut to size.


Assemble the Blocks
It is helpful to have the blocks be a consistent size. This makes assembly a lot easier. If a block needs a little strip of sashing to help it grow to size, this type of quilt allows for that without it looking out of place. I sewed some of the scraps into two sashing pieces and sewed them along the inside of the outer groupings of blocks. It is a busy quilt and this worked well there. |
| Improv 9-Patch Quilt |
And here is the completed quilt hanging on my back fence.
Please let me know if you have any questions.
Thank you for stopping by today!
No comments:
Post a Comment