Paper and Fiber Arts


Welcome to my mixed media blog. Thanks for stopping by.

Friday, May 20, 2022

How to Sew Three Different Easy Disappearing 9-Patchs

Disappearing 9-Patch Quilt Block Before and After


Disappearing 9-Patch

A disappearing 9-Patch block is a traditional 9-patch that has been cut apart, the pieces rearranged, and then sewn back together to make a block that appears different than the original. There are numerous ways to make a disappearing 9-patch. This tutorial shows how to sew three different easy disappearing 9-patches. The focus here is on the easy part. The end result for these blocks will be to turn them into improv quilt blocks with inset strips. I don't want the blocks to look too complicated to begin with so it is preferable that they be simple to do.
Disappearing 9-Patch Starting With Two Cuts

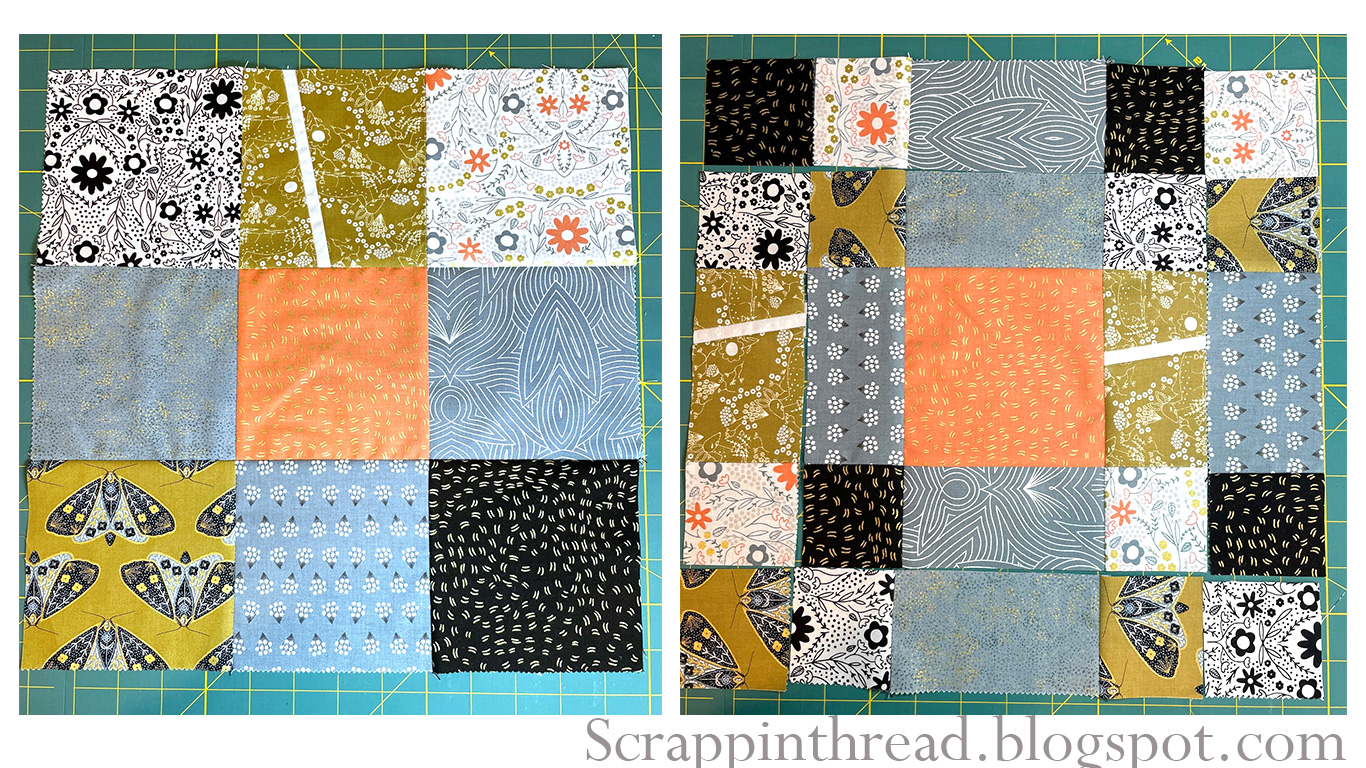
The Easiest Disappearing 9-Patch To Make

This 9-patch block is very simple. Start with a traditional 9- patch and then cut it in half lengthwise and crosswise. Rearrange the 4 pieces by turning and flipping them until you find a design you like. I started with 5" squares using 4 dark/medium and 5 light colored squares.  Here are several of the different variations after cutting and rearranging the pieces. It is difficult to keep track of all of the configurations. I would recommend taking pictures as you work so that you can look at your favorites before sewing them. Use a 1/4" seam for all sewing.


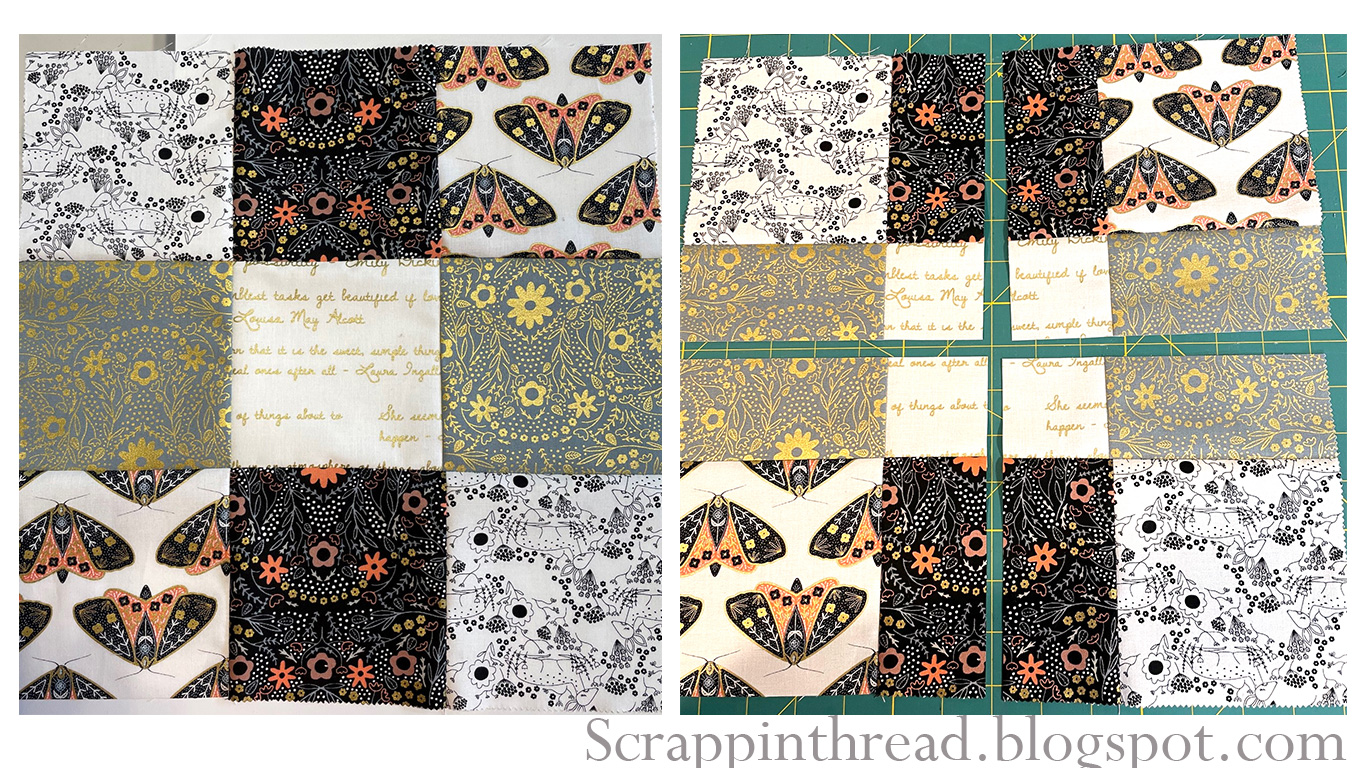
Another Easy Disappearing 9-Patch

This one is a little more complicated because there are a few more cuts. This means that more sewing is involved. Once again start with a traditional 9-patch block. The cut dimensions are dependent upon the size of the squares with which you begin. These are 5" squares. I like to cut whatever the square finishes at divided by two. So in this instance the inside square is now 4.5". I cut 2.25" away from the inside square's seams. That means there is a cut along the left, right, top, and bottom 2.25" away from the middle square. You can choose any measurement you want. Consistency is key in getting the pieces to fit back together nicely. If that is what you want.

Disappearing 9-Patch with Four Cuts

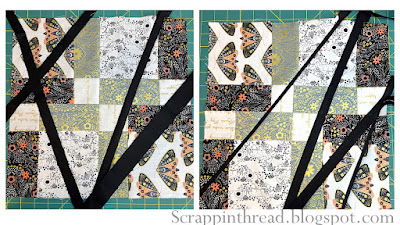
Combining The Two Easy Techniques Into A Third Option

This last, still easy option, starts with making two vertical cuts as just discussed in the previous paragraph. That is to say: 5" squares = cut the strips 2.25" away from center square on the left and righthand sides of the center.  Flip the center section around 180 degrees. Sew the three pieces back together using a 1/4" seam. The block is now about a 1/2" shorter in one direction. 
Now make two cuts as described for the easiest option, above. One cut goes through the middle vertically. The other is through the middle horizontally. Rearrange the pieces and sew back together.
Depending on your placement, you may end up with some pieces protruding out from the other pieces. It is ok. In the end, you'll square up the block anyway.
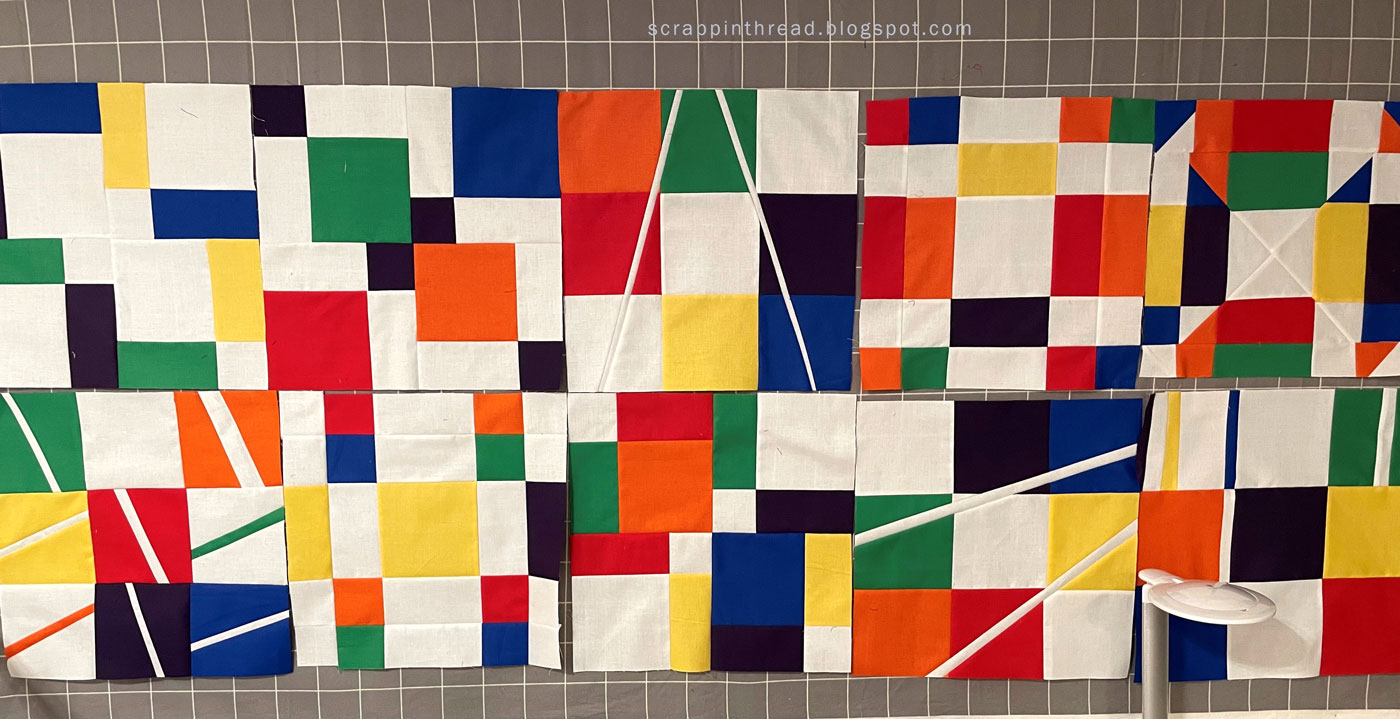
Bonus!

By starting with something that can be kind of boring, you can make some great discoveries.  It is fun to see what happens when the fabric is shuffled around. Some of the designs lend themselves to wonderful secondary designs. This is only a very small number of variations that you can try. For example, cutting the 9-patch into quarter square triangles is another fun way to explore manipulating this traditional block. 

Disappearing 9-Patch with Inset Strips In Progress

As mentioned above, these blocks were used for inserting strips of fabric to make a type of improvisational block. For more information on how to do that please see this blog post.


Please let me know if you have any questions. In a few days, there will be a video that shows how to sew these three different easy disappearing 9-patches.   Thank you for visiting today!


Wednesday, May 18, 2022

How to Sew a Structured Improv 9-Patch Block

Structured Improv 9-Patch Blocks

Improvisational Quilting

Improv Quilting is a free-form style of quilting. It can be completely improvisational when you sew as you cut without a clear plan in mind. Or it can be a minimalistic approach to improv by just changing up one thing that is traditional in quilting and throwing in a wonky cut or an unexpected inclusion or deletion to something that is otherwise quite recognizable.  My style more readily lends itself to the latter interpretation. Here is a video that explains most of the process or read on to find out my take on how to sew a structured improv 9-patch block.


9-Patch Blocks

In this iteration, I started with one of the easiest and most recognizable quilt blocks. That being said, there is still a lot of thought that CAN go into a 9-Patch. But only if you want to do so.  Here are several examples of different placement choices working within a small colorway from a layer cake pack.  I cut the squares down to 5" and started arranging them. 


9-Patch Variations
You may have noticed that two of the blocks are the same. That is because the more I arranged and rearranged the more I forgot what I had already done. Taking pictures helps because if you like a particular layout, you can come back to it after you have moved things around too many times to remember which one you liked the best. 

Or you can just wing it and not worry about placement at all. Just sew 9 squares together and call it good. You are going to be cutting them up anyway, so it won't really matter as long as the colors work for you. If the scale of the fabric's design is important to you, then you may consider a larger or smaller square than the 5" ones that I started with and which are pictured here.


Cut 9-Patch Into Two Pieces

If you are new to improvisational quilting the first cut can be a little daunting. Just do it. Try to stay at least a half-inch from the edge. The reason for this is that it makes it easier to sew in a strip. I usually stay at least an inch away. Using a ruler helps to get a nice straight cut. It isn't used for measuring in this instance. 


9-Patch Cut Into Two Pieces
Insert Strip of Fabric

Typically, I use strips that are .75", 1", 1.25", 1.5" wide. Sometimes, I will use wider strips if the project seems to call for it. For example, a block that is not pieced. In other words, a solid piece of fabric in lieu of a pieced block. Or, conversely, if I am using a crumb block made with lots of scraps and it needs some unifying element. Using different-sized strips in the same block adds interest. I don't recommend using bias strips because there will be some inevitable stretch and ensuing wonkiness.


The strips need to extend beyond the block. If you cut a diagonal across the block, you will need a longer strip than you would for one cut straight across (180 degrees.) 
Sew the strip to one side of the cut block using a 1/4" seam. Press the strip open so that it is flat and sew the other side of the block so that you end up with a square again. This is when watching the video would be helpful. Wide strips will cause your block to grow.

Insert More Strips of Fabric

Continue cutting and adding strips. It is fun to do this and sometimes it is hard to know when to stop! It can be helpful to audition strips before cutting. This allows you to see if you need more strips or not. As you work, take pictures and see what appeals to you.

Improv Block with Four Inset Strips


Square Up

The blocks will get a little odd looking around the edges. I don't cut them until the end. If the blocks are going into a quilt I try to get them to be uniform in size. With large differences in size, I add an extra piece of fabric to kind of make a little sashing for the smaller blocks.  If the project doesn't require the same-sized blocks, then I just trim to the narrowest measurement of each block.


More Tips


Tips for Sewing Inset Strips


This is a really fun way to sew! If you make any structured improv 9-patch blocks, I'd love to see them!

Thanks for stopping by today.

Monday, May 16, 2022

Improv 9-Patch Quilt


When making an Improv 9-Patch quilt, you will make many decisions. Each step will give you another chance to change the outcome. That is part of the fun of doing improvisational quilts. There is a level of uncertainty that keeps it interesting!

Start with a 9-Patch Block

 
There are a lot of ways to make a standard 9-patch. Some people like random fabric placement. Other people prefer to have a formula with 5 dark and 4 light-colored squares or 4 dark and 5 light-colored squares. There is no correct way. This can be freeing for some people and terrifying for others!  The very short video below outlines my process while making this quilt. For the details about block sizes, etc. keep reading, below.

Video Explaining My Process in Making this Improv Quilt


Make a 9-Patch Block

Once you have decided upon the fabric for the blocks, determine approximately how big you want to make the blocks. I chose the size of my nine squares, (5") which dictated the size of the block. Sort of. Because the blocks were going to be cut apart and sewn back together using a variety of techniques and cuts, I ended up with blocks of different sizes. That is ok! Part of the improv fun is getting things to fit together how you want. 

5" squares are sewn into 9- Patch and cut apart

Disappearing 9-Patch Blocks

One of my favorite 9-patch blocks is actually a Disappearing 9-Patch. There are many ways to make a Disappearing 9-Patch. Here are just two. One method is to cut the regular 9-patch in half horizontally and vertically and then move the pieces around, flipping and turning them until you find a design you like. Sew the pieces back together and make a squared block.

Disappearing 9-Patch
Another Version of a Disappearing 9-Patch
Another variation is to cut a standard 9-patch, twice, along two parallel lines an equal distance from the outside vertical edge. Flip flop the pieces and sew together. Cut the block twice, again along two parallel lines but on the horizontal this time. Rearrange those pieces and sew them back together to make a square block. 


Improv Strips

The next step is to cut apart one of the blocks using an angled cut. A slight tip of the cutting ruler provides a good first cut. Insert a narrow strip of fabric. For small blocks, I use 3/4" wide strips. For larger blocks any size from 3/4" up to 1 3/4" wide works well. The strips do not have to be the same size. Nor do they have to be the same color. Choose colors that contrast well. Keep cutting and sewing the block with inserted strips. It is a good idea to have your strips be long enough to stick out at least 1/2" from the edge because they will be cut at an angle when squaring the block.


Use a Design Wall to Help with Placement

Assemble the Blocks

It is helpful to see the blocks arranged before sewing all of them together.  Try to lay them out on a bed, the floor, or better yet, a design wall.  If something seems too tame, cut it and insert a strip. If things seem to be too chaotic, wait until you have completed all of the blocks before making a decision about using the block in your project.

Rearrange as necessary

Move the blocks around until you find a pleasing arrangement.  Think about your intended use for the quilt. How many blocks will you need? Do you want to include sashing and borders? The quilt (pictured) was for my couch so I needed it to be long and thin.  I also knew that I needed some negative space for my own sanity. It turns out that I made it too long and should have cut the inside white pieces a little narrower. If I would have had a larger design wall, that would have been more obvious sooner.


Making Order from the Chaos

Some of the blocks were too busy. I didn't want to discard them, so I cut them into 10" circles and fused them onto a plain piece of white fabric cut the same size as most of the blocks. Then I machine appliqued the circles.  The blocks that were a little small had white fabric sewn along the edges. The blocks that were larger than the average, were cut to size. 


Assemble the Blocks

It is helpful to have the blocks be a consistent size. This makes assembly a lot easier. If a block needs a little strip of sashing to help it grow to size, this type of quilt allows for that without it looking out of place. I sewed some of the scraps into two sashing pieces and sewed them along the inside of the outer groupings of blocks. It is a busy quilt and this worked well there.


Improv 9-Patch Quilt
And here is the completed quilt hanging on my back fence. 

Please let me know if you have any questions.
Thank you for stopping by today!


Cat Hand Tree Collage Quilt


 You may be saying, "What in the world is a Cat Hand Tree Collage Quilt?" or possibly, "Why would anyone want one?"  I wanted to make an original collage quilt. It started as a tree. I feel like there is some powerful symbolism in hands and like to incorporate them in my work when I can. And, I have a lot of cat fabrics. And that is the shortish answer to those questions.

Emerson As A Pillow

Many years ago, I took a collage quilt class with Laura Heine and made a very cute puppy, named Emerson. Her use of bright colors fused together makes for a happy project. The pattern is available through her website, here.  It was patterned as a wall hanging but I turned mine into a pillow and see it every day, as he sits on the mudroom bench. 

Tree Collage Quilt

Using the collage technique, that I sort of remembered from the class, I drew a tree-like shape and then searched for fabrics in my stash to cut up. Rainbow colors are always fun to use and ROY G BIV placement is usually successful.  

Some help

My cat routinely tries to supervise. Does it look like there is a halo over his head? He is not as angelic as he appears and, in fact, moved some of the pieces around when flicking his tail.

Cat Tree Collage Quilt


For my first attempt at an original collage design, I am not unhappy with it. 

Thanks for stopping by today!


Saturday, May 14, 2022

Easy Quilts That Go Together Quickly

Easy Quilts from Simple Blocks

Quilts made with straight seams and not too many pieces sew up easily and quickly. This little roundup of some quilts that were (finally!) finished this winter fit into that favored category of Easy Quilts. And also my favorite: Ones that go together quickly!  The two red and cream-colored quilts were started many, many years ago. I was determined to finish some UFO's this past year and these two landed at the top of the list.  And once they were done, I wondered why I hadn't finished them before? It only took a few hours to sew them up and a few more hours to quilt them. 

Rail Fence and Disappearing 9-Patch Blocks

Most of the blocks were Rail Fence blocks. Some were Disappearing 9-Patches. The pictures below show a variation of a Disappearing 9-Patch. There are a lot of different ways to cut and reshuffle the cut pieces to make a new block. This is just one way.

Sew a 9-Patch Block and cut it apart
The 9-patch block shown above is sewn with two squares made up of three rectangles. The other blocks are all the same size. The 9-Patch is then cut in half horizontally and vertically. Flip the squares around to achieve a new design.  There are many variations. After choosing a variation, sew the squares back together to make a Disappearing 9-Patch block.
Disappearing 9-Patch Block


How to make a quilt larger if you run out of blocks

I added some borders to make the centers a little bigger and voila! They were done. It was a stroke of luck that I had some of the older fabric to mix in with a bit of newish fabric to complete the tops. One quilt went to my toddler granddaughter for her daycare cot and the other was thrown on the back of the couch for the dog to lay on.


Tips for Designing Quick Quilts

  • Use a large block size
  • Use one primary main or background color that contrasts with the alternate color(s)
  • Make wide borders
  • Limit the number of block styles, having all of the blocks be the same means fewer decisions along the way
  • Choose easy to sew blocks with few seams
  • Simple cutting
  • Fill in with blocks of fabric that are not pieced

Easier Quilts from Half-Square Triangles

The quilt below was designed in EQ8 for my nephew. I wanted to use my Accuquilt cutter to cut things very quickly. I chose an HST that finishes at 6" for this quilt. There is one die for the GO! and two dies for the Studio cutter. The Studio 2 can cut more layers and has a number of dies that cut multiple shapes at a time. This is the best time-saver of all! 
EQ8 Designed Quilt

After drawing the twin-sized quilt in EQ8, I pulled fabrics and cut them with my Accuquilt dies. I used strip cutters for the borders and also for the 6" (finished) squares. It really was fast! 
Using a design board made from a foam insulation sheet covered in fabric, I arranged the sewn HSTs and the square blocks. My design wall is in a hallway in the basement. It is not very well lit and it is difficult to stand very far back. However, it works well enough to get a pretty good idea as to how the fabrics will work when placed prior to sewing.


Never underestimate the impact of the quilting

After completing the top, I quilted a geometric maze-like design on the quilt. I love how it makes the quilt crinkly when washed and dried. The pictures below were taken outside and the blue color isn't true. The blue is somewhere between the bright blue below and the drab blue above.


Finally, I made an embroidered quilt label with laundering instructions. He was given the quilt when he visited for the Holidays to take back home and it seemed like a good idea to let him know how to care for it. 

Quilt Label With Laundering Instructions

Do You EQ?

And just for fun, here is a comparison of the quilts. The one on the left was drawn with Electric Quilt 8 software and the one on the right is the completed quilt.

Do You EQ? Quilts

Thank you for stopping by today!