Paper and Fiber Arts


Welcome to my mixed media blog. Thanks for stopping by.
Showing posts with label Organization. Show all posts

Monday, October 5, 2020

An Old Garage Turned Into A New Office, Studio, Gym, and yet is still a Garage - Part 2

Garage Makeover

Before it became a multi-function space

Yesterday's post, here, has lots of "before" pictures of our old garage.  Before we turned it into a new office, studio, and gym I took a quick video of the area. Here is our before and after video:


This house is 60 years old and did not have any energy-saving measures when we moved in three years ago. When we knew we were going to move our home office out to the garage we started budgeting for all of the things necessary to make it a habitable space, even though it was not to be conditioned. It was important for us to keep in mind that this area would still need to function as a garage for future homeowners!


New Age flooring

Cost

The flooring was a big expense, about $2,000 for materials. Because my husband is very handy, we knew he could install it. However, there was a lot that needed to be done first! The cost of the mudjacking was about $2,500. The scarifier rental, the storage rental, the sheetrock, and lots of other smaller items added up to around $1,000. The door, window, and garage door were about $4,500. My husband installed the back door and window.  We ended up needing to buy a new garage door opener because the garage door installers broke the old one. The insulation was professionally installed. The total for the project was around $11,000. That is a lot of money! Especially since there is no HVAC. Though, this was by choice. We did not want it to be considered "living space" for two reasons - one is resale and the other is that our property taxes would likely go up.
Mini Home Gym

Components

That being said, we also needed the space to function for many different purposes. Therefore, we felt that we needed to make it as air-tight and comfortable as possible. 

Mudroom Area
Now that all of the work is done and we are enjoying the space, it was definitely worth the time, hassle, and money. It also forced us to re-evaluate how much stuff we could part with and what really needed to stay.
Home Office
One of the nicest things is that my husband can be working at his desk and I can be at mine and we are not in each other's way - and we are together. We had that in our previous house and I missed that. 
Tool Area
My husband has made some big sacrifices to fit his tools into this area. We have two Rubbermaid storage sheds on the side of the garage where he has moved the gardening tools and some of his other tools. 
Studio Area
The wood furniture that is pictured above and below was offered for free by someone in our community who was remodeling. They wanted to save it from the landfill. It had been custom made for their house by the previous owners and the new owners did not wish to keep it. My hubby built backs on the base cabinets and we made the pieces work for our garage. It was such a wonderful find for me! It really makes the garage seem less 'garage-like'.
Wonderful Light from the Backyard
My favorite thing in the garage is the window overlooking our shallow backyard. I love to see the birds, squirrels, and chipmunks enjoying their space as I enjoy working in mine.

Thank you for going on this home renovation journey with me! And now I can get back to papercrafting! 
Beverly


Sunday, October 4, 2020

An Old Garage Turned Into A New Office, Studio, Gym, and yet is still a Garage - Part 1

Have you ever thought about converting your garage into something other than a parking spot for your car? Or maybe, like my family, you've been using it for storage and want to have a place to do other things. This summer we undertook this project so our home office, my art studio, our gym, and my husband's tools could be better housed in the space.

Old garage door

Our house was built in 1960. There is a two-car garage, which is attached to the kitchen. It had not been insulated or drywalled so it was drafty and had a healthy creepy-crawly habitat within the space. I was skeptical that I would want to have Any of My stuff out there. My husband assured me that it would be nice enough for me to work there. With a heavy dose of skepticism, I agreed that we could give it a go. At the bare minimum, it would help for resale in the future.


We had stuff piled from floor to rafters

In the beginning, I thought the biggest job would be clearing out all of the stuff. We had A Lot of Stuff! To house it while we worked on the garage, I rented a large storage unit to sit in the driveway. We rented it for three months. Unfortunately, that is how long this renovation took. 


The old door had huge gaps around the frame


The back door of the garage opens to the patio on the backside of our house. I wanted to have that be the new entryway for the family to use as a mudroom-like area. We bought a new door from Home Depot and my husband installed it. This was after he took out all of the rotting wood around the frame and fixed it. And he had to build a base for the threshold and pour leveling compound to get it to fit properly. The old threshold was built on wood. Lots of critters had used it as their main point of entry because the wood was essentially decomposed wood and splinters.

This is the Southeast corner of the garage

My husband works full-time so the work was done on his days off. He did not take any vacation time to complete this project. In retrospect, completing this over three months of weekends is pretty impressive! He did most of the work himself. For example, he ran the wiring for outlets and lighting. He fixes machines for a living and has electrical experience because of that and also from previous home renovations.

Part of this wall was inset and was brick on the other side
Every area had some type of conundrum that presented itself. The wall above had to be built so the drywall could be attached. Hubby put the sheet of insulation in and then built a wall in front of it. Then more insulation was added in between the studs.

Our refrigerator and storage unit in the driveway
The neighbors are probably as happy as we are that the project is finally done so that they don't have to see the driveway storage unit any longer. Most of them didn't know there was a refrigerator behind the unit, too!

Drywall had to be installed on the ceiling rafters
There were a few things for which we hired outside contractors. Originally, we hired a company to do the sheetrock. They were to install the ceiling sheetrock and then the insulation people would come the next day to do the blown-in insulation for the attic and put the batts in the walls. The drywall company would come the following day and finish hanging the drywall and start taping and mudding. They would finish their job by adding texture and sanding all of the surfaces. That did not go to plan. When the insulation company was here to do their part one of the pieces of sheetrock fell off the ceiling. The job stopped because none of the drywall had been properly installed. My husband ended up hanging all of the sheetrock because the insulation company had a tight schedule and had to come back when they could squeeze us in. I am so thankful no one was hurt.

The previous owner had taken out the window
There had been a window on the southside of the garage. We bought a window at Home Depot and my husband learned how to install it. He also learned how to uninstall, cut, and reinstall siding. The picture below shows the exterior with the work in progress.

This wall had a mystery cut in the insulation
The garage had a problem with water coming in and puddling. We hired a company to mud-jack the floor because half of the garage was much lower than the other half. The mud-jacking was done with a foam product that was pumped into the ground under the garage floor. It helped quite a bit but didn't even the floor as much as necessary. We rented a scarifier which is a big grinder and my husband ground down the high parts. Then he filled in the cracks.

Concrete crack filler
The floor prepped and the walls have been painted so the next step is flooring. As this still needs to be a garage, I opted for a very durable tile that is manufactured for garages. It looks like tile but is a vinyl product. The installation was pretty easy once the prep work was done!
 
This post is quite long. I will post the "After" pictures tomorrow. Here is the link to that post. 
Thanks for visiting today.
Beverly

Saturday, June 29, 2019

Wellness Journal Part C - Example Pages and Printable Tracker List

There are a lot of pictures in this post.
Yaquina Head Lighthouse
Last weekend, my family and I went to the coast.  It was a beautiful getaway and we had a wonderful, relaxing, mini-vacation.  We drove to the coast so I knew there would be space for some art supplies. In addition to a package of rolls of washi tape, that is not pictured, the box below shows the materials that I brought to use.  As it turned out, I did not end up using everything I brought.

Travel box of supplies for the weekend
To read more about the idea behind, and some resources for, a Wellness Journal please look at these two posts, here and here. In the first one, I give an example of a time management technique and the second one, I share more specific information about a couple of dimensions of wellness.


In the evenings and early mornings, I spent a little bit of time putting my Wellness Journal together. When I was organizing how to set everything up, I decided that it would be more convenient to have a separate tracker for food and water consumption that I could keep in the kitchen.  And one that it didn't matter if someone splattered spaghetti sauce upon. For that purpose, I chose an old Composition notebook, pictured below. 
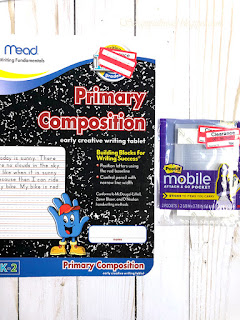
From the clearance section at Target a couple of years ago

Water and food tracker on composition paper


As time goes on, I might draw lines for columns for the days of the week.  Right now, they are just divided by open space in-between the washi tape days. The little scale and glasses of water to color in or mark off, are stamped images. This format gives me plenty of space to write down what I eat each day. Now, onto the main tracker/journal...


For my main record keeping, I decided to go with a Rhodia Dot Pad. I like the size of it and the dots.  Both sides of the pages have dots. I like to use things all the way up, so this will work for at least a year. Also, it is easy to remove pages, as needed. This type of paper works very well for bullet journaling, too.

Rewards that are meaningful to me written over a stenciled woman from StencilGirl
On the very first page, I listed some rewards that I may earn by achieving some of my goals.  Sometimes, it is nice to have a reward after working to achieve something.  Sometimes, the reward is in the achievement.  A lot of that has to do with mindset and effort, in my opinion.  And everyone is different in how important rewards are to them.

This is a double-page spread for my gratitude practice
The next page is used for recording daily gratitude reminders.  I kept the lefthand-side page blank so that there would be space for an entire month's worth of little hearts.  Those were leftover from a project made a long time ago.  At the time, I cut an entire 12 x 12 cardstock sheet (or maybe two) using my Cricut and the Art Philosophy Cartridge.

This is the back page of the gratitude page and opposite the main tracking page
Next, I want to track my fruit and vegetable intake.  There is a lot of conflicting information about whether 5 a day is enough fruit and veg or if it should be 7 or 10.  Some people say 5 is not necessary.  At this point in my life, 5 seems like a good number. So, for now, I am sticking with that.  If modifications seem necessary, it will be easy to do those down the line.

This is the busiest page because I wanted a one-page, at-a-glance type tracker
The first page with dates attributed to it starts in the middle of the year. That may seem strange.  However, we are halfway into the year and I like the idea of beginning something new at this point in the year. It seems less 'resolution-y.' So, all of that to say that means July is when I am beginning my trackers.
Goals have to be measurable and have a timeframe
The next set of pages are "Goals."  These are short or long term specific goals.  There are also some on-going goals for leading a healthy, happy life.  Most goals are measurable and have an end date.  Some are broad in scope.  This is another area that can be tweaked as time goes on.  Hopefully, some of the tweakings will have to do with re-evaluating specifics or having met some of the goals along the way.
Washi tape used to divide the paper and make columns.


Lastly, here is a list of items that might be useful to track.  Please feel free to use it as you work on your own journal.  And, if you think of something that you think should be included, please let me know.
Tracker Suggestions for Bullet or Wellness Journal

Sometimes all we can ask of ourselves is that we make the effort and do the best we can. We are going to make mistakes. That is ok.  With that in mind, I thought I'd share this picture I snapped a couple of weeks ago in the Target parking lot:

Being Ok is good enough!


All the best to you!  Let me know how things are going for you. Please leave a comment or email me at stampinbev@msn.com.

Most of the items used are from my stash.  However, here are some items that are currently available:

Sunday, June 23, 2019

Wellness Journal Part B: Occupational and Intellectual Wellness as Related to Crafting (a Better Life)

My workspace
On Friday's post, here, there was a link to the University of California's Riverside campus. They have outlined seven dimensions of wellness. Today, this post is specifically about including Occupational and Intellectual Wellness as related to crafting. And, for me, that makes for a Better Life.

Wellness Journal Part B

It makes sense to include things that make me happy in a wellness journal. Mainly because I am more likely to slog through unpleasant things (exercise!) if I get to reward myself with things that bring me joy (paper crafting and quilting!) 

Gardening is another area where one can meet their Occupational Wellness goals

Occupational Wellness

To read about this more fully, please visit the UCR website here.  They explain about work/home balance and the importance of working at something that you enjoy. I was an elementary school teacher for a decade.  I Loved teaching! I Loved my students and for most of that time, I Loved going to work every day. It was great until I decided to become a Principal. After completing the coursework necessary to apply for state certification, I found that I needed to change careers because I dreaded going to work each day. I still loved the students and teaching, just not the stuff that goes along with middle-level management. Why am I writing all of this? Because sometimes we forget that we can change our direction and head down a new path. So that is my call out to those who are worried about being labeled 'quitters'. You are free to make the choice to be a 'starter', instead.

Hubby's computer is surrounded by my craft stuff

Peonies from my yard

Intellectual Wellness

The link for more information on Intellectual Wellness is here. The main takeaway for me is this sentence:
As you develop your intellectual curiosity, you'll actively strive to expand and challenge your mind with creative endeavors.
Isn't that great? Someone, No, A University, told us that we should be pursuing creative endeavors!  I love that!  Now only if they could fund it. Or convince my hubby that it should be a line item in our budget. 😉

So back to how this fits into a Wellness Journal...
If you are gathering your thoughts and materials to make your own journal, you may want to give some space in your journal for including things that contribute to these two dimensions of wellness. You have likely thought of the Physical, Spiritual, and Emotional wellness aspects but maybe not the Occupational and Intellectual. Maybe figure out a way to include your craft time in your journal.  It has value if it is important to you.


My Wellness Journal will be posted later this week. I wanted to give people enough time to get their heads around the ideas and have time for shopping their stash.

Thank you for stopping by! I'd love to hear what you think about wellness and or journaling. Please comment below or send me an email at Stampinbev@msn.com.