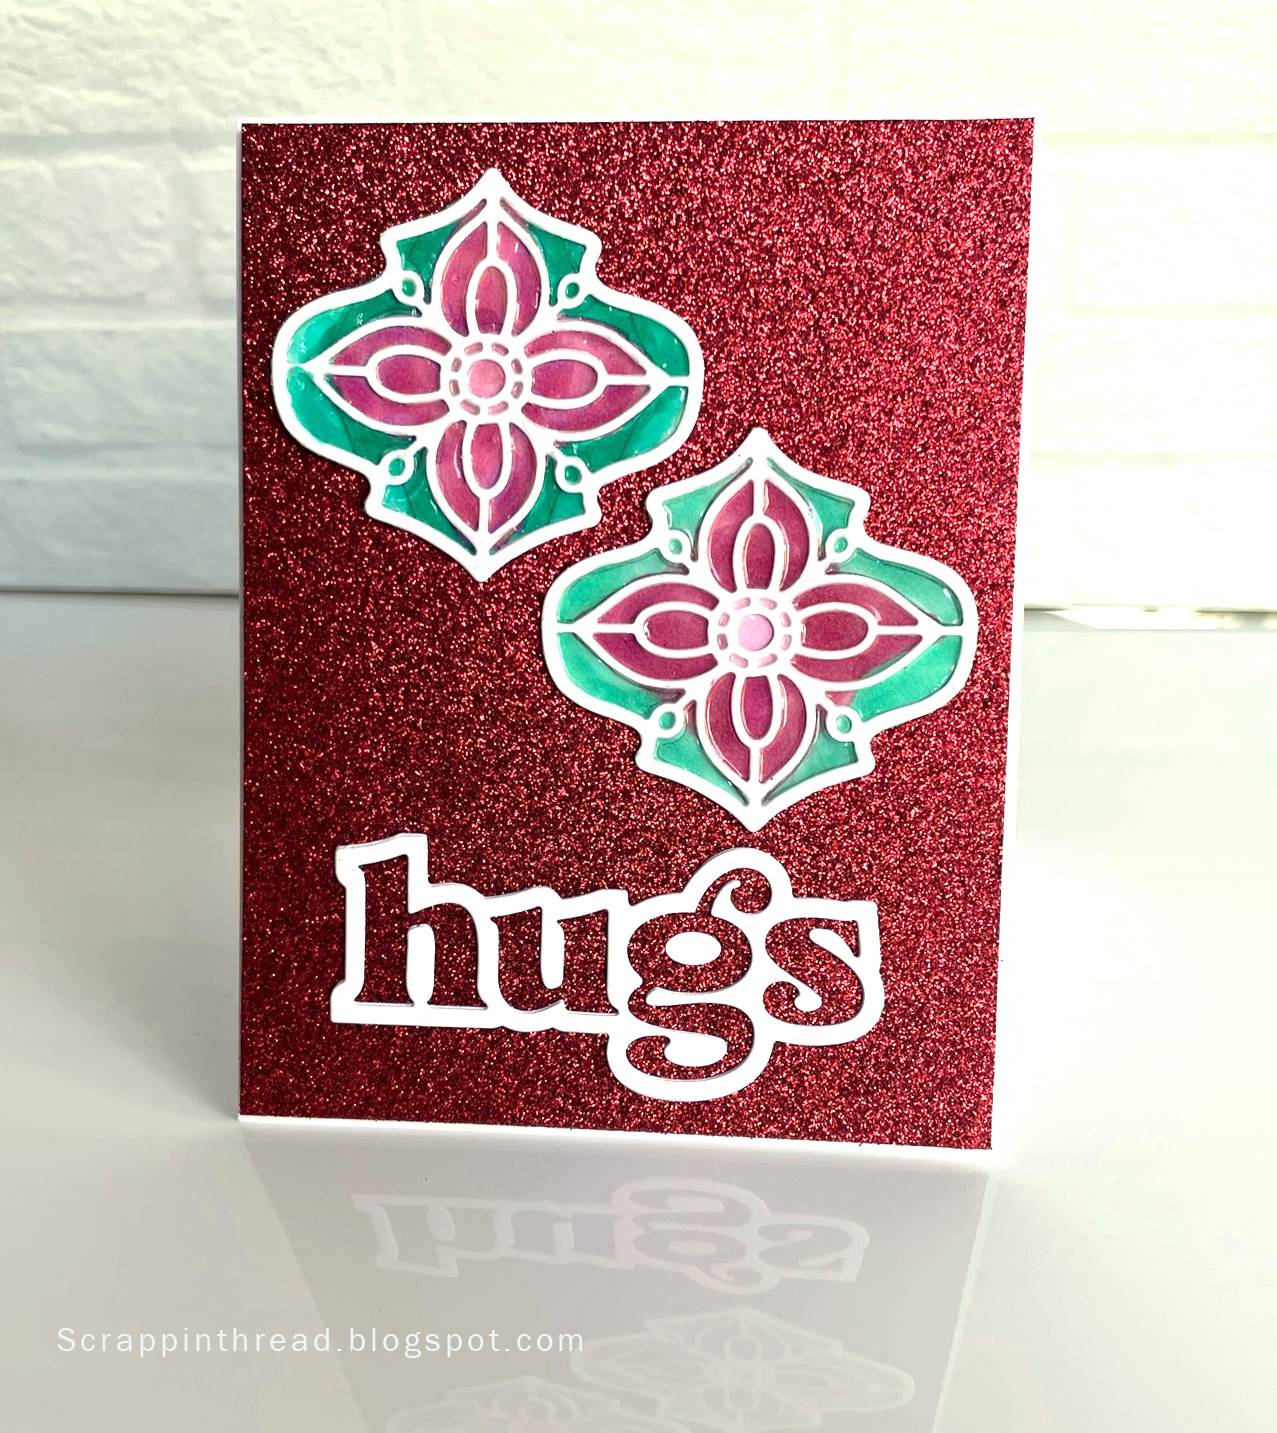
This card came about because I wanted to make the medallion from the Stained Glass Medallion die set look as close to stained glass as possible. Using a high gloss glue over the ink-blended cardstock gives a shiny, almost glass-like look.
Ink blending within the parameters of the shapes keeps the focus on the pretty die-cut design. Two layers of die-cuts are adhered together to form a well for the shiny glue to be poured into.
The final touch was to add some of the shrink plastic die cuts as embellishments. The photo, below, is an auditioned cardstock background color. It is as good a choice as the green pictured above. Color is a personal choice, there is no right or wrong.
The second card is the same process without a die-cut sentiment or additional embellishments. Using black cardstock for the die-cuts to be framed upon makes for a bold card front. It looks almost like wall art.
Both the Glossy Accents from Ranger and Spellbinders Glaze 'N Glue work equally well in creating the shiny stained glass look. They also work well for adhering the die-cut pieces in place once the surface is dry.
THIS POST MAY CONTAIN AFFILIATE LINKS. BY CLICKING ON THEM AND PURCHASING PRODUCTS THROUGH MY LINKS, I RECEIVE A SMALL COMMISSION FOR THE REFERRAL. THE ITEM WILL NOT COST YOU ANY MORE BY GOING THROUGH THIS LINK.
Recently, I purchased some new glossy glue from Spellbinders called Glaze and Glue. This purchase, as are many of mine, was motivated by thinking it was a new product to try. As it turns out, it is very much like something already in my stash: Glossy Accents from Ranger. This makes this Craft My Stash post a project review and tutorial using old and very new items.
It seemed like a good idea to compare the two products. And also, because trying new things is fun! This project uses the Glaze and Glue and the Glossy Accents over cardstock which has been colored with alcohol markers. Here is a video tutorial showing the process:
Video Tutorial
Outlining the areas to be colored helps to maintain clearer lines of color. This enhances the stained glass vibe of the piece.
After coloring the background, glue the die-cut to the top and then cut out the shape. At this point fill in the die-cut channels with Glossy Accents or whatever glaze/glue you may have. Let it dry and then use it as you would any die-cut or embellishment.
The drying time depends on your climate. When it is dry, you will have a shiny, glass look over the areas where the glue has been placed.
As I was trying to craft from my stash, I used some glitter cardstock which has been in my stash for several years. The glittery card stock and the shiny die-cut decorative pieces look very pretty together.
Catherine Pooler Snug Hug Word Die
The sentiment is a word die with the shadow layer cut as one piece. This gives you a fun outline effect from the negative cut letters. It is a bonus to have the h, u, g, and s to use on a separate project. Hugs to you for reading this far!
Happy Summer Solstice!
THIS POST MAY CONTAIN AFFILIATE LINKS. BY CLICKING ON THEM AND PURCHASING PRODUCTS THROUGH MY LINKS, I RECEIVE A SMALL COMMISSION FOR THE REFERRAL. THE ITEM WILL NOT COST YOU ANY MORE BY GOING THROUGH THIS LINK.