Paper and Fiber Arts


Welcome to my mixed media blog. Thanks for stopping by.
Showing posts with label Glitter. Show all posts

Wednesday, June 28, 2023

Mixed Media Hello Card


The background on this card is usually something I do on my art journal pages. This type of mixed-media layering reminds me of old-fashioned wallpaper or deep brocade fabric.  It is a pretty quick project. The process starts with stamping, then layering a stencil with glimmer paste. Waiting for that layer to dry takes the longest time. Then yellow ink and metallic glimmer ink were added on top. The Nuvo glimmer paste is discontinued but the other items are still available. 


The picture above shows the detail of all the wonderful layers. To add an additional layer, the black die-cut 'hello' is layered onto a white layer. It is an unusual card but in a good way!


THIS POST MAY CONTAIN AFFILIATE LINKS. BY CLICKING ON THEM AND PURCHASING PRODUCTS THROUGH MY LINKS, I RECEIVE A SMALL COMMISSION FOR THE REFERRAL. THE ITEM WILL NOT COST YOU ANY MORE BY GOING THROUGH THIS LINK.


Products Used:

Wednesday, June 21, 2023

Craft My Stash: Glossy Accents For Stained Glass Effect

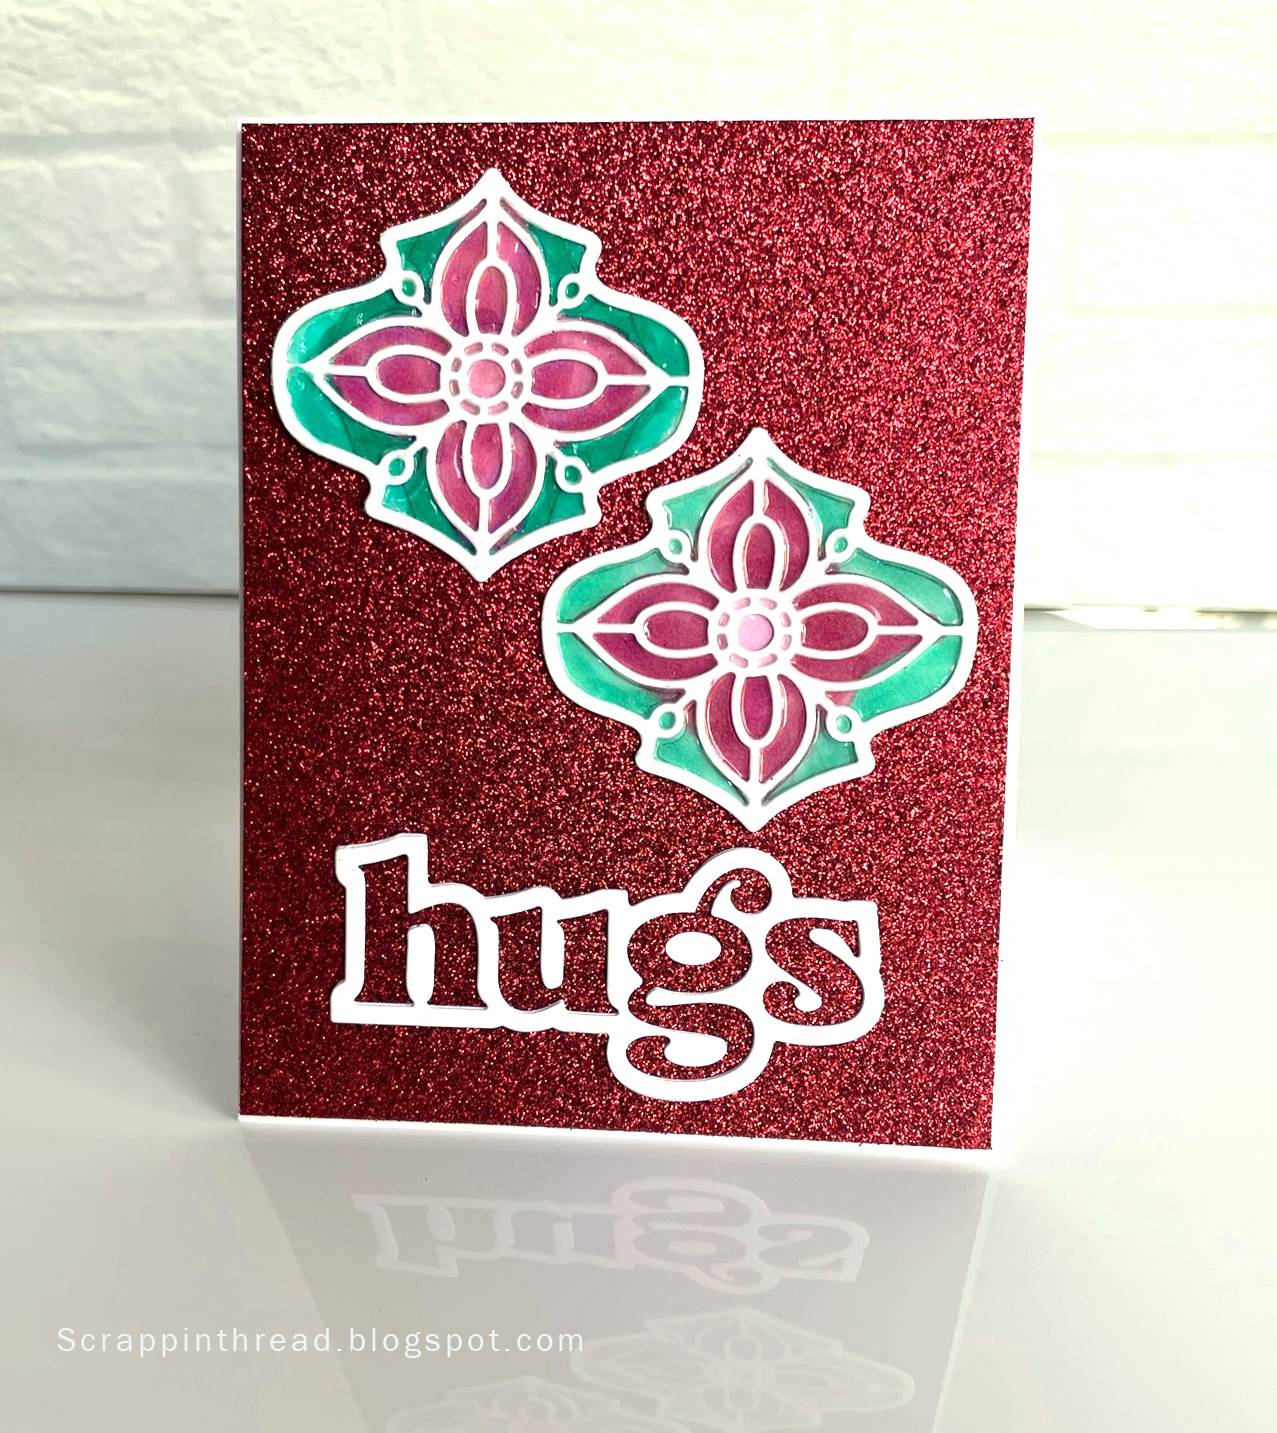
Recently, I purchased some new glossy glue from Spellbinders called Glaze and Glue. This purchase, as are many of mine, was motivated by thinking it was a new product to try. As it turns out, it is very much like something already in my stash: Glossy Accents from Ranger.  This makes this Craft My Stash post a project review and tutorial using old and very new items.

It seemed like a good idea to compare the two products. And also, because trying new things is fun! This project uses the Glaze and Glue and the Glossy Accents over cardstock which has been colored with alcohol markers. Here is a video tutorial showing the process:
Video Tutorial
Outlining the areas to be colored helps to maintain clearer lines of color. This enhances the stained glass vibe of the piece.
 

After coloring the background, glue the die-cut to the top and then cut out the shape. At this point fill in the die-cut channels with Glossy Accents or whatever glaze/glue you may have. Let it dry and then use it as you would any die-cut or embellishment.

The drying time depends on your climate. When it is dry, you will have a shiny, glass look over the areas where the glue has been placed. 


As I was trying to craft from my stash, I used some glitter cardstock which has been in my stash for several years. The glittery card stock and the shiny die-cut decorative pieces look very pretty together. 
Catherine Pooler Snug Hug Word Die 

The sentiment is a word die with the shadow layer cut as one piece. This gives you a fun outline effect from the negative cut letters. It is a bonus to have the h, u, g, and s to use on a separate project. Hugs to you for reading this far!

Happy Summer Solstice!

Tuesday, March 21, 2023

AECP - Let It Shine


Carissa Wiley teaches the AECP Let It Shine class for the Altenew Academy. It was a class filled with many different techniques for adding sparkle to cards. This class is one of the ten required classes for the Altenew Education Certification Level One Program. It has been my favorite thus far because it is all about adding shine and sparkle to cards from a teacher who really loves adding some glam to her projects. 


Inlaid Die Cutting
This card was inspired by Carissa's use of specialty papers to add shine to her cards. I enjoy doing inlaid die cutting and wanted to use some of Altenew's glitter cardstock in some of the cut-outs of the Simple Shapes cover die. I also wanted to use some bright colors to help showcase the 'hello' sentiment. Coloring individual pieces is very quick and easy.


Random pieces were colored with the following Copic colors: RV06, R27, YR09, Y08, YG07, B04, and B28. B28 is darker than the other hues so it was only used once. A piece of vellum placed over it helped tone it down and also gave a nice backdrop to the sentiment. Ink blending would also achieve a similar effect. However, I am a messy ink blender and the tiny pieces seemed like a recipe for inky fingers. Alternatively, I could have ink blended the cardstock prior to die cutting. My Copics have been neglected for awhile so it was nice to get them out for a bit to play.


A note about the Circled Greetings die - it is intended to be used as a cut-out rather than a stand-alone die cut. In order to cut it out as I have used it, I used the Hero Arts Nesting Circle Infinity die set. The third largest die is what gave a thicker border around the hello.

THIS POST MAY CONTAIN AFFILIATE LINKS. BY CLICKING ON THEM AND PURCHASING PRODUCTS THROUGH MY LINKS, I RECEIVE A SMALL COMMISSION FOR THE REFERRAL. THE ITEM WILL NOT COST YOU ANY MORE BY GOING THROUGH THIS LINK.


Products Used:

Copic Markers are available here:


Saturday, June 22, 2019

Stenciling Card Fronts


If you are anything like me, you want to maximize your supplies and tools by getting as much use out of them as you can. I love stencils because of their versatility. Mainly, I use them for art journaling. They are fun for scrapbooking, too. Some stencils are scaled specifically for use on cards. However, those that are smaller or larger can, of course, be used for card fronts, too! There are thousands of stencils commercially available.  You can also make your own!  Whatever your style and color palette, you can choose what speaks to you when stenciling card fronts.


Altenew Weave Builder Stencil with Distress Inks on the card front

These cards use the same stencil with two different colorways and styles.  It is fun to see what you can create by changing the colors. Do you have favorite products to use with stencils? Inking is probably the easiest way to apply color to paper.  For color and texture, Tonic Studios Nuvo Mousse is very easy to use - and to clean up.  Glitter paste is another fun and easy way to add both color and texture. Spraying ink, mica mist, flowable paint, and anything else that can go through a spray bottle are all great mediums to try.  Acrylic or watercolor paint can be applied directly to paper or applied over other media.  Watercolor paper is a great base for wet media. I use washi tape to hold down the stencil. Painters tape will work to hold the stencil in place, too. If you have a bit of time, it is a relaxing activity to doodle with markers in the open areas of the stencil.  For example, use the spaces to Zentangle.

Some of my favorite things
In case you are in the market for any new goodies in the Nuvo line, Tonic Studios is part of Scrapbook.com's 7 days of summer sale. 
Today's Freebie
Thank you for stopping by today! And in case you were wondering, these are some of the items I used on the two cards pictured above:

Thursday, June 20, 2019

Free Hugs

Sizzix - Framelits Die with Clear Acrylic Stamp Set - Sending Hugs
You know those moments when you see something that you just need to have because it strikes you that it is perfect for you or someone you know?  Well, this stamp and die set fit that situation for me.  It is a really cute set and is easy to color. I dusted off the Tombows after I masked the cacti and hoped they hadn't dried out in the almost two years of neglect in storage.  The glittery die cut piece was stamped with a glue stamp pad. Then I poured three different colors of glitter on it and matted it onto the card front.  The two little cutout hearts glued to twine seemed like a rustic, yet sweet, touch. This is a mailable, standard-sized card at 4.25" x 5.5".


Sizzix is part of Scrapbook.com's Seven Sizzling Days of Summer sale. If you like this set, you may want to check it out on their site.  The freebie for today will help you make lots of cards. It is perfect for making your die cuts into stickers by applying the double-sided adhesive to the cardstock and running it through your die-cutter.


Here is the link for the Sizzix set:
Thanks for stopping by!  Have a great day!

Monday, June 17, 2019

Easy Paper Piecing with Die Cuts


Currently, my favorite tool in my crafting area is the Vagabond die cutting machine made by Sizzix. I have enjoyed using it for a variety of different quilting and paper crafting projects over the past few weeks.  It continues to serve my purposes very well.  However, I feel like the dies are sometimes a one-off purchase. This goes against my more frugal side. As I was looking at a beautiful die, designed to be a card front, I started thinking about other ways I can maximize that and some of the other dies in my collection.  That is when the idea about easy paper piecing with die-cuts came to mind. As a bonus, there is a card that is made with paper piecing on the backside, too.


Because I did not need to have an entire cut of the image, I used small pieces over the design. Washi tape can be used to hold the paper in place if needed. 
If you want to replace the background with different colors of paper, you would cut out the entire image.  Piece the colors of the negative spaces back in and adhere to a card front.  The picture above shows just two different pieced colors.  The light blue is the card base. This is not a completed card, it is an example of how to use the negative cuts.

Hero Arts Fairy Window Fancy Die cut out of vellum 
The fairy picture, above, does not have anything to do with paper piecing. But, I wanted to show another way to get a variety of colors using one die cut image.  The base under the vellum piece was made using two different kinds of powder paint on Bristol paper, spritzed with water.  The green is a shimmery Tonic product and the other colors are Ken Oliver's Color Burst.


The cards pictured in this post are all standard 5.5" x 4.25" mailable cards. Even though they are pieced, there is no extra bulk, and they can be run through the post office sorters.

Card made with Altenew's Layering Floral Cover Die A

This next card die is from Altenew. The picture below shows the backside of the die-cut image with the different colors of pieces adhered to the back. The front is layered on a piece of vellum which is adhered to a standard white card.
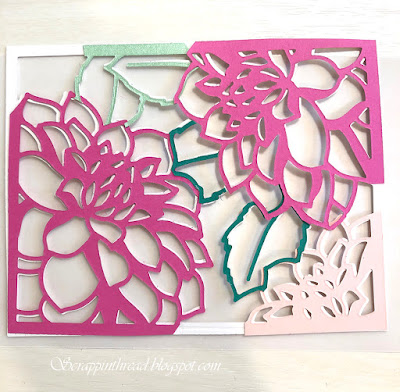
Back of card with pieced papers as shadow outlines
The next card is super simple to make. I am showing the individual pieces before they've been assembled. It was very easy to cut out the skirt and layer it.


Thank you for visiting today! 
These are the supplies that are currently available that were used on these cards:


Scrapbook.com: Thousands of scrapbooking supplies. HUGE daily discounts!