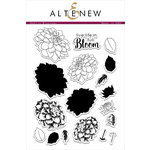
Paper and Fiber Arts


Welcome to my mixed media blog. Thanks for stopping by.
Showing posts with label Random Stamping. Show all posts

Monday, May 1, 2023

Magical Marker Techniques


 Do you like to color? If so, do you have a favorite media to use? Pencils, markers, crayons, pastels, or a combination of things? A class I recently completed through the Altenew Academy, Magical Marker Techniques, was all about using alcohol-based markers. The focus was actually not on coloring but rather on how to use alcohol markers in other ways to apply color to paper. Many of the techniques would also work for water-based markers and pastels. Sometimes it is fun to get out your supplies and try using them in alternate ways. This card uses one of the ideas from the class. But first, let's do the background.

Background

Today's card has a randomly stamped background using the Build-A-Flower: Primrose stamp set from Altenew. The three floral outline images are stamped with black ink on a standard A2 card front in no particular fashion. When random stamping, it is important to stamp off the page and also to turn the stamps so they look different from their neighboring images. I love using Gina K. Designs Master Layouts to get clean, crisp cuts for layering the card fronts. The smaller size was used for the stamped background and the larger one was used to cut the turquoise layer. These are popped up with foam tape onto a white card base.


Isopropyl Rubbing Alcohol

To make the ombre layer, I scribbled three different corresponding colors from Altenew's D set of Artist Markers onto a piece of plastic packaging that was destined for the trash. Then I spritzed some rubbing alcohol onto the plastic and smooshed the cardstock onto it. I repeated the spritzing of alcohol a couple of times because there was not enough liquid on the plastic to allow it to transfer to the paper. After allowing it to dry, I tore the edges and outlined the paper with one of the markers. It was a more intense color than I wanted so I sprayed the edges with the alcohol, as well. The Isopropyl I used is 70%, it comes in 91% also and is available at Target, pharmacies, and supermarkets. 

The flower was made by stamping one of the same floral images, as was used on the background, onto a scrap of cardstock. This was stamped with Altenew's Permanent Black Ink because it is safe to use with alcohol markers. I used the same D set of markers and colored the flower with some of the pink shades. To give it the mottled/watercolory look, I spritzed it with the rubbing alcohol. When dry, I die cut it and popped it up onto the card with foam tape.

For the pearl center, I used one of the same pink markers and colored a self-adhesive pearl from my stash. The "Hello There" sentiment is from the same Primrose stamp set.

THIS POST MAY CONTAIN AFFILIATE LINKS. BY CLICKING ON THEM AND PURCHASING PRODUCTS THROUGH MY LINKS, I RECEIVE A SMALL COMMISSION FOR THE REFERRAL. THE ITEM WILL NOT COST YOU ANY MORE BY GOING THROUGH THIS LINK.

Saturday, March 18, 2023

AECP - All About Layering Three Course Altenew Academy


Hello! I've been having fun pulling out older stamp sets and supplies and playing with them to complete the assignments for Altenew's AECP courses. Today's class is All About Layering Three. Lydia taught many ways to use the layered stamps for which Altenew is famous. The stamps and matching dies used on these cards are from the Dahlia Blossoms sets.  

Sakura Gelly Roll pen highlights
The background was created using outline stamps for the large and medium blooms. The images were randomly stamped with Grey Denim ink. The die-cut blossoms and leaves were stamped in layers using a light and dark color combination and also the outline stamps, this time in black. The 'sending hugs' die is from CTMH. The grey centers to the e, d, and g are the remnants from making a faux shadow layer.


The second card uses the same Dahlia Blossoms set. The background is the Layered Floral Cover Die A ink blended and adhered to a white card base. The Sending Hugs sentiment is from the Strength Blooms stamp set.


Tomorrow's card will be a Clean and Simple design. Please stop by to see another fairly easy card.


THIS POST MAY CONTAIN AFFILIATE LINKS. BY CLICKING ON THEM AND PURCHASING PRODUCTS THROUGH MY LINKS, I RECEIVE A SMALL COMMISSION FOR THE REFERRAL. THE ITEM WILL NOT COST YOU ANY MORE BY GOING THROUGH THIS LINK.


Products Used:


Thursday, October 8, 2020

Tips and Ideas for Using Big Stamps

Using Big Stamps

Recently, I found a new-to-me stamp company, Colorado Craft Company. Their Big and Bold stamp collection looked particularly interesting because they are really large images!  I purchased a couple of sets and started playing with them. The first one is called "Miss You Peony". Working with the gorgeous peony image led me to discover a few tips and ideas that I hope you will find useful when using big stamps on your projects.


Stamping Tips

3C's Blissful Butterflies and Miss You Peony 

Extra-large clear stamps may be too big for a traditional acrylic block. Listed below are some alternate ideas for using a big stamp. Practice on some scratch paper to see which options work best for you and your project. Keep in mind, it is a good idea to turn the stamp upside down and apply the ink to the stamp rather than tapping the stamp onto the ink pad.

  • Using the carrier sheet that the stamp comes packaged upon
  • Fiskars Easy Stamp Press I have better success with this tool if I press down without hesitating
  • Using your hand as a flexible 'block' - this is particularly useful in art journaling 
  • Using the top side of the MISTI tool or removing the top of the Tim Holtz stamp platform and using it as a giant block

Ideas

Watercoloring

Both of the examples above were colored using watercoloring techniques. The stamps can be stamped using traditional, no line, invisible line, or ghost stamping and then inked or painted. In the video below, I show a couple of ways to do this along with some of the stamp block substitutes.

Traditional Coloring

The card posted below was colored with Tombow Dual Brush Pens. I outlined the image to help make it pop a bit. This is a personal preference. Please do what you think looks best!


Background stamping - no coloring

Neither of the example shown below needed coloring after stamping. The crisp image is so striking on the scrapbook page that it did a good job of adding to the story without taking away from the photographs.


The art journal page on the right-hand side has the peony stamped on it several times. Both projects used Tuxedo Black Memento ink.


Supplies

From the Colorado Craft Company: 

Inks:
Rose Madder Archival by Ranger

Thank you for visiting today!
Beverly

Tuesday, May 14, 2019

Distress Oxide Background on Kraft and White Cards

There are a lot of photos in this post.
It all started when I was making swatches for some Distress Oxide inks.  I was curious about using a solid stamp on kraft and white cardstock. It is fun to compare the different ways that paper takes color and water.  These backgrounds were made on one 12 x12 kraft and one 8 1/2 x 11 white piece with six different colors of Distress Oxide inks. Any kind of solid stamp would work. I used one from one of the Altenew flower sets. Stamping gives a different effect than applying the ink pad directly to paper.  This is a more abstract, softer look. Which in turn made pretty cards.
3-inch x 3-inch cardstock samples for swatches
These swatches are on kraft, black and white cardstock. I cut a bunch of them at once.  A hole is punched in one corner and then the squares are put on a binder ring.
The name of the Distress Oxide ink is only written on the white cardstock
 It is easier for me to do all of the writing and then all of the stamping and water brushing at once.

Stamped images on three different cardstocks
In the photo above, the bottom stamped image is the one that is painted with water.  The little blob next to the stamped image is just that - a little blob of water and ink.


Distress Oxide Stamped on Kraft and White Cardstock with Water Splatters
After randomly stamping the ink onto the cardstock with an Altenew solid flower stamp in the different colors, I cut them into 4 1/4-inch by 5 1/2-inch pieces.  Some of the pieces were splattered with water.  The others were left as is.  Some were stamped and embossed with either clear detail or white embossing powder.

Others were cut into smaller pieces or die cut. I used the negative and positive cuts for the following two cards.  The extra white butterflies were used under the kraft ones for more dimension.

A2 Die Cover

Layered Butterflies Create a Shadow Effect

Background layered under the die cut butterflies
The "Hello" die is from A Muse Studio. The Butterfly die is from Memory Box. I believe it is retired.
Altenew Dahlia Blossoms Stamps and Diecut Shapes

Altenew Dahlia Blossoms stamped on Distress Oxide background
The cards look different enough that I thought I would share all 8 of them.  There are no bulky embellishments so they can all be mailed in a regular envelope without extra postage needed.
Here are the scans of the cards:


Thank you for visiting!
Here is a list of supplies:

Sunday, August 5, 2012

Avonlea Note Board - Serenity Prayer


Glass Fronted Frame For Message Board
Almost every time that we get home from the grocery store or Costco one of us remembers something that we needed to buy, but we had forgotten.  I decided to take a big picture frame and turn it into a message center so that we can hopefully avoid these problems in the future. The idea is to record grocery lists or other important messages on something big enough that we can see it/find it.  

It was important to me that the picture frame be attractive and functional.  The insert for the mat board is an 11 1/2" square.  It was a perfect size for a piece of scrapbooking paper!  Having a gorgeous piece of framed paper was great, but I decided that I wanted it to be even More spectacular!  So I typed the Serenity Prayer and printed it on cardstock.  I decided to random stamp some of the images from the Avonlea WOTG on it and then distressed the edges.  A few Mocha Pearl Opaques decorated the insert and it was almost done.
The last step was cutting the letters.  I used a different piece of Avonlea paper and the Cricut Art Philosophy cartridge to spell Notes.  The periods were made with more Mocha Pearls.

CTMH Avonlea Patterned Paper
It probably would have been best to photograph it without the glass.  But I wanted to show it with the dry erase or chalk ink - wet wipe markers written on it. Please excuse the glare.  If you click on the photograph you can see a bigger picture, which will show the poem and detail better.

Ikea Virserum 19 3/4" Square Frame

Last year I made a Blessings Board with a smaller frame for my dd.  The project idea is similar to this. That post is here.

The full project instructions for the Avonlea Notes/Message Board are my thank-you gift for my customers this month.  The instructions also include the ornaments posted yesterday and the cards that will be posted tomorrow.  If you place an online order with me, your bonus project instruction sheet will be emailed to you.

Thank you so much for stopping by today!

Beverly

Supplies:
Ikea Virserum Square Frame, Chalk Ink Wet Wipe Marker
CTMH: Avonlea Workshop on the Go Stamp, Paper Packet and Mocha Opaques
Cricut Art Philosophy
Ink: Slate, Juniper, Chocolate, Bamboo
White Daisy Cardstock