Paper and Fiber Arts


Welcome to my mixed media blog. Thanks for stopping by.
Showing posts with label Wafer thin dies. Show all posts

Friday, March 17, 2023

AECP - For The Guys


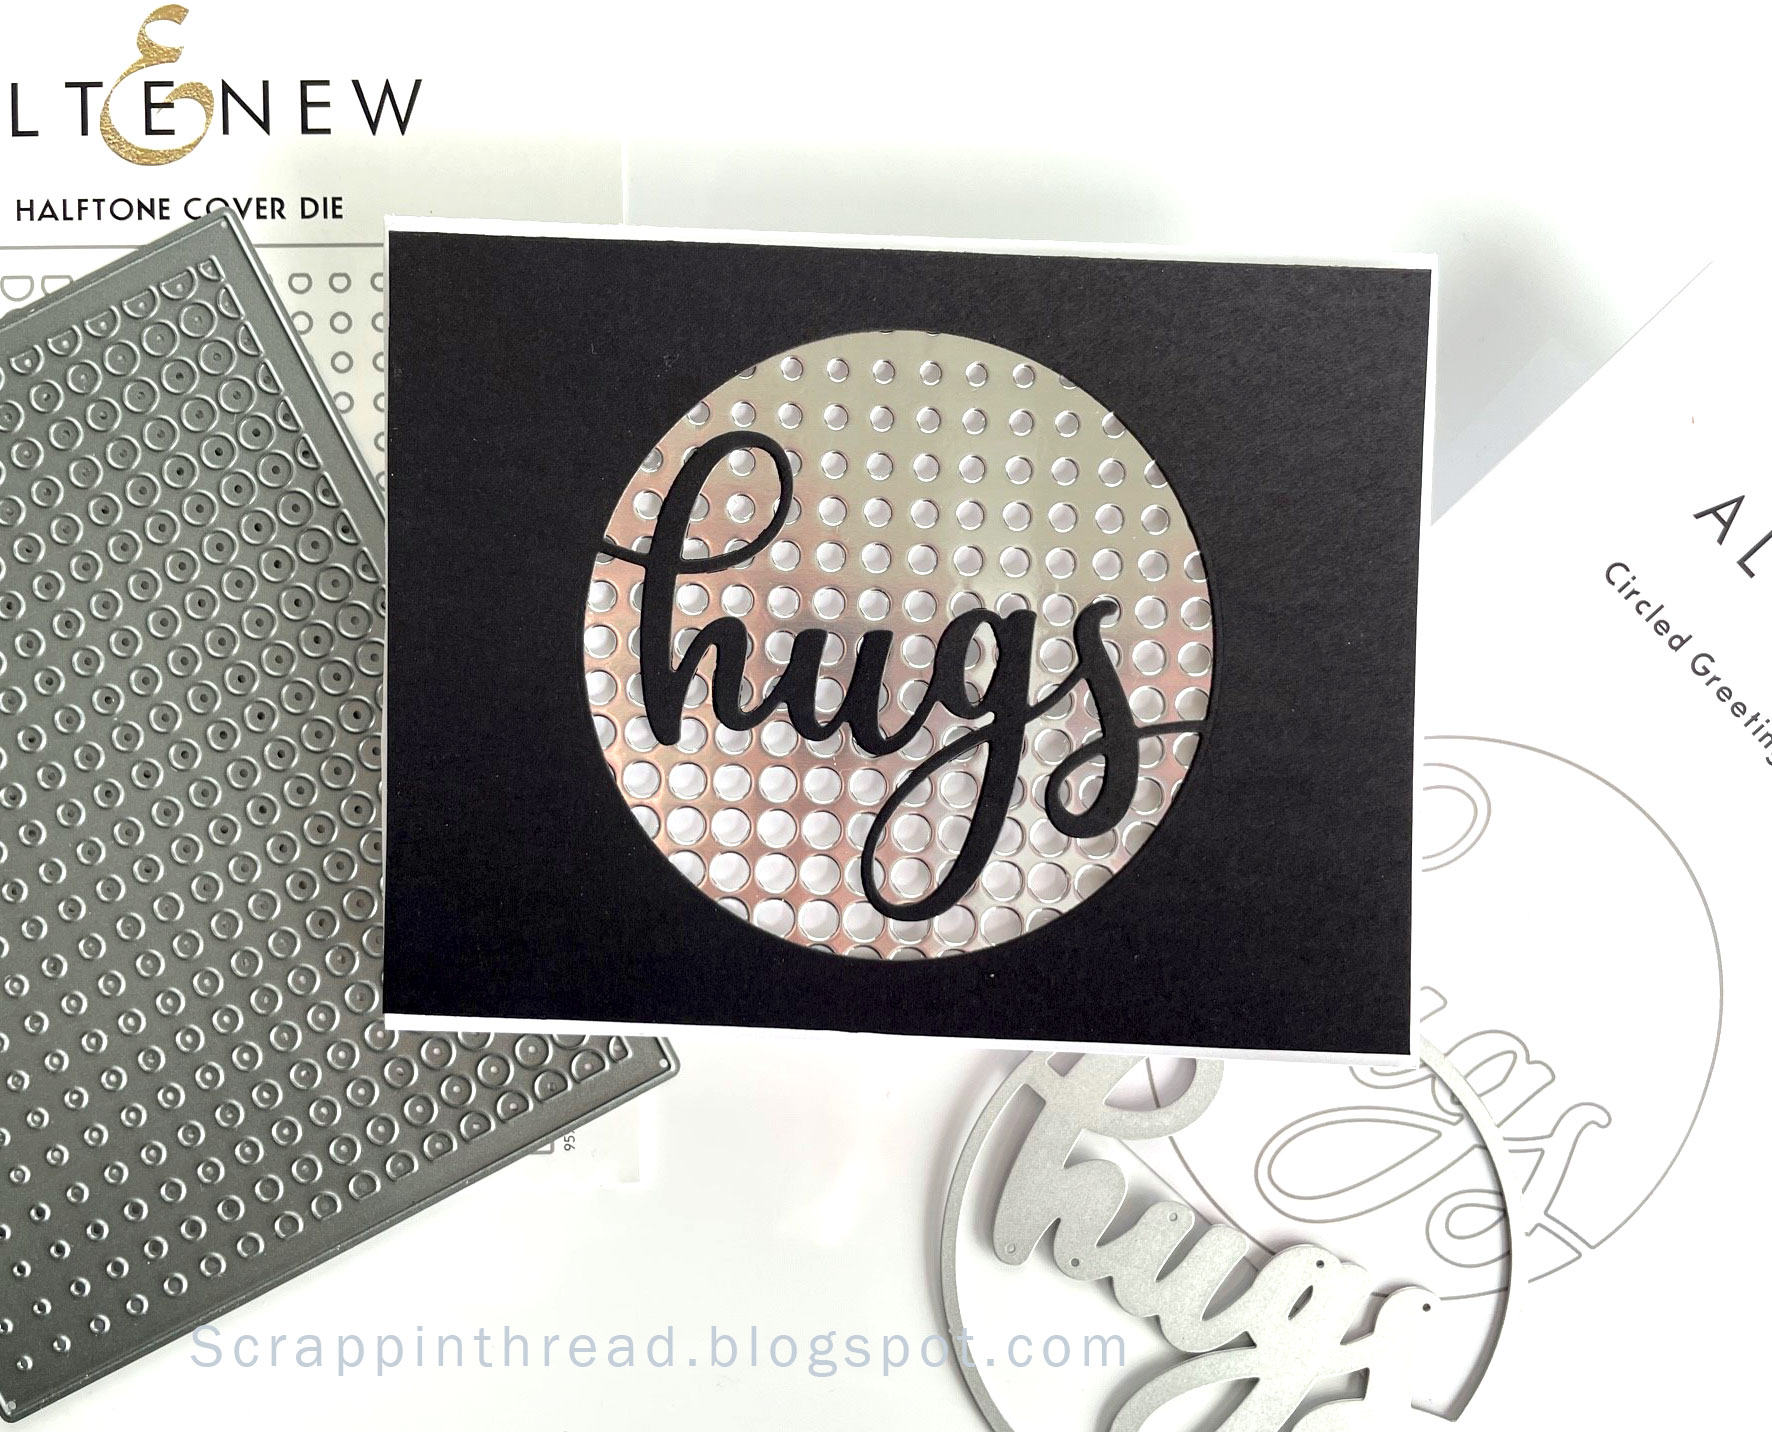
The latest Altenew Academy class that I've completed is about making masculine cards. The course is called For the Guys. Making cards for men is always a little bit challenging for me. Clean and simple cards seem to lend themselves to a more masculine feel. With that in mind, here is my latest project for  AECP certification consideration.

The cover die cut out of silver cardstock lends an industrial vibe to the card. Black was an easy choice to go with it. This is a very simple card but definitely works for the requirement to make a masculine card. The only thing I hesitated about was the inclusion of the 'hugs' die. It is a bit fancier than I may have chosen but I love the circle around the word. It mimics all of the tiny circles in the background.


THIS POST MAY CONTAIN AFFILIATE LINKS. BY CLICKING ON THEM AND PURCHASING PRODUCTS THROUGH MY LINKS, I RECEIVE A SMALL COMMISSION FOR THE REFERRAL. THE ITEM WILL NOT COST YOU ANY MORE BY GOING THROUGH THIS LINK.

Wednesday, March 15, 2023

AECP Easy Ink Blending Course


AECP Second Submission

The Easy Ink Blending Course taught through Altenew Academy by Amy Lee was a fun journey visiting some favorite techniques. I chose to focus on the lesson showcasing ink-blended backgrounds. It never fails to impress when a plain piece of cardstock transforms into a colorful backdrop. 


The first example is made on a panel for a slimline card. Slimline cards vary in size. What they have in common is that they will fit into a legal-sized envelope. This card measures 8.5" x 3.5". The inked panel is 3.25" x 8.25". 


What is ink blending?

Even though I started with a white piece of 110 lb cardstock, ink blending can be done on any type and color of cardstock or paper. As long as it hasn't been coated. The only tools needed are some type of applicator, such as a blending brush or dauber and your chosen ink colors.  A large brush is faster for larger and open areas. I'm trying to use up a large supply so I used both brushes and daubers. The little circles pictured above are from the daubers. This is fine because it blends out with more ink applied on top. Dye and hybrid inks work very well for this technique. Pigment inks will work but they are sticky. You can heat set in-between layers but then you don't get as nice of a blend. That being said, pigment inks or embossing inks can add a nice effect if you want to add embossing glitter or powder to your project. 

Adding dimension

After blending the background, I splattered rubbing alcohol using a toothbrush to give it little 'star shine' like areas. On top of that, I splattered white droplets using Dr. Ph. Martin's Bleedproof White and a small paintbrush.

The skyline is washi applied to a piece of cardstock, roughly fussy cut, and popped up over the background. The gold washi was applied to another piece of white cardstock covering about 2/3's of the piece. I die-cut the 'love" so that both the white and gold would be seen. This was also popped up with foam tape. If the washi doesn't want to stay adhered, use a little wet glue to keep it in place.


Sprinkling gold sequins on the card was the finishing touch. This is a quick and easy card that should not require additional postage when mailed.


Thank you for stopping by today as I continue with my Altenew Educator Certification Program classes and share my completed projects.

THIS POST MAY CONTAIN AFFILIATE LINKS. BY CLICKING ON THEM AND PURCHASING PRODUCTS THROUGH MY LINKS, I RECEIVE A SMALL COMMISSION FOR THE REFERRAL. THE ITEM WILL NOT COST YOU ANY MORE BY GOING THROUGH THIS LINK.


Products Used:


I mainly used the darkest colors of each of the ink bundles. The entire bundle isn't necessary to use for this particular background. Use what appeals to you.


Tuesday, March 14, 2023

Altenew's AECP Celebration Stencil Techniques


What is AECP?

AECP stands for Altenew Educator Certification Program. Even though I have been using Altenew products for many years, I decided to challenge myself by going through their certification program. This post was born out of the first class that I completed. The cards started from an idea based on Lesson One in the Celebration Stencil Techniques by Laurel Beard. 


The stencil used for the card below is under the silver cardstock cut from the same die


Altenew's Product Line

You have probably seen Altenew's gorgeous layered stamped images on Instagram and on many blogs, including this one! They are the company that made layered stamping popular because the results are always beautiful. Did you know they also have other paper crafting products to complement their stamps?

Stretching your supplies

Today, I want to share one of their cover dies - but used in a less traditional way. By cutting a piece of heavy cardstock or watercolor paper, you can make a stencil for ink blending, spraying, and water-coloring,  You use the die cut like you would with a mylar or plastic stencil. When you are done with it as a stencil you may be able to use it on a project, as well. The photo at the top of the post uses both the stencil and the stenciled panel. The stencil was moved over a little to create an interesting pattern.


Liquid watercolor on die-cut through to base cardstock

Thoughts about paper

Paper weight matters. The heavier the paper, the more robust the die cut will be. However, if it is very thick, you may need to run it through your die-cutting machine several times for a good cut. In the projects posted here, you will see 140 lb watercolor paper and 110 lb cardstock. If using gel or paste on the die cut to make a textured card, use the heaviest weight paper you can get through your die-cutter. 


Watercolor mixed with gouache and applied to die-cut and base layer cardstock

Best choices for dies to use as stencils

Bold cover dies work very well. I tend to favor geometric designs for this technique. However, you can also use smaller die cuts as masks.  That is one of my favorite ways to use spray inks or mists. I love how the image is protected by the mask. Additionally, the intricacy of the die should also be considered. If you want to use a lot of wet media or are an aggressive blender, intricate dies may not give you the best results. But use what you have and experiment to find what works best for you.

Ink-blended die-cut and base layer

Inks or Paints?

The media that you choose to use for your project will depend on a variety of things. Are you having a play to see how the product works? Are you making a card, painting on fabric, or working on an art journal? The application may dictate whether you use a paint with high viscosity or a very fluid ink spray. Or maybe you want to use watercolors or ink blending to achieve a certain lightness or intensity of color. Many times, I have an idea and start with it and then find that something more interesting presents itself.

The stencil was offset on top of the stenciled panel
Close-ups


THIS POST MAY CONTAIN AFFILIATE LINKS. BY CLICKING ON THEM AND PURCHASING PRODUCTS THROUGH MY LINKS, I RECEIVE A SMALL COMMISSION FOR THE REFERRAL. THE ITEM WILL NOT COST YOU ANY MORE BY GOING THROUGH THIS LINK.

Products Used:

Circled Greetings: Hugs Die (this die does not cut the outer circle, it is intended to be used as a cutout)


Friday, February 17, 2023

Spellbinders and Altenew Fun With Florals Review


My version of  Yana Smakula's card

Online Cardmaking Retreat

Because I knew I would be very sad when my daughter returned to college in January, I booked lots of fun things to keep me busy. Many had to do with some retail therapy and crafting or sewing. The first fun activity/event was the collaborative paper crafting retreat with Spellbinders and Altenew. It was held this past weekend, virtually at Atlenew Academy. Beforehand, attendees received a fabulous kit with goodies from both manufacturers.

My version of Jennifer Rzasa's card

Ideas and Inspiration

The cards that are posted here were made from the materials and tools that were in the kit. The instructors presented the techniques and their color choices for each of the three top cards that are shown here. As with any class, the students can always do their own thing with any colors of their choosing. 

My version of Lydia Evans' card

Class Kit = Happy Mail  

This is where I went rogue and made cards with leftover materials and a 3D embossing folder from Spellbinders. The two cards posted below are very textural, yet were easy to make. The kit included paper, embossing folders, and dies from both Spellbinders and Altenew. It also had stamps, enamel dots, and stencils from Altenew. 
Even though I am an affiliate* with both of these companies, I purchased the kit at full price. It was a good value. Having enjoyable things to look forward to is important for me in dealing with a sense of loss at being an empty nester after having a child at home for over 30 years! 

Thank you for stopping by! 

* If you are curious about what "an affiliate" means, it is a program that allows bloggers, etc., to receive a small payment for referring customers to select businesses. There is no additional charge to the customer for any purchase made through the affiliate link.


Friday, October 22, 2021

Pinkfresh Studio - Daisy Wreath and Slimline Cards


Pinkfresh Studio Layering Slimline Frame Stencil


Layering Stencils

Getting the most use out of your supplies

Pinkfresh Studio has some gorgeous layering stencils. Recently, I used the Daisy Wreath and the Daisy Slimline Frame stencils and die-cuts to make cards that will fit into regular business-sized envelopes. These cards measure 9" by 4". The first two can be mailed with standard postage. The last card is popped up quite a bit and may require additional postage.


It is ok to cut up the image and use pieces of the design

The second and third cards have both the slimline frame and the wreath used on them. However, I cut apart the wreath after completing the five-step inking process. I ended up using both halves on the 'Smile' card and made two wreaths for the last card. By cutting the wreath up, it added some additional softness with the flow of the flowers.
Layered Diecut Sentiment with Mini Slimline Panel


For added interest, I layered the "Smile" die-cut on top of the small diagonal stitch rectangle die-cut from the Mini-Slimline Bundle. The layers are glued together and are still fairly flat for mailing. On this card I used the 6th layer of the slimline stencil to use Nuvo Moonstone Glimmer Paste. And for extra sparkle I used a little Unicorn Stickles from Ranger. Stickles is a quick and easy way to add sparkle!


Scrapbook.com

Dress it up or down

The following card falls into the "maximalist" camp of design. There are many layers of ink and paper and sparkle. For the 6th layer on this one, I used heat embossing with a sparkly powder called Iridescent Ice. The powder was sprinkled onto watermark/embossing ink.  There is more information about how to do that here. This added a nice bit of bling. To take it up another notch, I used the Unicorn Stickles again. 

The butterfly is from a Martha Stewart punch. It, too, is embellished with Stickles. The inks on all of the cards are combinations of Pinkfresh Studio, Altenew, Close to My Heart, and Ranger's Broken China Distress Ink.

For inking through stencils, the most important thing to consider is whether your ink pads are juicy enough. I found that it was time for me to dig out some of my reinkers! It is nice to be able to extend the use of my stamp pad. Yay for having a stash of supplies!
A variety of different ink brands worked well together

Getting maximum use of your tools and supplies

It is a lot of fun to try new things. Everytime I try something new, I am reminded of many favorite 'old' techniques. Sometimes I forget that I can use my new things in familar ways and that the older products still have much life to them! Lately, I have been wanting to engage in retail therapy and shop and shop! And that isn't good for my budget! If I buy a few new things and can use them in the intended ways and come up with additional ones, then I feel like it sort of justifies the purchase! That is the case with the Pinkfresh Studio - Daisy Wreath and Slimline Card stencils and dies. I know that with different color combinations and additional techniques, these will become some of my favorite tools!


Thank you for stopping by today!
Beverly

Additional inks and colors:


or as part of the Green Valley set 

As of October 22, 2021 the following inks are currently out of stock. Maybe you have something similar already at hand?

Thursday, June 17, 2021

Spring Update - Cards, Gifts, Rag Quilts

This is just a quick Spring update with a few pictures of the cards, gifts, and rag quilts I have made since March. 

Mask made for a 2-year-old grandchild

My sweet little granddaughter needed a mask to fly on an airplane from Seattle to Phoenix in May. Winnie the Pooh has about the same size face as she does. Since she wasn't here to model it, I had to use Winnie.
 
MJ's Messenger Bag Pattern by Annie

If you are looking to make a bag for yourself or as a gift. I highly recommend the patterns by Annie Unrein. She has thorough directions with good videos to show some of the steps to assembling them. I have made several of her bags and every one of them has been well received by the recipient.


Double Oven Mitt, Hot Pads, and Card

Kitchen linens are fun to make. Usually people are happy to get new ones to replace their stained or worn out hot pads, etc. My niece is a Chemist and I thought she might enjoy these fabrics for a new set of hotpads and oven mitts. I really like the one on the right because it hangs over the oven door handle and is great for removing casseroles from the oven.


Copic Colored Baby Shower Card

The stamped images on this card are from a retired Close to My Heart set. I love how easy it is to color these open images with Copics.

Fleece and Flannel Baby Rag Quilt

The two rag quilts are made with flannel. The top one also has a fleece back. The purple one is made with different Shannon Fabrics - Minky, Cuddle, Dimples and hand-dyed flannel. Both quilts were cut with Accuquilt steel dies. (If you click on the link, it doesn't cost you anything extra but I may receive a small commission if you make a purchase from their site.)


Queen and Co shaker card

My dear granddaughter needed a quilt for daycare. I thought she might enjoy a rag quilt to play with as she avoided sleep during naptime on her little cot.

Minky and Flannel Toddler Size Rag Quilt

The Cuddle fabrics are so warm and soft. It is messy to work with but feels so lovely that it is worth the extra vacuuming and lint collection! I usually throw the fabric in the dryer when it enters the house. After cutting it, with either a rotary cutter or an Accuquilt die, I shake it out over a rug and then run it through the dryer again to collect the lint. My vacuum is the kind that collects the dirt in a container that gets dumped out. This is much better than quickly filling vacuum cleaner bags! It is necessary to vacuum frequently!

Shannon Cuddle Fabrics for Rag Quilt

Minky and Flannel
It seems that there is never enough time to make all of the things that are rattling around in my head, but at least this is a start. And these things all found good homes.
Thank you for visiting!
Beverly