Paper and Fiber Arts


Welcome to my mixed media blog. Thanks for stopping by.
Showing posts with label Ribbon. Show all posts

Saturday, May 11, 2019

Vintage Photos Used in Cardmaking

Grandma as a young woman
When sorting through water-damaged books I was reminded of a few things about life and stuff in general.  One, never take anyone or anything for granted. Two, you never know what you may find when sorting things headed for the trash bin. Three, even though my grandmother lived with us for a short time, I didn't really know her very well. Four, I wanted to make this vintage photo into a card for my mother for Mother's Day. Five, how could it already be time for Mother's Day?! And that is how my grandmother became the focus of my mother's card.

A little Photoshopping to repair and lighten the 100-year-old photo
I scanned Grandma and printed out several copies of her onto cardstock made for printers. Our scanner/ copier is a laser printer. I used Hammermill 80lb cover weight paper purchased from Costco.com. There are many options when it comes to printing photographs. Because this picture was going to be altered with a glaze medium, I wanted a smooth surface that would not bleed.  If you do not have access to a laser printer, you can take a copy of your picture to a copy center and have it printed there. Or, if you do not intend to put anything moist on the printout, it won't smear and become a big mess!


The photo on the left shows the colored Creative Medium that I used on the photo.  On the righthand side is the dried and cropped photo. To make the photograph look like it was in a gold-gild picture frame I made a border with tissue tape. Washi tape or Post-it notes would work, also.  It is important that whatever is used doesn't damage the photograph and makes a nice clean line, too.

Embossing paste used to frame photograph

Embossing paste dries a pretty antique gold color
The heart shape took on a leather-like look after distressed with ink.  The lace ribbon was also inked a little bit to tone down the harshness of the white.


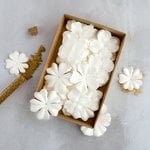
There are many layers to this card and also layers of flowers.  
The very bottom of the flower is a paper doily which was distressed with ink and folded.  Glued on top of that is a piece of ribbon formed into a hoop.  More distressed paper flowers were glued on top and finished with a resin flower center.

Ribbon base for paper flowers to rest upon
Below is the side view of the big flower embellishment.  There are also two different types of lace ribbon layered with the patterned paper.

Lots of layers make this flower embellishment
And finally, here is the finished card with all of the embellishments and distressing completed.
Vintage Photo used on Greeting Card
This card is to go with a set of greeting cards that I made for my mom to be able to mail out to whomever she wants.  All eight of the cards are posted on this post if you would like to see them.

Packet of cards for giving away
Thank you for visiting!

Supplies:

Saturday, May 18, 2013

Scrapbooking Without Pictures

After taking a very long break, I am glad that the first blog post of my work includes an image of two of the biggest blessings in my life. Thanks for sticking it out with me and being here to share it.  I appreciate all the support that you all have shown me! Now on to the actual post...


At Disneyland there is a tiny shop on Main Street where silhouettes are made.  When we went in there last October, we were impressed by an amazing woman who could hand-cut a silhouette in just a few minutes.  She looks at the person and cuts with scissors.  All the while, she is carrying on a conversation!  I love how her artwork looks and wanted to keep it as part of our vacation memories in a scrapbook, even though it is not a photograph.


The silhouette is on a rectangular piece of cardstock.  I cut out the oval to mount it with foam tape on the double mat. Using a black paper as the background would give the best contrast, so that is what I chose. The For Always paper packet is classy and vintage-y feeling.  It seemed like a perfect choice for this silhouette of my two daughters. One was celebrating her 8th birthday and the other was 22 at the time.

Click on the picture to see more detail

Each piece of paper was ink distressed and all, except the oval, were edge distressed as well.

CTMH Black Tulle Ribbon made into Flowers and Bow-like Shapes
The black tulle comes on a wide roll.  It is easy to scrunch up into flower-like shapes.  I stapled the 'blossoms' and glued the top one in place and flattened it with a dictionary.  The two at the bottom of the page were attached to the page with brads.

CTMH Sparkles Black Flourishes
Usually, I do double layouts but since it has been such a long time (over six months!) since I have scrapbooked, I thought I would start with a single 12 x 12 page.

CTMH For Always B & T Papers
Initially, I was going to follow this sketch from Creating Keepsakes for a group of pictures that I wanted to scrap.  Rather than wait for the pictures to be printed, I decided to go ahead and modify the sketch to use it today.  It doesn't look a lot like the sketch, but it was the jumping off point for this layout.

All of the materials are CTMH except as noted:
For Always Paper Pack
Black and White Daisy cardstock
Black Tulle Ribbon
Sparkles: Black Flourishes and Black and Grey Assortment
Key from Brocade Assortment
Foundry Metal Pin Clip
Black staples/stapler
Black Soot Distress Ink - Ranger
Mickey Mouse paper clip - from stash
White lace ribbon - Martha Stewart
Grey ruffle ribbon - Pink Paislee House of Three
Washi Tape - Teresa Collins
Spellbinders ornate frame - this was a leftover piece that was in my stash so I don't remember which one it is.
Black thread and sewing machine
Black brads from stash

Thank you so much for stopping by today!
Beverly

Saturday, September 1, 2012

CTMH Alcohol-Based Markers


Ribbon and Background Mat Colored With CTMH Ruby Set of  Markers
Recently, Close to My Heart changed their marker formula from dye-based to alcohol-based inks.  The new markers are sold in sets of twos, with one lighter and one darker. For this card, I used the new Ruby color. 

Self-Adhesive Pearls Colored With Markers
With the new markers, I colored the glossy cardstock background mat, the Opaque pearl adhesive gems, and the seam binding ribbon.  It was a very fast coloring/drying time and I love how well coordinated everything looks.

Thank you for visiting!
Beverly

Friday, August 31, 2012

Frosted Designs Office Supplies Challenge

Reminder Board For Child
Office supply stores are one of my favorite places to visit; on the list just under bookstores.  Back-to-School-Time is also one of my favorites because all of the school supplies are on sale.  I think a lot of paper-crafters share similar feelings.  Which brings me to the challenge from Frosted Designs this week: Office Supplies. Whoo hoo!  I love it!

Three Pieces of Cardboard Packaging To Be Glued Together For Base
For the challenge, I knew I wanted to use shipping tags and binder clips.  I also knew that I was becoming weary of reminding my dd every single day to do some simple things.  It seemed a Reminder Chart was in order.  

The greatest thing about this project is that I used things on hand and things that would normally have been thrown into the recycling bin.

Cricut Art Philosophy Negative Cut Sheet 
After painting the cardboard base with acrylic paint, I adhered a piece of cardstock that was a leftover from a Cricut heart-cutting project that had been misted with pearl paint and water.
Binder Clips To Be Covered With Washi and Tissue Tape
On each side of the chart there are cute tape covered binder clips to hold the decorated shipping tags with the various reminders printed on them.  

Painted Tattered Angels Glimmer Mist Shipping Tag

The tags are regular manilla painted with Tattered Angels Tutti Fruiti Glimmer Mist.  After they dried I ran them through the printer and added washi/tissue tape to both ends.

Close-Up of Painted Chipboard Letters With Liquid Pearls
My seven year old is the princess of re-purposing. She noticed that the double-sided tape dispenser was empty and that some of the washi tape was the same size as the used-up tape.  She suggested that I re-use the dispenser.  What a great idea! See it pictured below.

Reusing Tape Dispenser For Washi Tape
The last addition to the board was ribbon.  The one used for hanging came from a gift and the other little ones are from my stash.

Bow Tucked Through Binder Clip
She has had this in her room for a couple of days and it has helped a little bit.  Now instead of asking her if she did each of the individual things, I ask her if she did the things on the board.  It is progress!  Once these items are habits, we can change the tags to new things.

Hanging In DD's Room
This is my last Frosted Designs Challenge as a Design Team member.  When the card challenges ceased, I opted to remain for my term as a Friday team member.  I love the women who are part of Frosted Designs.  They are talented, kind and very sharing.  I will miss being a part of this amazing group, but am excited to continue working on other projects.  Speaking of which, if you get a chance, please visit Faithbooking For All for this week's Faithbooking Friday post.

Thank you for visiting! Have an amazing weekend!
Beverly


Tuesday, August 14, 2012

Mini Albums - Interactive Elements

CTMH Cricut Artiste Collection 3 3/4" Album
Mini-books are more playful than traditional scrapbooks because of their diminutive size. They seem to lend themselves to the use of lots of interactive elements as well.  This video shows many examples of folders, tags and pockets that were included on the pages of the mini album pictured on this page.


All of the book pages were cut using the Cricut Artiste cartridge.  Most of the interactive elements were random cuts or scraps that were laying on my desk.
The best sizes for the elements will be determined by the size of the pages in the book.  It is a great way to use up bits and pieces.
Stella B & T Paper
I bound the book with large book binder rings which were embellished with some burlap and striped ribbons.

Thank you for visiting today!
Beverly

Thursday, August 9, 2012

Harvest Happiness Ornaments Video

Gift Bow/Topper or Ornament
These pretty decorations are made by stamping images onto corresponding cut shapes, folding them and gluing them into 3 dimensional shapes.  Here is a video tutorial showing how to make them:


The stamp shapes for Harvest Happiness correspond with the Art Philosophy cartridge.  The shapes on the posts here and here correspond with the Cricut Artiste cartridge.  Once you know the procedure, you can use any shape that you like!


CTMH Harvest Happiness Stamp Set
The ornaments can be hung up or used to decorate gifts.

15 Shapes Cut From Cricut Art Philosophy
Embellishments in the center offer another place to show your creativity.  Add bling, buttons, ribbons, twine, beads, etc. either with glue or foam tape.
CTMH Burlap Ribbon
If you have any questions please leave me a comment or feel free to email me at StampinBev@msn.com

Thank you for visiting!
Beverly

Monday, August 6, 2012

Avonlea Cards - August Bonus Projects

CTMH Avonlea B & T Paper
The three cards on this page all used patterned paper from the Avonlea collection.  The top two are 6 x 6 square cards and the bottom one is a standard 5 1/2" x 4 1/4" card.  The top one has a Parlor Velvet Rub-On for a little added texture, along with pieces of Black Tulle Ribbon and Slate Satin Polka Dot Ribbon.  The sentiment comes from the Words of Comfort set.

Sentiment is from CTMH Card Chatter - Sympathy Set
I love how simple this card is, but it still has a lot of character.  The sentiment was stamped on a shape cut with the Art Philosophy cartridge and layered over progressively larger shapes.  A couple of Mocha Opaques anchor the sides of the layered labels. The Slate Polka Dot Ribbon adds an elegant touch. Inside the card is a strip of patterned paper adhered to the edge.  The front of the card was cut a little smaller so that the inside paper could be seen peeking out.
Liquid Glass Turns Matte Finishes to Glossy
 The birthday card has pops of bright, stamped images.  Honey ink was used with the images from the Artiste Collection.  The two banners were then covered with Liquid Glass to make shiny embellishments for the card.  All of the design elements were popped off the page using foam tape.
Paper Pieced Cupcake
Even though there is a cupcake cut file on the Artiste cartridge, I hand cut it because I wanted to paper-piece it. The 'sprinkles' on the cupcake are Mocha Opaques Adhesive Gems. 

All three cards are part of my August Bonus - Thank-You Projects for any customer who shops with me this month.  I will email the complete instructions to all online customers.  The projects can be made with whatever papers and inks you have on hand, they do not have to be made with the supplies that are from the samples. The other projects are here and here.

Thank you for stopping by today!  I appreciate you taking the time to visit.
Beverly

Thursday, August 2, 2012

Ornaments From Cardstock

CTMH Cricut Artiste Page 53 - Accent 2
Folding pretty cut papers into prettier shapes is one of the things I love about papercrafting.  To take a flat shape and turn it into a 3-dimensional object is so coo!.  These ornaments or gift toppers or scapbook page embellishments are really fun, no matter what you call them. I will post a video explaining how to make them but in the meantime here are some pictures to walk you through the steps.
Cut at 1 3/4"
 Each layer of this ornament has 15 identically cut shapes.  They are scored in half and then adhered into little groups of threes.  Those components are then glued to a piece of cardstock as pictured above.
Cut at 2 1/2" and 3"
 One layer is pretty, but adding more layers increases the "wow factor".  Here are the layers as they are being assembled together.
Layered with 3-D Foam Tape
 I added a ribbon to the shapes to use them as ornaments.  They could be double sided by making two of the same and gluing them back-to-back. Alternatively, these would look stunning on a present instead of a traditional bow.
CTMH Cricut Artiste Page 53 - Accent 3
 Here is a different one made from the same page.  The folding is the same, but this has four 'spokes' and the last component was used in the middle to add another type of layer. All of the cardstock for both projects was glued using Bonding Memories.
CTMH Boutique Assortment Bling Gem
Try this with many different designs in both the Art Philosophy and the Artiste cartridges.
Thank you for visiting today!
Beverly