Paper and Fiber Arts


Welcome to my mixed media blog. Thanks for stopping by.
Showing posts with label CTMH Stamps. Show all posts

Thursday, July 10, 2014

Simple, Easy Card

CTMH Picture My Life Card  Layered On Card Base
I love quick projects.  And ones that use up leftover supplies are even better!  This card was made with scraps of cardstock, B & T paper, a piece of ribbon, a couple of leftover punched butterflies, and a Picture My Life Balloon Ride 4 x 6 card (from CTMH's pocket scrapbooking program.)  The sentiment is from the Give a Lift stamp set.  To complete the look, I used a couple of old Durables studs that are self-adhesive and inked the edges of the card and the rounded pieces of paper. It took less than 10 minutes to make.  Which is less time than it would have taken to file all of the scraps away!

Thank you for visiting!
Beverly

Monday, February 3, 2014

The New Spring/Summer 2014 CTMH Idea Book - Top Three Favorite Items

http://scrappinthread.ctmh.com/ctmh/products/online-idea-book.aspx
Click on image to view Idea Book online
February 1, 2014, was the release date for the new CTMH Idea Book and Catalog. There are many new, exclusive products available in each new book.  Here are a few of my top picks:

http://scrappinthread.ctmh.com/ctmh/promotions/campaigns/1402-embossing-is-boss.aspx
Click on image to view Embossing Promotion details

1. Large (5 x 7) Embossing Folders!  You can receive your favorite(s) for free with a purchase of colored cardstock packs! There are five different designs: Dot, Chevron, Damask, Stripe, and Quatrefoil. The Accessories page found here lists them all.


2. Picture My Life is a new program offering from CTMH. It is sort of like Project Life, but the program kit starts you off with a Cover Sheet and 10 Memory Protectors.  There are also 122 fabulous cards to insert in your pocket scrapbooking album.  They are sized at 3 x 4 and 4 x 6 inches to coordinate beautifully with your photos. It makes it easy to share your photos with minimal work but with lots of panache! There are 8 different collections.  Please visit here to see them all. Tomorrow's post will show a video of an album that I made using the Balloon Ride kit.  I also made some flat/mailable cards with some of the leftover cards.

CTMH Believe In Yourself C1574

3. I love stamps.  There are so many wonderful new images! It is hard to choose but this is one of my favorites. And (can't help myself!) here is another one:
http://scrappinthread.ctmh.com/retail/Product.aspx?ItemID=7825&CatalogID=672
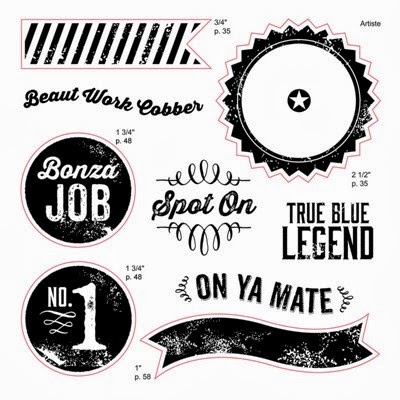
The outline in red indicates which images are Cricut Artiste compatible


Also, there are some Australian designs that are NOT in the new USA Idea Book, but are available here. The first six sets on this linked page are in the Australian/New Zealand Idea Books. Here is a sneak peak at one of them:
http://scrappinthread.ctmh.com/Retail/Product.aspx?ItemID=7871&CatalogID=1835
CTMH Aussie Praises Stamp Set

If you'd like to order a new Idea Book please visit my website here. Please let me know if you have any questions.

Thank you for visiting!
Beverly

Thursday, June 20, 2013

CTMH Announces Retiring Products


It is that time of year when Close to My Heart is gearing up for convention and the release of the new Autumn/Winter Idea book.  Which means that there are a lot of new products that will be introduced in August.  To make room for them in the catalog, some of the other items will be discontinued. Some items are being discounted and are already on sale here.

The following list includes items that are while supplies last and/or will automatically be discontinued July 31st.  Stamps are produced in house, so they will be available through July.  If you are interested in any of the following items, you will want to make your shopping list soon! :-)

Spring 2013 Retiring List

        Item #   Description

  • Z1366 Brads Metal Assortment Accessory brads 
  • Z1410 Antiqued Copper Designer Brads Accessory brads 
  • Z1704 Pewter Badge Buttons Accessory Buttons
  • Z1703 Wooden Badge Buttons Accessory Buttons
  • Z1821 Buttons Black Assortment Accessory Buttons
  • Z1371 Buttons Blue Assortment Accessory Buttons
  • Z1370 Buttons Pink Assortment Accessory Buttons
  • Z1358 Buttons Basic Assortment Accessory Buttons
  • Z1369 Buttons Red Assortment Accessory Buttons
  • Z1372 Buttons Green Assortment Accessory Buttons
  • Z1773 Color-Ready Noted Canvas Shapes Accessory Color Ready
  • Z1718 Color-Ready Garden Wooden Shapes Accessory Color Ready
  • Z1450 Cork Color-Ready Alphabet Accessory Color Ready
  • Z1719 Color-Ready Evergreen Cork Shapes Accessory Color Ready
  • X7164C Buzz and Bumble My Stickease® Assortment Accessory Complements
  • X7155C Avonlea Complements Canvas Shapes Accessory Complements
  • X7167C Later Sk8r My Stickease® Assortment Accessory Complements
  • X7166C Claire Complements Canvas Shapes Accessory Complements
  • X7156C Clementine Complements Canvas Shapes Accessory Complements
  • X7157C Dakota Complements Silver Foil Images Accessory Complements
  • X7159C Scholastic My Stickease® Assortment Accessory Complements
  • Z1326 Sparkles Red, Pink & Purple Assortment Accessory embellishment
  • Z1327 Sparkles Blue & Green Assortment Accessory embellishment
  • Z1710 Just Blooms® Paradise Paper Flowers Accessory Flowers
  • Z1612 Paper Clip Pins Accessory foundry
  • Z1755 Posh Journaling Spots Accessory Journaling
  • Z1734 Irresistibles™ Persnickety Journaling Spots Accessory Journaling
  • Z1831 Buzz and Bumble Assortment Accessory Level 2 
  • Z1813 Claire Assortment Accessory Level 2 
  • Z1810 Later Sk8r Assortment Accessory Level 2 
  • Z1748 Brocade Assortment Accessory Level 2
  • Z1794 Cottage Assortment Accessory Level 2
  • Z1766 Memo Assortment Accessory Level 2
  • Z1780 Wrangler Assortment Accessory Level 2
  • Z1487 Mini Medley Accents Pewter Collection Accessory mini medley
  • Z1697 Mini-Medley Accents Smoothie Collection Accessory mini medley
  • Z1489 Mini Medley Accents Olive Collection Accessory mini medley
  • Z1798 Black Tulle Ribbon Accessory Ribbon
  • Z1088 ChocolateWaxyFlax Accessory Ribbon
  • Z1089 BlackWaxyFlax Accessory Ribbon
  • Z906 BambooWaxyFlax Accessory Ribbon
  • Z1081 ColonialWhiteWaxyFlax Accessory Ribbon
  • Z1096 EmbroideryFlossNeutralAssortment Accessory Ribbon
  • Z1347 12 x 12 Post Bound Album- New England Ivy Album album
  • Z1827 My Creations™ Paper Pouch - Small Crafts gift 
  • Z1828 My Creations™ Paper Pouch - Large Crafts gift 
  • Z1740 My Creations® Bookmark Album Crafts My Creations
  • Z1739 My Creations® Milk Carton Crafts My Creations
  • Z1774 My Creations® Canvas Journal Crafts My Creations
  • Z1736 My Creations® Mini Banner Crafts My Creations
  • Z1267 Paper/StampOrganizer8.5x11(3) organization
  • Z4200 AccessoriesOrganizer Organization
  • Z4136 ExclusiveInksOrganizerCarryingCase Organization
  • Z1474 6" x 6" Kraft Die-Cut Cards & Envelopes Paper Product cards
  • Z1724 6” x 6” Kraft Envelopes Paper Product Cards
  • Z1412 10-Things Pocket Paper Product cards
  • Z1722 4 1/4" x 5 1/2" Kraft Envelopes Paper Product Cards
  • Z1723 5” x 7” Kraft Envelopes Paper Product Cards
  • Z1721 3” x 3” Kraft Envelopes Paper Product Cards
  • X7155B Avonlea Paper Packet Paper Product Level 2
  • X7157B Dakota Paper Packet Paper Product Level 2
  • X7156B Clementine Paper Packet Paper Product Level 2X7159B Scholastic Paper Packet Paper Product Level 2
  • X7167B Later Sk8r Paper Packet Paper Product Level 2
  • X7166B Claire Paper Packet Paper Product Level 2
  • X7164B Buzz and Bumble Paper Packet Paper Product Level 2
  • Z4134 Handle and Swivel Base organization
  • W1123 Spring Summer 2013 B&T Duo Sampler Supply Supply
  • Z724 EmbossingPen Tool coloring 
  • Z670 EmbPowderBlack Tool coloring 
  • Z673 EmbPowderWhite Tool coloring 
  • Z1246 EmbPowderCocoa Tool coloring 
  • Z672 EmbPowderRed Tool coloring 
  • Z1351 embossing powder dutch blue Tool coloring 
  • Z659 EmbPowderCranberry Tool coloring 
  • Z656 EmbPowderOutdoorDenim Tool coloring 
  • Z655 EmbPowderOlive Tool coloring 
  • 1771 WaterbrushMedium Tool coloring 
  • Z1350 embossing powder topiary Tool coloring 
  • Z1392 2" Scallop Circle Punch Tool cutting
  • Z578 Corner Rounder Tool cutting
  • Z608 EmbossingStylusMedium Tool
  • G1061 Workshops on the Go® Chantilly Cardmaking Kit WOTG Card 
  • G1060 Workshops on the Go® For Always Cardmaking Kit WOTG Card 
  • G1062 Workshops on the Go® Canvas Art Kit WOTG home décor 
  • G1053 Workshops on the Go® Chantilly Scrapbooking Kit WOTG Layout
  • G1054 Workshops on the Go® Buzz and Bumble Scrapbooking Kit WOTG Layout
  • G1057 Workshops on the Go® Later Sk8r Scrapbooking Kit WOTG Layout
  • G1055 Workshops on the Go® For Always Scrapbooking Kit WOTG Layout
  • G1059 Workshops on the Go® Surf's Up Scrapbooking Kit WOTG Layout
  • G1056 Workshops on the Go® Claire Scrapbooking Kit WOTG Layout
  • G1058 Workshops on the Go® Tommy Scrapbooking Kit WOTG Layout
         Stamp Sets
  • A1132 Family 
  • A1133 Festival of Lights
  • B1372 Circle Together 
  • B1395 So Grateful 
  • B1396 School Rocks 
  • B1405 Rugged Dude 
  • B1406 Blessings of Peace 
  • B1410 A Friend Like You 
  • B1414 Bonjour Stamp BC1438 Tea Time 
  • C1461 Salutation Seals 
  • C1466 Instant Memories 
  • C1505 Pun Fun 
  • C1507 Angelic Blessings 
  • C1508 Paisley Flair 
  • C1511 Love Blooms 
  • C1520 Christmas Joy 
  • D1187 For Every Occasion 
  • D1388 Card Chatter - Christmas 
  • D1399 Dream Big 
  • D1440 Everlasting Life 
  • D1444 A Little Thanks 
  • D1492 Christmas Love 
  • D1517 Game On 
  • D1519 Abundance 
  • D1521 Powder Heaven 
  • D1523 Sweet Music 
  • D1528 Jardin 
  • E1010 Chocolate Alphabet Large 
  • E1014 Posterboard Alphabet 
  • E1015 Cocktail Alphabet 
  • E1017 Old World Alphabet 
  • E1018 Pennant Alphabet 
  • E1019 Bohemian Alphabet 
  • E1020 Token Alphabet 
  • E1021 Trinity Alphabet 
  • E1022 Hero Alphabet 
  • E1023 Varsity Alphabet 
  • E1024 Keepsake Alphabet 
  • K900 Single Name Stamp Stamp Custom
  • K9012 Address Stamp w/o Icon 2 Lines Stamp Custom
  • K9013 Address Stamp w/o Icon 3 Lines Stamp Custom
  • K9014 Address Stamp w/o Icon 4 Lines Stamp Custom
  • K9022 Address Stamp with Icon 2 Lines Stamp Custom
  • K9023 Address Stamp with Icon 3 Lines Stamp Custom
  • K9024 Address Stamp with Icon 4 Lines Stamp Custom
  • W1600 Customized Set Stamp Custom

If you would like to purchase any of these items before they are gone, please visit my website here.  Thank you.

Thursday, August 30, 2012

Background Techniques - Washi and Tissue Tape

Washi Tape on Shipping Tag
Washi tape is so much fun to use.  It is somewhat transparent and re-stickable.  On the tag above you can see the manila color of the shipping tag.  Below is a picture of the two different colors of cardstock that the Tim Holtz Tissue Tape was placed on for the card background (which is pictured at the bottom of the post.)

 
Cardstock Colors Before Tissue Tape Was Adhered

The tissue tape is 1/2" wide.  This was the perfect size for a standard size card.  When it was done, I decided that it would be nice to see the light pink of the card base, so I cut the tissue tape background to a 4" x 5 1/4" rectangle.

Tissue Tape Strips On Alternating Colors of Cardstock


Tissue Tape Background for Standard Sized Card
The CTMH stamped images were stamped with CTMH Black Archival ink.

Thank you for stopping by!
Beverly


Wednesday, August 29, 2012

Background Technique - Crimp or Corrugate

Crimped Shipping Tag
There are hundreds of background techniques for papercrafters to choose from when working on any given project.  I am revisiting a bunch of them over the next couple of weeks. Also, I am starting a new page on my blog that is specifically for background techniques.  This way the techniques will be listed with commonly used names. I hope it is easy to locate the one for which someone may be looking. And maybe it will help those who are looking for something new or different to try. It should be ready by the end of the week.


 This card was made by using a Fiskars crimper horizontally on a piece of kraft cardstock and a piece of Ruby cardstock running diagonally.  The base is also CTMH kraft cardstock.

CTMH Cashmere Pigment Ink and Clear Embossing Powder
I layered the embossed sentiment over a piece of burlap ribbon and Ruby cs.  The edges of all pieces were either edge or ink distressed.

Thank you so much for visiting today.  Please stop back tomorrow when the background technique is all about using washi and tissue tape.

Beverly


Tuesday, August 28, 2012

Polished Stone Technique - CTMH Inks

CTMH Thanks Stamped with CTMH Black Archival Ink
 Background Technique Week continues with a third variation of the Polished Stone Technique.  Here is a video recap of the different materials and a quick demonstration of the technique using cotton balls and CTMH reinkers:


The reason why glossy paper works well for this technique is that the liquid needs to stay on top of the paper for as long as possible so that it can be moved around.  Some applicators work better than others for dispersing the ink and blending solutions. One of my favorites is cotton balls because they hold the liquid well and are inexpensive.  You can also try sponges, rags, q-tips and see what works best for you.  With the other applicators you may get a different look than polished stone, but it can still be pretty spectacular in appearance.
Polished Stone Technique with CTMH Juniper, Sky and Lagoon Reinkers
I tried using the silver metallic marker from CTMH on the piece above and discovered that the ink would not blend.  Good to know that it is a great medium for a permanent application.

Hambly Studios Washi Tape Toned Down the Intensity of the Pink Cardstock
The last picture is to show that the washi tape really changed the tone of the front.  The pink of the cardstock  is very bright.  Depending on the recipient, it may need a neutral mat added to the inside for the message and signature.

Monday, August 27, 2012

Polished Stone Technique With Copic Markers

CTMH Stamps: Treasure Life and Rosy Regards
Thank you for visiting! Yesterday's post was also about the Polished Stone Technique. The main star was Adirondack's alcohol inks, which offer spectacular results. Today's post is another way to do this easy technique, but with other supplies. Many of which are likely to be on hand.  I do not have any colors of Copic reinkers so I devised a way to do the polished stone technique with Copic markers.  It isn't great, but it is ok. It is not as 'stone-like' as using ink from a bottle.  More of a blended, water-like or field type background. Though, I really like how it looks when stamped with CTMH's Black Archival ink on top.

Copic Markers and Rubbing Alcohol 
The basic method of the Polished Stone Technique is to apply ink to a glossy surface along with an alcohol blending solution.  A metallic mixative is optional.  Today I used 3 copic colors and regular drug store rubbing alcohol on top of glossy cardstock and Kodak photo paper.  Prior to scribbling onto the paper, I coated it with alcohol.  After applying all three markers, I took the Inkssentials Blending Tool (with felt) and applied more alcohol.  It worked much better on the glossy cardstock than on the photo paper. When I get an air compressor, this will be the first technique I try.  I think the results will be amazing!  Probably more Polished-Stone-ish.

Please come back tomorrow for the Polished Stone Technique with CTMH ink and also a video with samples and a quick demonstration.

Have a glorious Monday!
Beverly

Wednesday, August 15, 2012

It's Your Day Double Stamp Set


To celebrate National Stamping Month in September, CTMH is bringing back the popular double stamp set promotion! You can get the exclusive, new My Acrylix® It’s Your Day double stamp set for just $5 when you place a minimum order of $35 in full retail products from August 15 through September 30, 2012. You’ll love this double set—two D-size sets in one envelope—which includes nearly 50 trendy images that makes it easy to capture the everyday moments in your life. The double set has a retail value of $35.90, which drastically increases the value of your qualifying purchase! Have twice the fun stamping during National Stamping Month with our new, exclusive It’s Your Day double stamp set!

Inside Card
 I did a water wash over the stamped images on the inside of the card and the polka dots on the card front at the top of the post. The stamp set is pictured below along with some of the corporate artwork from CTMH.

Thank you for visiting today!
Beverly

Sunday, August 12, 2012

10 Minute Card - Suitable for Mailing Sympathy Card

Butterfly is Negative Cut From Cricut Artiste
 Sometimes it is necessary to come up with a very quick card.  Unfortunately, sympathy cards usually fall into that category for me.  I would love to be able to send an 'over-the-top' card to everyone who receives a card from me, but realistically that is not always possible.  And sympathy cards are oftentimes needed without advance notice.  I needed a quick mailable card yesterday and this is what I came up with. Sadness sometimes makes it hard for me to think creatively, so that is another challenge in coming up with a card quickly.  It is simple, but I think that is ok.  It will let the little girl who is receiving this know that she is in my thoughts as she mourns the loss of her father.

Larger Butterfly Cut For Inside Card
Very few words were needed on the inside of the card, so I decided to dry emboss the edge and adhere a large butterfly inside.  I know this card is not spectacular, but I wanted to share it because all of us need quick cards sometimes; and maybe it will help someone else when they need one.

May your day be filled with joy and love. Give your dad or your dear children an extra hug if you can.  Life is unpredictable.

Beverly

Thursday, August 9, 2012

Harvest Happiness Ornaments Video

Gift Bow/Topper or Ornament
These pretty decorations are made by stamping images onto corresponding cut shapes, folding them and gluing them into 3 dimensional shapes.  Here is a video tutorial showing how to make them:


The stamp shapes for Harvest Happiness correspond with the Art Philosophy cartridge.  The shapes on the posts here and here correspond with the Cricut Artiste cartridge.  Once you know the procedure, you can use any shape that you like!


CTMH Harvest Happiness Stamp Set
The ornaments can be hung up or used to decorate gifts.

15 Shapes Cut From Cricut Art Philosophy
Embellishments in the center offer another place to show your creativity.  Add bling, buttons, ribbons, twine, beads, etc. either with glue or foam tape.
CTMH Burlap Ribbon
If you have any questions please leave me a comment or feel free to email me at StampinBev@msn.com

Thank you for visiting!
Beverly

Monday, August 6, 2012

Avonlea Cards - August Bonus Projects

CTMH Avonlea B & T Paper
The three cards on this page all used patterned paper from the Avonlea collection.  The top two are 6 x 6 square cards and the bottom one is a standard 5 1/2" x 4 1/4" card.  The top one has a Parlor Velvet Rub-On for a little added texture, along with pieces of Black Tulle Ribbon and Slate Satin Polka Dot Ribbon.  The sentiment comes from the Words of Comfort set.

Sentiment is from CTMH Card Chatter - Sympathy Set
I love how simple this card is, but it still has a lot of character.  The sentiment was stamped on a shape cut with the Art Philosophy cartridge and layered over progressively larger shapes.  A couple of Mocha Opaques anchor the sides of the layered labels. The Slate Polka Dot Ribbon adds an elegant touch. Inside the card is a strip of patterned paper adhered to the edge.  The front of the card was cut a little smaller so that the inside paper could be seen peeking out.
Liquid Glass Turns Matte Finishes to Glossy
 The birthday card has pops of bright, stamped images.  Honey ink was used with the images from the Artiste Collection.  The two banners were then covered with Liquid Glass to make shiny embellishments for the card.  All of the design elements were popped off the page using foam tape.
Paper Pieced Cupcake
Even though there is a cupcake cut file on the Artiste cartridge, I hand cut it because I wanted to paper-piece it. The 'sprinkles' on the cupcake are Mocha Opaques Adhesive Gems. 

All three cards are part of my August Bonus - Thank-You Projects for any customer who shops with me this month.  I will email the complete instructions to all online customers.  The projects can be made with whatever papers and inks you have on hand, they do not have to be made with the supplies that are from the samples. The other projects are here and here.

Thank you for stopping by today!  I appreciate you taking the time to visit.
Beverly

Sunday, July 29, 2012

Using the Negative Space from Cut Images

CAS Butterfly Card

 Sometimes it is hard to throw away the scraps from cut images.  This butterfly was one such cut for me.  It is about 3 inches tall and I knew it would look great with the Watermelon cardstock behind it.  After looking at it for a couple of minutes I decided to stamp it with one of the Diverse Background stamps using CTMH's Archival black ink.  I layered it with Topiary and White Daisy cardstock along with a little more Watermelon.  The final touches were the hand drawn antennae and a bit of bling.

Negative Space Cut Image - CTMH Cricut Artiste Butterfly
It is a simple card and only took a couple of minutes to make.  But, I think it is very pretty. I hope you like it, too.

I hope you have had a restful weekend with some time to create something.  It rejuvenates my soul to work with crafty things so I am now ready for a busy week.
Thank you for visiting!
Beverly

Supplies:
CTMH Cricut Artiste cartridge
Paper: CTMH cardstock in the following colors - White Daisy, Topiary and Watermelon (retired)
Ink: CTMH Black Archival
Stamps: CTMH Diverse Backgrounds
CTMH Bitty Sparkles
Black Copic Multi-Liner

Sunday, July 8, 2012

What Inks To Use With Copic Markers?


Supplies Used For Comparing Different Ink Pads
There is a reason I have so many different types of ink.  They really do serve different purposes in life and this was a good project for me to justify their existence in my craft room. :-)  It all came about because of a question posted on a Facebook group to which I belong.  The query had to do with whether or not SU! ink would work with Copics.

When I first started collecting Copics I read that they did not work with certain inks, SU! was one of them.  But I had never tried it for myself.  When I went through the training for Copic Certification we were given a booklet that has lots of helpful information and some information that was less than definitive!  A lot of the advice was try it and see.  So in that spirit, that is what I set out to do.
Eight Different Black Inks
This is not a scientific study.  It is for my own amusement. I do hope that it will possibly help someone else with knowing whether they want to try certain product combinations.  Even though I am a CTMH consultant and was once a SU! demo, I tried to keep an open mind about the results. And of course, your mileage may vary.

It is recommended that some inks be heat set.  For others, it is important to make sure they have dried on the paper prior to coloring.  Because there is always a difference in juicy-ness of ink pads and the amount of pressure people stamp with, I decided to stamp all of the images and then let them sit overnight. This may seem like an unnecessary step, but it was important to me to try to make sure all of the inks were 'treated' the same. I did not heat set any of them, because of this.  But, I knew they would all be dry and ready to color.
One Red Rubber and One Acrylic Stamp For Each Ink On Cryogen White Card Stock
One ink that is recommended frequently for use with Copics is Memento - Tuxedo Black.  It never fails me when I am coloring.  No feathering or bleeding.  Even with those pesky pinks that seem to have a will of their own sometimes.  I do not Love the stamped image though.  Yes, I am picky.  It gives an okay result.  This will probably continue to be my 'go-to' ink of choice for Copics, though.  But there were some surprising (to me) results with some of the other inks...
Tsukineko Black Inks
Pigment inks are not usually recommended for use with Copics. Though, there are some exceptions. I only included one pigment ink in the test and it is not mentioned on Copic's Good or Bad list.  It is called Versafine.  It is made by the same company that makes Memento inks. Incidentally, one of the exceptions to the 'no-pigments' suggestion is also a Tsukineko product, Brilliance Ink. (More was posted here about Brilliance yesterday.)  There is a lot of information available on the internet about the different types of inks, so I will not address that topic today.  But I will say that water-based, washable inks are to be avoided when using Copic markers.  And just because something says it is archival, that does not automatically mean it is a good ink for use with Copics.

There was NO competition for Versafine's stamped image.  It made a crisp, clear, image.  It is perfect. This is a pigment ink that I normally use for watercoloring and for CAS cards.  I love how the detail shows in the image.  However, even though the ink sat overnight, the pink did bleed a little at first.  After the colored images sat for a bit, both the yellow and pink were bleeders.  Use this lovely ink for other types of projects.

Two Black CTMH Inks
Next up is another ink on the to-avoid list, Close To My Heart. The list did not specify which CTMH ink to not use and I believe that is because the Archival ink has only been out for a couple years, so the list may not have been updated to amend that information.

Both inks stamped very well on the Cryogen cardstock.  CTMH markets their ink for use with acrylic stamps, since that is what they manufacture.  Red rubber typically has thicker "walls" in their images so that results in a little more surface area for the ink.  That is why I included both types of stamps here. Even though this isn't scientific, I would like to give each of the inks a fair chance.

Back to the results:  The regular black dye bled a little with the yellow markers and did not bleed with the pinks.  The opposite was true of the archival.  This was becoming exasperating because I wanted a definitive good or bad result!  If I were in a bind, I would use the CTMH Archival ink for coloring with darker colors.  But it would not be my first choice.

Two Black Ranger Inks
Now, this was the one that I was most surprised by... The Ranger Archival ink was really messy when I colored both images.  It stamped nicely, but you can see in the photo above, it did not react well to the Copics.
The Tim Holtz Distress ink stamps thick.  It is an acceptable stamping ink, but not impressive for thinner images.  However, it plays very nicely with Copic markers.  So I would give the TH inks a definite "yes" for use with Copics.
Stampin' Up! Black Ink
The last two inks I tried  had disappointing results. The SU! ink has a purplish hue to it, as you can see above. I had reinked the pad, so it wasn't drying out.  But, more importantly, the Copics smeared and ran. After the image had dried overnight, I was surprised by how much the ink interacted with the Copics.

Which brings me to the other big surprise to me.  The last ink (which is half pictured on the photo above) is the Stewart Memories dye ink.  It is listed as a Good ink on Copic's list.  Neither image stamped very cleanly and worse, the ink was very smeary when I colored them.  

So after all this lengthy explanation, here is a little chart that I made with my recommendations.  I included Copic's recommendations as well.  Though the Brilliance ink was not reviewed on this post, I did include it because it was reviewed yesterday.

Click on the chart to see it larger.

Ink Recommendations For Use With Copic Markers

I hope that you find this information helpful.  It was a good exercise for me to try these inks with my markers.  It gave me some good data that I can refer back to as I continue to figure out which papers, inks, stamps, and Copics combinations I like the best.  There is no right or wrong, just personal preference.

Thank you for stopping by today!
Beverly

Friday, July 6, 2012

Christmas In July - Part 1 - Advent Calendar Wreath


Countdown to Christmas Wreath

Now that the Fourth of July is over it is time for me to get ready for Christmas!  Just kidding.  I actually made this advent calendar last winter and I am finally getting around to posting the video tutorial.  It has been in the video camera for months!

Here is the tutorial if you would like to follow along as I show you the steps that I took to make this.


This wreath is made with wedding favor tins.  Inside can be placed candies or little messages.  Over the years I have made a few Countdown To Christmas/Advent Calendars.  Here is one that I made last year with some ideas posted about what I was enclosing inside.  

Wilton Wedding Favor Tins - For Christmas Advent Calendar
It would have been yummy to have sampled lots of different sized candies for the tins, but I am trying to set a good example about "every once in awhile treats." So, in order to show the relative size of these little tins I used candy that was already in the house.  This could also be interpreted as "candy that is not to my liking."  Which is why it is still in the house. ;-)


This is a great project that my family will enjoy using for many years. I hope you get a chance to make one, too!

Please visit again next Friday for another Christmas in July project.  I hope to have a new Christmas project posted every Friday this month.

Thank you for stopping by today!
Beverly

Supplies:
Wilton Wedding Favor Tin Kit
18" MDF Craft Wreath Base
Paint Brush
Adirondack Red Pepper Acrylic Paint Dabber
CTMH - Create A Shade Pearl Paint
Cricut Art Philosophy Cartridge - Leaf 3 on page 46, numbers
Stamp Set: CTMH A Holiday
CTMH New England Ivy and Olive Cardstock
CTMH White Daisy Cardstock
CTMH New England Ivy Ink Pad
Assorted Patterned Paper - I used retired CTMH papers
2" Circle Punch
Hot glue gun
Ribbon and Wire for bow

Tuesday, July 3, 2012

Frosted Designs Card Sketch Challenge #22

Ice Cream Sundae - Stitchy Bear Digital Stamp
Welcome to another fabulous Frosted Designs Card Sketch Challenge.  Our sponsor this week, Stitchy Bear, gave us some designs to work with for the challenge.  I chose to color the image digitally in Photoshop.  After it was colored, I decided to make a background paper from it by shrinking and duplicating the design.

Frosted Designs Sketch by Heather Adams
Heather's fantastic sketch seemed like the perfect one to do a CAS (clean and simple) card.  I haven't done one in awhile and loved the opportunity to showcase the digital stamp in a clean, simple, fun way.  I also wanted to use the sketch in a sort of interactive way.  The top banner-like flap flips up and the white background that forms the base flips down to open the card. Thanks, Heather for such a great sketch!

Tri-fold Card Opens At Top
The white textured card stock (CTMH) for the base was cut 5 1/2" by 11".  I scored it at 4 1/4" and at 8 1/2".  The last flap is what folded down over the front. I fussy cut around the center banner focal point flap to make it obvious that is the way to open the card.

I hope you get a chance to use Heather's sketch and join us by linking your card up on Frosted Designs.

Hope you have a happy day with lots to celebrate!
Beverly

Saturday, June 16, 2012

Art Journal Page - Image Transfer Over Embroidery


Denim Fabric Was Printed, Embroidered, Stamped and Collaged
It is so much fun to incorporate fabric, paper, thread, ink and other tools and supplies together while exploring creative endeavors.  The outside cover of this book was the subject of my post here.  As I am working on the pages on the inside, I will attempt to share some of the challenges and successes in working with mixed media.  This fabric page has a ribbon border on the top and bottom.  It frames a stamped sentiment using Staz-On ink and a butterfly image using pigment ink. These were all applied after completing the base design in the center.
OESD's Sepia Petals Designs and Pigment Ink with CTMH Stamp 
I wanted to use a graphic that came with the embroidery design collection as a base for my page.  It seemed like a good time to experiment with running a piece of 10 ounce denim fabric through the ink jet printer we have had for several years. I ironed a piece of freezer paper to the piece and it went through with no problems.  Do you think holding one's breath during the process helps? :-)  The image turned out great, in fact!

Image Transfer Technique Using Golden's Matte Medium
After using a machine embroidery design on the page, it was time to add more layers.  A scrapbook page that I made several months ago had the right colors and conveyed a sense of exploration that I wanted to show on this page.  I made an image transfer of it from a photo printed at home on a regular HP ink jet printer.  After coating it with the matte medium a couple of times, I soaked it in water and rubbed off the back of the paper.  The picture shown above on the left is a photo after it was painted with the medium, but before soaking the paper off.  The bent photo on the right in the picture above is after the paper is off.  It is flexible and somewhat fragile.  You can see the top edge is ripped a little.

I may add more to this page as time goes on, but for now, I am happy with what I discovered while working on it.
Gluing Paper to Fabric With Claudine Helmuth's Studio Matte Medium
and Aleene's Flexible Stretchable Fabric Glue
The picture above shows another couple of pages as I was experimenting with different adhesives.  Please stop by again for another installment as these are completed.

Thank you for visiting today!
Beverly