Paper and Fiber Arts


Welcome to my mixed media blog. Thanks for stopping by.

Monday, March 12, 2012

Frosted Designs Tuesday Card Sketch #14

4 1/2" Round Card
Welcome to another Frosted Designs Card Sketch Challenge!  I am so excited to share a fun new sketch created by our own Card Team Leader, Ann Bacon!  This sketch and shape seem so fresh and a bit edgy to me.  Which made me think of these new papers from CTMH called Footloose.  I think they fit this sketch perfectly.  But really, the fun of the sketch is to see everyone's interpretation of it!  So please play along and link up your card at Frosted Designs.
Card Sketch by Ann Bacon for Frosted Designs
As you can see, I swapped out the center blossom for a wooden star fish.  And the two round embellishments, I changed for one larger seashell/fan shape.  See? Anything on a sketch can be modified to suit your taste.  That is the super, cool thing about sketches... they give you a starting place and then you can make it all your own.  I Love That!
Sentiment Stamped with Lagoon Ink on CTMH Canvas Badge Button
Supplies are all Close To My Heart:
Paper: Footloose B & T Paper Packet, Colonial White 4 1/2" Circle Card Base
Ink: Lagoon
Stamps: Art Philosophy Collection
Embellishments: Canvas Badge Buttons, Baker's Twine - Paradise Assortment, Seaside Wooden Shapes

Sunday, March 11, 2012

A Tree Sewn With Smoothie Baker's Twine


Hello Blogger Friends!  Today, I wanted to share with you a clean and simple looking card that uses only three colors: Sky, Smoothie and Black.  I love the color combination and hope that the pictures show the striking contrast that is apparent in real life!
Baker's Twine Sewn on to Cardstock
Supplies:
Paper: CTMH Sky, Smoothie, Black
Ink: CTMH Archival Black, Black
Stamps: CTMH A Tree, Martha Stewart 3 in 1 Butterfly Punch/Stamp
Embellishments: CTMH Smoothie Baker's Twine from Paradise Assortment, MS Punch, CTMH Glitz Glitter Gel

Saturday, March 10, 2012

Shabby Chic Layout / Painting With Reinkers To Create Vintage-Like Weathered Papers

Edited on 6/21/2012 - Reposted after having been removed for publication. 
12 x 12 Painting/Painted Layout
 As time goes by, I find myself becoming more eclectic in my tastes.  Somedays I am in a clean and simple (CAS) mood and others.... well, it is good the kitchen sink is bolted in - otherwise with my "more is more" attitude, anything is fair game. :-)
This layout uses a lot of stuff.  The hardest part for me is to commit to using up my stuff.  Hoarder, maybe?  For some reason it is easier for me to use plain cardstock and pretty it up rather than use a lot of patterned paper.  Here is how I transformed the Twilight cardstock, and to a lesser extent the Colonial White cardstock, into the gussied up paper in the layout.
"Altered" Cardstock used for  Flowers and Labels
 There are different types of reinkers.  The kind I used to 'paint' the cardstock is a pigment ink.  This is thicker than dye ink and needs to have a long drying time or can be heat set with a heat gun.
CTMH Colonial White Pigment Reinker on Twilight Cardstock
 After applying a small amount of ink to the cs, sponge it around and smooth it out with the sponge as you go.
Adding a faux texture to the cardstock with reinker
 The paper does not having any bumps, it just looks like it has some texture to it.  Sort of like a suede look.  After heat setting it or allowing it to dry a LONG time, it can be stamped or distressed in a multitude of other ways.  I used background stamps and other single image stamps to create a background-effect.  Some were stamped with 2nd and 3rd generation stamping to give a progressively more subtle effect.
Original Twilight CS and Altered CS to Show Contrast in Coloring
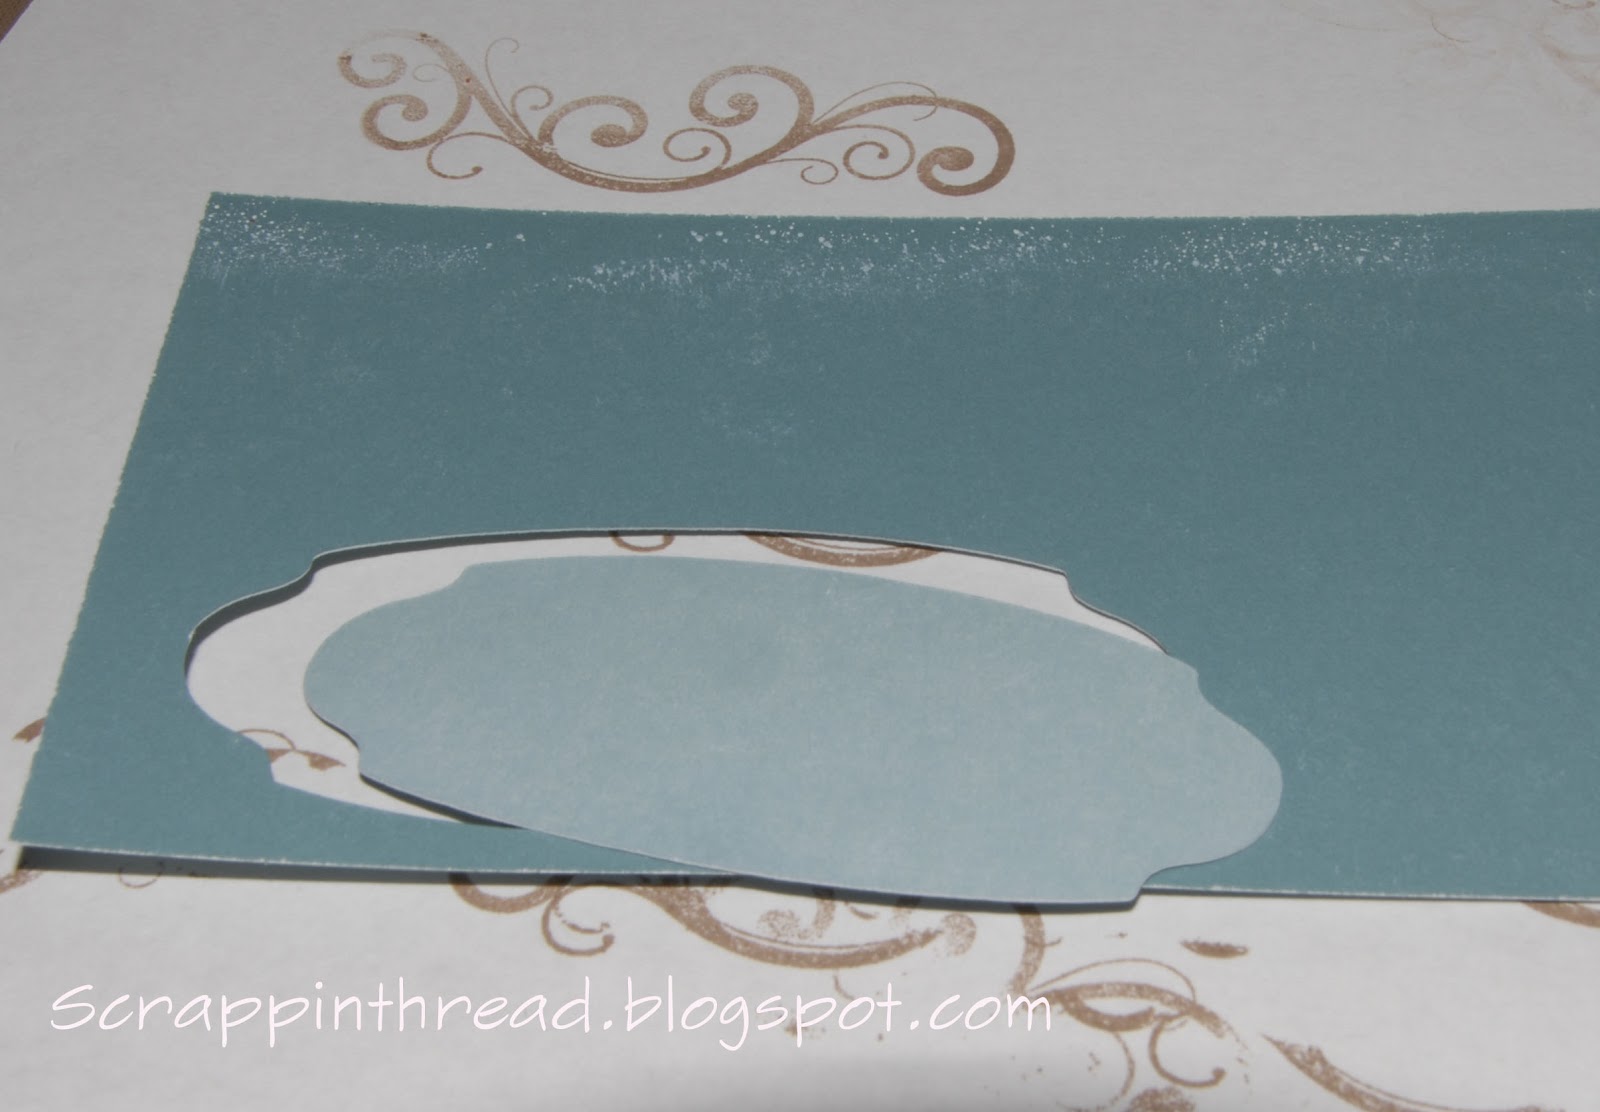
 Several of the pieces I decided to cut with the Cricut and then further alter the individual pieces once they had been cut.  The larger piece pictured above is the mat for the photo in the layout.  It was adhered under a piece of Colonial White cardstock that was ink distressed and edge distressed after using a border bunch on one side and cutting a circle from the center. Then it was spritzed with a little bit of Mister Huey's Color Mist.
Art Philosophy Cricut Label Cut Out After Ink Painted
 The picture above shows the back of the cardstock along with the front of the painted piece after it was cut.  The inking did not cause any problems with getting a good, sharp cut with the Cricut.
CTMH Chocolate Ink with AE Stamp Used on "Painted" Label Layered on top of Linen Fabric
 The great thing about this technique is that you can continue to add ink through sponging, stamping or direct to paper as much as you like.  It is a forgiving type of inky fun. More is ok in this type of creating!
Retired CTMH B & T Paper for Journaling Tag and Base
 The photograph that I used is an original picture of me from (I believe) 1966.  I love this picture because it shows me intent on painting.  It reminds me of how I am now when I am working on projects.  I also love it because my dad took it and I don't have very many things that connect me to him.  Now that I have written that, I think I'll add that to a little hidden journaling under the Bo Bunny diecut journal paper, which is immediately under the photo.
Happy Painting!
Supplies:
Paper: Cardstock and B & T are all CTMH, Bo Bunny Noteworth Journal Diecut
Stamps: CTMH - Potential March 2012 SOTM, Universal Backgrounds, The Best Things. Ali Edwards - Favorite Memories
Ink: CTMH - Colonial White Pigment, (and reinker) Chocolate, Twilight, Bamboo, White Daisy Pigment
Embellishments:  Linen fabric,Mulberry Paper, Prima Wood Tickets, Making Memories off white flower, (in right hand corner) May Arts ribbon,  All other items are from Close to My Heart - Bitty Buds Assortment, Flutter Paper Shape, Foundry Binder Clip, Durables Round Pewter Studs, Sparkles Flourish, Sparkles, some Sparkles and retired hat pin colored with Copic Markers, Kraft Border
Supplies: Sewing Machine and thread, EK Success Scrolls and Dots Edge Punch, MS Doily Lace Edge Punch, Mister Huey's Classic Calico and Bonny Blue

Thanks for visiting and making it through such a long post!
Have an amazing day!
Hugs,
Beverly

Wednesday, March 7, 2012

10 Minute Card - Random Stamping and Stamping on Twill

Smoothie, Lagoon, Gypsy, and  Colonial White Cardstock
 Sometimes it is nice to be able to make a super fast and easy card.  When I need one, I almost always avoid using patterned paper.  For some reason, it requires me to think more when I use designer paper!  I am not sure what that says about me, but I think it means I am just a simple person with simple thoughts.  :-)  So here is my simple card for the day...
Black Dye Ink Stamped On Cotton Twill Ribbon
 Random stamping is lots of fun and I love to do it.  Here I used three different colors of ink on the Colonial White center.  I colored the centers of the largest flowers with a yellow watercolor pencil and didn't add water to the coloring.  The other layers were all stamped with a tone-on-tone effect with their corresponding cardstock color.
CTMH Paradise Paper Flowers with a Brad Center
 The stamps came from the Art Philosophy and Love Life sets from Close to My Heart. All of the embellishments are from CTMH, as well.  The Square Durable Stud comes in pewter (pictured below) and antiqued gold.  The little pearls are self-adhesive and add a nice touch of softness on the card in contrast to the metal embellies.

Small Paper Flowers With Bitty Opaques Pearl Gems
This color combination is out of my normal comfort zone, but I wanted something with a tropical vibe to it and this seemed to fit that theme very well.

Thank you for stopping by today!
Hugs, Beverly

Monday, March 5, 2012

What's For Dinner? Planner

Linen Fabric Adhered with Multi-Medium to Black Chipboard
This is more a post about being organized when it comes to mealtime than it is about paper or fiber arts.  However, the tie in is that I made my own meal planner and bound it with the Cinch. :-)
The first page on the inside is a reference list that I typed many of my cookbooks and favorite recipe websites into.  It wouldn't Have to be printed and bound.  But I like books!
List of Cookbooks and Recipe Websites
Pictured below is the meal planning document that I created. It has two weeks worth of dinners on each side of the page.  I printed 13 copies on inexpensive card stock - double-sided - so that it would make a year's worth of dinners for the planner.
2 Weeks Worth Of Dinner Plans
This video explains the planner in a little more detail:

The documents were printed 'landscape' so that they would fit on the page horizontally.  You may have to tweak them a bit to get them to print the way you like.

Here is the Meal Planner Excel document that I created:

http://www.mediafire.com/?dcm55wx9mio9fa0

Here is the Recipe Resource Excel document that I modified from the Microsoft website:

http://www.mediafire.com/?8e7efs51ruhq182

Inside Back Cover - Lillian Vernon Envelope Bound Into Book

Sunday, March 4, 2012

Stretched Canvas Shadow Box Made For Small Picture From The 1960's

Edited on 6/21/2012 - Reposted after having been removed for publication. 
3.5 " Square Photo From 1968
Even though this photo isn't all that spectacular, it is the only one I have from a family reunion at my grandparent's house. It was taken when I was five years old.  Traveling long distances back then was a big deal and seeing relatives that I did not really know, was a big deal to the adults in the photo.  Most of the cousins probably felt like I did at the time.  It was not that exciting.
But these are my relatives. There are not very many of us alive any longer and I now think it Is exciting to have a picture of that time and place!  So let's scrapbook it!

The picture is small.  It needed to feel more substantial, so I decided to make a shadow box out of a stretched canvas to 'bulk it up'.

Side View of Canvas
After scanning my old photographs, I am scrapbooking the originals.  I want to see the pictures the way that the person who took them saw them when they got them back from the developer.  Maybe this is weird, but I remember opening up the envelope with photos enclosed with such joyful anticipation. Did they turn out?  How many 'good ones' were there?  Did someone have their eyes closed?  Or make a funny expression right when the shutter clicked?  Sorry for the digression.  Back to the layout...
8 x 8 Canvas
To make the shadow box, I flipped the canvas over and used the back, inside opening.  I hope to make a tutorial about this later this week to show how it was assembled.  All the papers are from Close To My Heart's Florentine packet plus an extra piece of Twilight and Olive card stock. These orange-y papers seemed to fit that time period really well. Most of the papers were cut with the Art Philosophy Cricut Cartridge.  The flower was made with burlap (from Joann's) and linen (from  http://www.fabrics-store.com) and cut with Spellbinders dies.  The cute chipboard butterfly is from Studio Calico. That gorgeous ribbon is from May Arts.
Frame Shapes Cut With Art Philosophy Cricut Cartridge
This was a lot of fun to make and I think it makes the photograph look more important.  The finished layout is about 10 1/2" across from point to point.  It will hang in our "hall of fame" in the basement with other family photographs.

Thank you so much for stopping by today!  I appreciate you taking the time to visit!
Hugs,
Beverly

Saturday, March 3, 2012

Real Life Scrapbooking

The Layout That Took Three and a Half Years to Complete
This post is about real life. It is a kind of a sad, rambling, soul-searching post. I decided to post it because maybe other people also struggle with scrapbooking their 'real lives'.

 It is easy to scrapbook events.  There are papers, stickers and all kinds of amazing embellishments designed for special, happy events in our lives.  Manufacturers of scrapbooking supplies know that we want to remember those beautiful days with the panache that they deserve.  But what about the "real life" days?  The ones with bumps, bruises and tears?  With children facing chronic illness, the days of special occasions are joy-filled, but so are the days where you can simply say, "She had a good day today."  Meaning, she got some rest or wasn't feeling as sick as she had been.

I am not trying to be Debbie Downer here, I am trying to explain... mainly to myself.... why it took me over three years to scrapbook photos that have been printed and stored with the papers that I had selected so long ago.  It seemed awkward to want to honor this memory as much as the happy-go-lucky ones.  But there those pictures sat on my desk.  Getting moved from pile to pile, from storage box, back to desk.  Until finally I had to face my own qualms about calling attention to what was a huge part of our lives, but one I hadn't had the strength to address.  Ongoing illness.  Doctors saying she will always be sick. She'll have "good days" but she will always need to be medicated.  She'll need to stay indoors. And the list goes on.

Does this make me a bad mother because I could not bring myself to do a layout that calls attention to the fact that my child was sick for months at a time?  Please know it was only because it made me sad to know that I could not make her better.

The Hidden Journaling Tag

Thank you for visiting my blog today.  I promise the next post will be my regular, happy missive.  :-)
And, as an additional bit of happy news, my dd2 is actually relatively healthy now and has far more 'good days' then bad.  She can be outside (most days) now and acts and looks like a 'normal' seven year old.

Hugs,
Beverly

Tuesday, February 28, 2012

Frosted Designs Tuesday Card Sketch #13

Vintage Card
Welcome to another Frosted Designs Card Sketch Challenge!  I hope you play along with us and link your card at Frosted Designs soon!  The Oh, So Talented Jenny Evans created another fabulous sketch for us this week!  It can take you in lots of directions depending on your mood or style.

Frosted Designs Card Sketch Challenge - Sketch by Jenny Evans
The paper that I wanted to use pushed me in a vintage-y direction. It is one of the new CTMH B & T packets that just came out this month.  I fussy cut the big flower and slightly curled the petals. This was my jumping off point and everything else just fell into place using Jenny's sketch.

Mini Envelope Tucked Behind the Flower
The seam binding was colored with an Outdoor Denim marker to match the paper's dark blue shade.  Behind the ribbon and middle cardstock panel I used a piece of paper from the CTMH Victory packet which I stamped with my favorite background stamp from the Universal Backgrounds set. The Desert Sand and Outdoor Denim cardstock were also stamped with a background stamp from the same set. I like the tone on tone look because it adds depth without being distracting.

Hexagon Center of Flower Fussy Cut From Pemberley Paper 
If you would like to see more detail, please click on the picture.

I appreciate that you stopped by to visit today!  Thank you!
Beverly

Supplies:
All CTMH unless otherwise indicated.
Ink: Desert Sand, Bamboo, Outdoor Denim
Paper: Pemberley, Victory, Desert Sand, Bamboo, Outdoor Denim
Stamps: Universal Backgrounds
Embellishments: Opaques Pearl Adhesive Gems, Durables Square Studs, Basic Assortment Buttons, Valdani thread, SU! linen thread
Tools: Sewing machine, MS Scallop 3-dot edge punch, Clever Lever Giga Craft Envelope Punch, edge distresser, sponges

Monday, February 27, 2012

Can I Stamp On Battery Operated Candles?

Stamped Images On Battery Operated Candles
This was a mystery to me and the only way to find out was to try it... and it worked!   I wanted to use a new stamp set for some Spring decor and longed to decorate some of my boring 'fake' candles. (We can no longer burn candles in our house because of asthmatic kids.) "Stamping" on regular candles has always been a sort of 'wow' kind of thing to show new people how to do. I thought it might be fun to show people that they may be able to try this on their battery operated candles, as well. These candles came from Costco. Probably other candles have a similar waxy coating, just be aware that your results may vary depending on the fake candle.  Real wax candles should work just fine. :-)
Image From CTMH My Peeps Stamp Set On Battery Operated Votive Candles
 Because I wasn't sure whether it would work, I decided to try on a votive candle first.  I used black ink with the bunny peep image pictured above.  After seeing it would work, I tried the Cotton Candy ink with no problems.
Stamped Image On White Tissue Paper
 In retrospect, I would have colored the Springtime image if I had thought of it.  But of course that occurred to me after melting it to the candle! Or stamping it in a different color ink that is more springy would also be cute.
Stamped Image Trimmed Closely With Micro-Tip Scissors
The main difference between the regular candles that I have used in the past and the battery operated ones was that I had to use the wax paper twice on some of the images.  Some were fine with just one melting, though.

Here is a quick video tutorial:

Supplies:
Stamps: CTMH My Peeps B1402
Ink: CTMH Black and Cotton Candy
Colored pencils, tissue paper, wax paper, micro-tip scissors, heat gun, candle

Sunday, February 26, 2012

My Peeps - Wreath/Candle Ring Tutorial

Peeps Stamp From CTMH My Peeps Set
 *** Lots of pictures ***

I have never eaten a Peep because I prefer to get my empty calories from chocolate.  But, I do think they are very cute.  When I saw this stamp set, I knew immediately that I wanted to make the adorable bunny peeps into a wreath.  Because it was going to take a lot of peeps to go around even a smallish circle, I decided to try to figure out how to cut the shape with my Silhouette Cameo.  It was easy! The free software that comes with the machine is very intuitive to figure out. I haven't had time to read the manual, yet I still managed to get a shape that fit the stamped image very well, even if I say so myself. Lol.
Candle Ring Made With Shapes Cut With Cameo
The Cameo cut out lots and lots of Peeps in Bubblegum, (retired) Sunny Yellow, and Sky cardstock.  While that was happening, it seemed like a good time to pull out the Martha Stewart Large Circle Cutter and figure out what size wreath to cut.
A six inch diameter with a four inch opening is what I settled upon. Then I stamped about 30 of the Peep shapes using black ink.
Colonial White Cardstock 6" Wreath Shape
The picture below shows a trial run of the placement to make sure the bunnies would fit properly with the pillar candle I stamped.
Easter Eggs Stamped On Tissue Paper and Colored With Pencils
The bunnies were glued onto the cardstock with Tombow Mono Multi Liquid Glue.  Here they are before I spritzed them with Create-A-Shade Pearl Paint mixed with water.

I thought it would be cute to have them rest on a layer of Easter grass.  The picture below shows the back of the wreath as more glue is being applied.


I smooshed a bunch of grass into the glue and gave it a couple of minutes to dry.  It didn't take much glue to get the grass to stick.
Backside of Wreath With Easter Grass Adhered
"happy easter to my peeps happy easter to my peeps" is the sentiment on the stamp that comes with the set.  I thought it would make a fun banner across the center of the wreath. I used yellow Fun Flock on a couple of the Peeps to anchor the banner.
Pearl Painted Peeps Around Outside of Wreath
To keep it as a candle-ring, I would have skipped the banner and ribbon on the back from which to hang it.  This was a very easy and fairly quick project once the die cut was drawn. :-)

Fun Flocked Peep
Any fun shape can easily be turned into a wreath or candle-ring for any decor or occasion. It will be something that I come back to again because it is very inexpensive and adds a nice change to my home's decorations.

Thank you for visiting my blog.  Have a fabulous day!
Beverly