Paper and Fiber Arts


Welcome to my mixed media blog. Thanks for stopping by.
Showing posts with label Silhouette Cameo. Show all posts

Saturday, December 21, 2019

Last Minute Easy to Make Christmas Cards


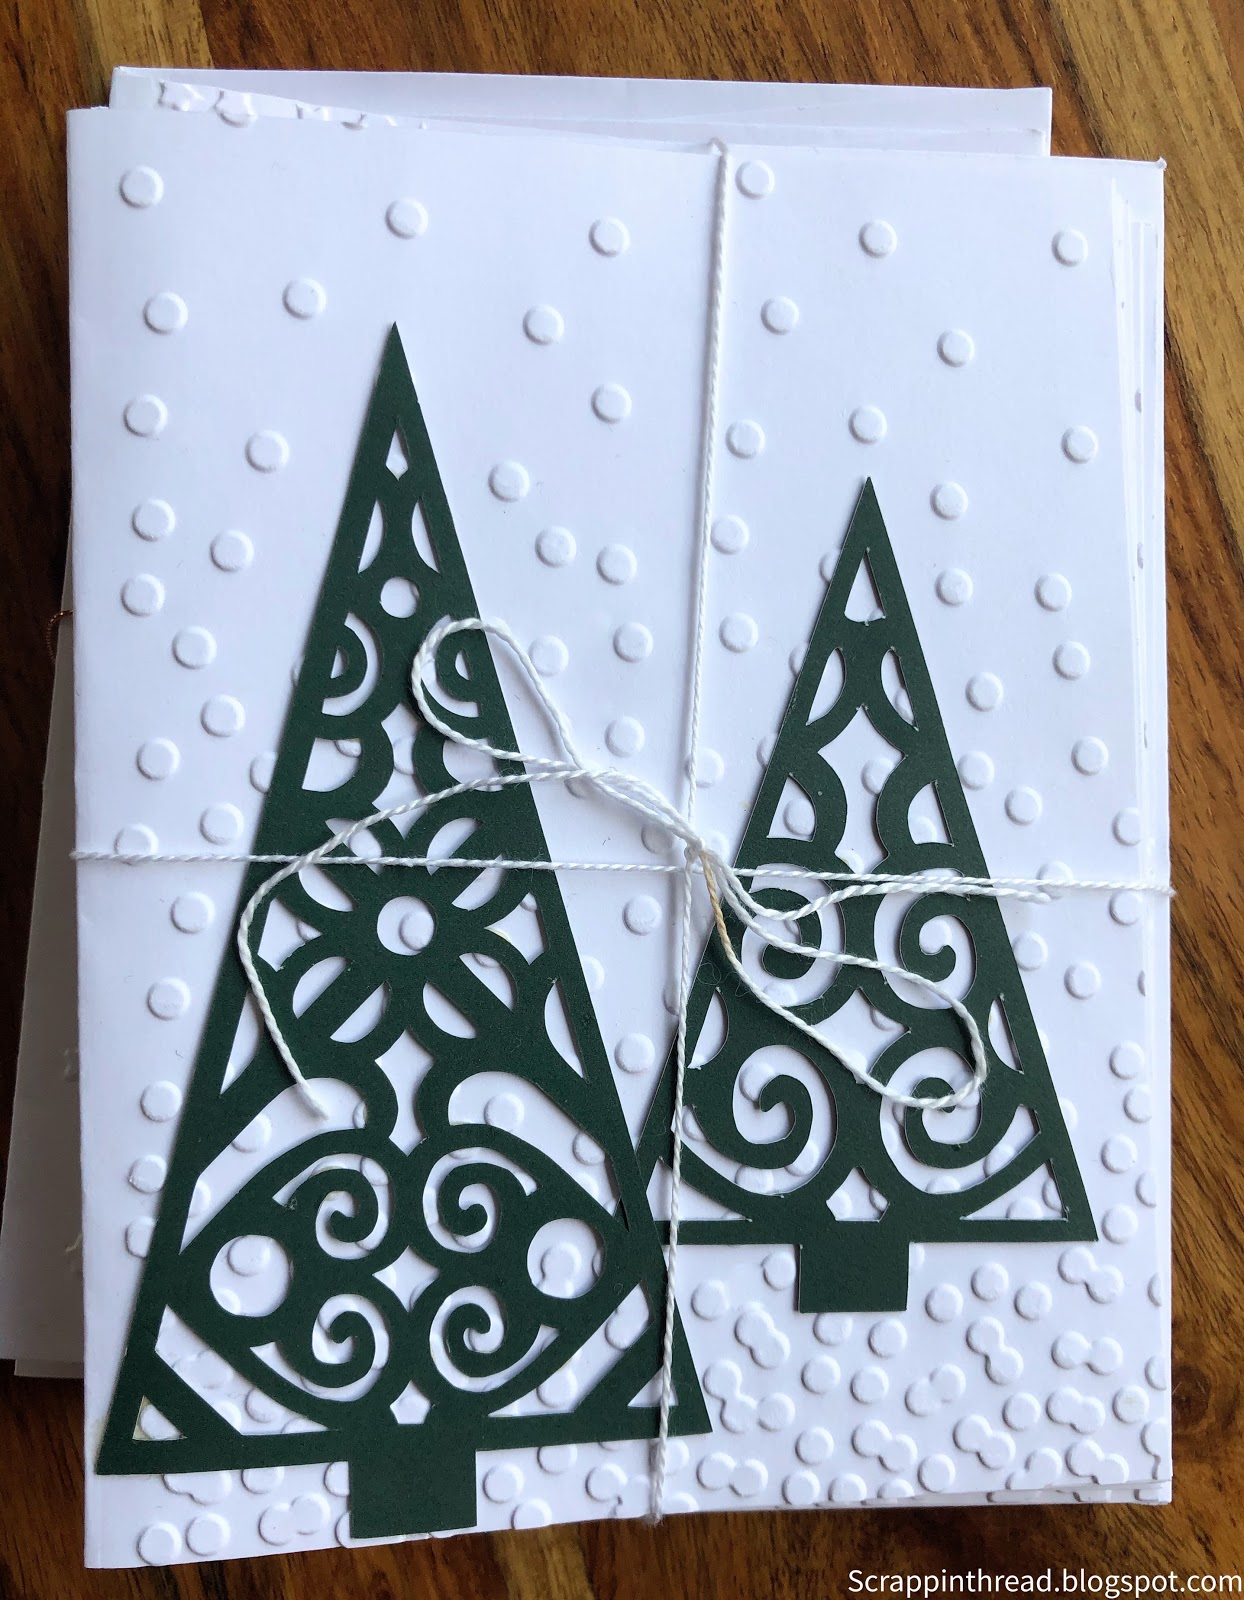
A stack of Christmas cards bundled for a gift to give to someone to send

This post may help if you are still trying to get a handmade card out in the mail for this holiday season. These are very quick, down-to-the-wire, last-minute, easy to make Christmas cards.

1st - Choose an embossing folder that works with whatever stamp or die-cut you are going to use

Another bundle of easy to make Christmas cards to give or sell 

2nd - Embossing a regular 4 1/4 x 5 1/2 card front.

Mailable card

3rd - Adhere a die-cut or stamped sentiment or image to the front. Write a greeting inside and sign the card.


4th - Address an envelope, affix a regular postage stamp and pop it in the mail.


Lastly, here is another quick craft project I made from a gingerbread house mold.  It is melted hard candy.

Pampered Chef Gingerbread Candy House

Wednesday, May 16, 2012

Graduation Projects

Each 7" x 6" Plain Chipboard Pennant Covered and Decorated
 Last weekend my older dd graduated from the University of Arizona.  I am so proud of her!  Younger dd and I made some things to decorate the entryway for when she came home after the commencement on Saturday.  The "Congratulations" banner looks much nicer in person, but I think you can see some of the detail in the first picture above.  I used a pre-cut chipboard base from CTMH.  Each of the letters was cut from very old paper from CTMH using the Cricut Art Philosophy Cartridge. The same paper packs were used to cover the pennants and make rosettes, etc.
Uses Two CTMH My Creations Chipboard Banner Packs
The letters were tied together with baker's twine.  It is nice that her school colors are so patriotic!  I will probably recycle some of the pieces for the Fourth of July. :-)
3 Giant Tissue Paper Flowers Made by 7 Year Old Daughter
 The "2012" on the tissue paper flowers was cut using the Silhouette Cameo and adhered with glue dots.  I think my younger dd did a great job making these big tissue paper flowers..  They are very easy to make.  Accordion fold the paper and tie a wire around the center.  A good fluffing and they are ready!


This note was hanging on the wall on the way to the kitchen.  It sums it all up!
I hope you have many fun things to celebrate this summer.
Thanks for stopping by.
Beverly


Friday, April 6, 2012

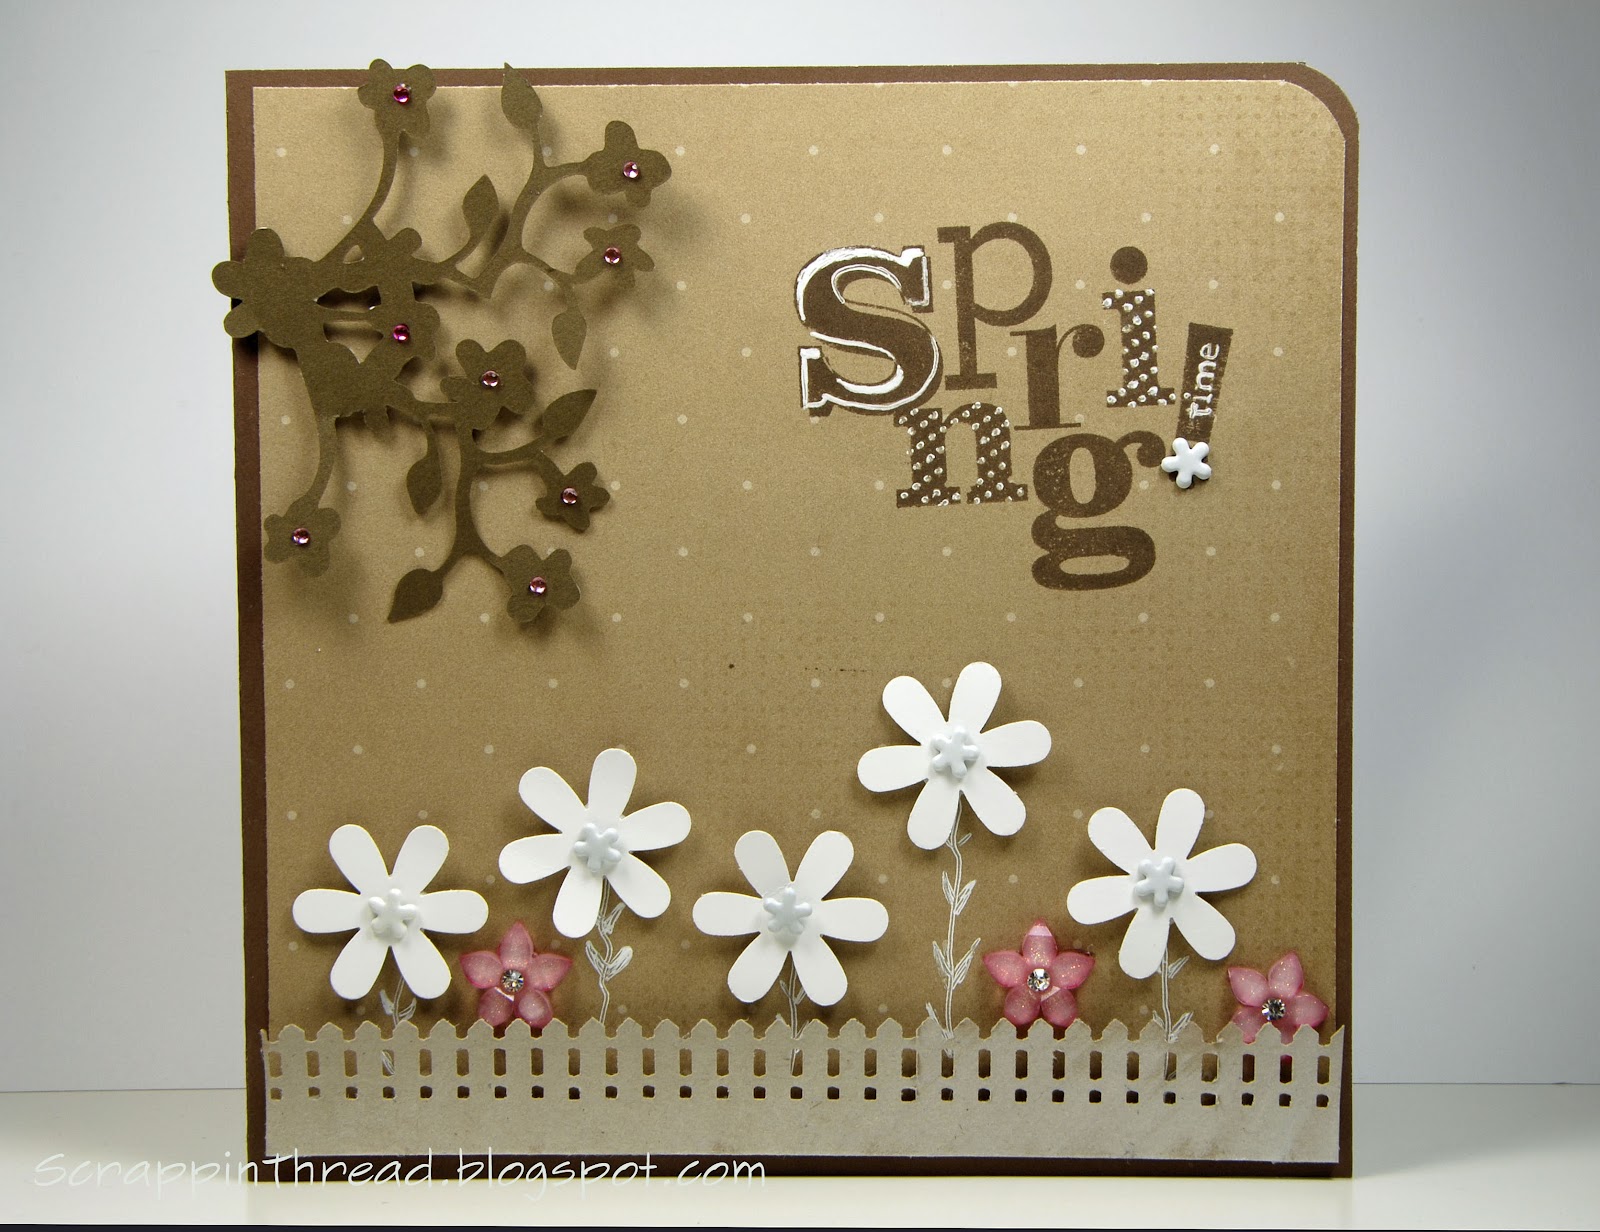
Happy Spring On A Brown Background


Picket Fence Cut With Edge Punch and Whitewashed with Tim Holtz Distressed Stain
Just a happy little card in browns, white and pink.  Have a Happy Easter Weekend!

Thursday, April 5, 2012

Thinking Of You - Stamping On Vellum Layered Card

Card With Vellum Cover
 Vellum seems so elegant to use on a hand-crafted card.  I love how what is layered underneath seems extra special.  This card is very simple to create, but in person still has a wow factor.
Vellum Adhered On The Fold Side
This card uses a 12" x 6" piece of cardstock, a 6" piece of vellum and a white cardstock diecut made with the Silhouette Cameo.   I spritzed the diecut with a mixture of CTMH Crystal Blue reinker, Create A Shade Pearl Paint and water to give it a bit of a blue tinge.  To make it easy to adhere, I ran it through the Xyron and made it into a gigantic sticker. This was then adhered to the card front.  The vellum was layered on top with a thin strip of vellum adhesive after stamping.
CTMH Thinking Of You Image From The Childhood Portrait Set
The image was stamped with Versamark ink and embossed with white powder.  I used a white fiber (retired CTMH) on the fold side and tied it in a bow.

Even though this card is layered, it is not at all bulky.  The fiber adds a bit of dimension but would not interfere with any of the automatic postage sorting machines.  No additional postage would be necessary if it were a standard size.  Of course I didn't think of that until after I made it. :-)

Thank you for stopping by today!
Beverly

Sunday, February 26, 2012

My Peeps - Wreath/Candle Ring Tutorial

Peeps Stamp From CTMH My Peeps Set
 *** Lots of pictures ***

I have never eaten a Peep because I prefer to get my empty calories from chocolate.  But, I do think they are very cute.  When I saw this stamp set, I knew immediately that I wanted to make the adorable bunny peeps into a wreath.  Because it was going to take a lot of peeps to go around even a smallish circle, I decided to try to figure out how to cut the shape with my Silhouette Cameo.  It was easy! The free software that comes with the machine is very intuitive to figure out. I haven't had time to read the manual, yet I still managed to get a shape that fit the stamped image very well, even if I say so myself. Lol.
Candle Ring Made With Shapes Cut With Cameo
The Cameo cut out lots and lots of Peeps in Bubblegum, (retired) Sunny Yellow, and Sky cardstock.  While that was happening, it seemed like a good time to pull out the Martha Stewart Large Circle Cutter and figure out what size wreath to cut.
A six inch diameter with a four inch opening is what I settled upon. Then I stamped about 30 of the Peep shapes using black ink.
Colonial White Cardstock 6" Wreath Shape
The picture below shows a trial run of the placement to make sure the bunnies would fit properly with the pillar candle I stamped.
Easter Eggs Stamped On Tissue Paper and Colored With Pencils
The bunnies were glued onto the cardstock with Tombow Mono Multi Liquid Glue.  Here they are before I spritzed them with Create-A-Shade Pearl Paint mixed with water.

I thought it would be cute to have them rest on a layer of Easter grass.  The picture below shows the back of the wreath as more glue is being applied.


I smooshed a bunch of grass into the glue and gave it a couple of minutes to dry.  It didn't take much glue to get the grass to stick.
Backside of Wreath With Easter Grass Adhered
"happy easter to my peeps happy easter to my peeps" is the sentiment on the stamp that comes with the set.  I thought it would make a fun banner across the center of the wreath. I used yellow Fun Flock on a couple of the Peeps to anchor the banner.
Pearl Painted Peeps Around Outside of Wreath
To keep it as a candle-ring, I would have skipped the banner and ribbon on the back from which to hang it.  This was a very easy and fairly quick project once the die cut was drawn. :-)

Fun Flocked Peep
Any fun shape can easily be turned into a wreath or candle-ring for any decor or occasion. It will be something that I come back to again because it is very inexpensive and adds a nice change to my home's decorations.

Thank you for visiting my blog.  Have a fabulous day!
Beverly

Wednesday, February 15, 2012

Maracas Turned Into Barbells - aka - A Three Year Old Invents Exercise Equipment

12 x 12 Traditional Layout
I recently found these photos in a box that had hurriedly been packed when our basement flooded a couple of years ago.  It had a bunch of different and somewhat non-related items in it. Most of the things were to be scanned.  I hate scanning, so when I came across these, I quickly switched gears to scrapbook instead!

Silhouette Cameo Title Using Print and Cut Features
Die-cuts are so much fun to use!  On this layout, I used a variety of different sources for die-cutting.  The flowers are a combination of purchased flowers from Close To My Heart, (now retired) some Silhouette Cameo cuts, (embossed with Sizzix folders) and a Stampin' Up! punch.

Stamping the date on the layout in Sunflower ink
There is one small strip of patterned paper with four words on it from Prima Marketing's Pixie Glen collection and one 1/4" by 12" piece of patterned paper (Elemental by CTMH) on the layout. Everything else is plain cardstock. The inks match the cardstock colors of Heavenly Blue and Sunflower. I also used black ink and white cardstock.
Working Hard!
The die-cuts and title were all sprayed with a Create-a-Shade pearl paint and water mixture. The big flower in the bottom left corner was also sprayed with Perfect Pearls.

Thanks so much for visiting today!  Please let me know if you have any questions.  And don't forget to scroll down to learn how to be eligible for my Frosted Designs Love is in the Air Blog Hop prize drawing. Or click here.

Beverly

Thursday, February 9, 2012

Joy =

12 x 12 Traditional Layout
 Joy means many things to me.  But the first thing that ALWAYS comes to my mind when I think of how Joy FEELS is this:
My blessings are plentiful!
 Joy = Receiving a hug from a child I was told I could never have.  My two children are 15 years apart in age.  When I was 42, I found out that I was going to have another chance at being a mom again.  It was a high risk pregnancy and my dd2 suffered from many medical issues after a normal birth.  The first few years of her life were not easy for her.  Maybe that is why her frequent and enthusiastic hugs are so cherished?  No, all hugs are cherished no matter what your child has been through.

Silhouette Cameo Cute Bird
 This happy page is all about the special hugs I am fortunate to receive every single day.  When there are more than just two of us at home, she asks for a "Family Hug".  The uninitiated may find that a little bit odd, but they soon realize that for dd2, everyone becomes family fairly quickly.  She loves group - "Family Hugs".

Hugs to you and may your life be filled with Joy!
Beverly

Monday, January 30, 2012

Frosted Designs Tuesday Card Sketch #11


The fabulously talented Jenny Evans designed another super card sketch for the Tuesday Card Challenge at Frosted Designs.  You have almost two weeks to link up your take on her sketch!
Jenny Evans' Card Sketch
As you can see, I turned the card so that it would open at the top.  This necessitated turning parts of the sketch a bit. The Cranberry colored cardstock is mounted on a black card base.  This allows the negative space of some of the die-cuts to act as debossed areas. The edges of the card front are distressed to bring out the white core of the cardstock.

Silhouette Cameo Used For All Die Cut Shapes
All papers, ink, stamps are from CTMH.  The Silhouette shapes were purchased from the Silhouette store.  They have an amazing selection of designs!  I colored the hat pin with alcohol ink and added beads purchased from Michael's.

2nd Generation Stamping on Inside Card Panel
It is sometimes nice to have a design on the inside of cards, so I stamped a couple of images from the Love Life set.  Also from the set, the "Love" sentiment on the front of the card was stamped using a mask.  The sentiment actually reads: "Live. Laugh. Love." I didn't want the punctuation to show, so I masked before and after the word.


Have a Happy Day!
Beverly

Monday, January 2, 2012

Let It Snow! Shaker Card

Frosted Designs Card Sketch Challenge # 9
Today marks another Frosted Designs Tuesday Card Sketch Challenge!  Thank you for stopping by to see my contribution as part of the design team.  Please visit Frosted Designs to see the other designer's cards and to play along for a chance to win a great prize!  You have almost two weeks to create a card following the great sketch below by Diana Gonzalez!

Diana Gonzalez's Sketch
This sketch made me think of a shaker card.  Sandwiched in-between two layers of acetate (transparency film) I poured a mixture of craft-supply "snow".
The "snow" is made with Flower Soft Polar White and Stampendous Silver Crushed Glass Glitter.  I added the glitter because it was heavier then the Flower Soft and I thought it may make the card "shake" better.

Looking through the window of snow to the stamped sentiment
The paper diecuts are from a few Silhouette Cameo shapes, a Martha Stewart Snowflake Punch and a Martha Stewart Snowflake Edger Punch.  I cut out the center of the two large snowflakes for the window using a circle template shape with the Coluzzle.  How I wish that hadn't been discontinued!  I am hoarding a couple of the blades to use only for special occasions, like this card. :-)

Snowflakes layered under a CTMH Shimmer Brad 
The papers are all from CTMH:  Crystal Blue, Grey Flannel, White Daisy and Wonderland B & T.  The inks are Crystal Blue and Black.

First and Second Generation Stamping using CTMH Snowflakes Stamp Set
The snowflakes on the inside of the card were embellished with Silver Glitz Glitter Gel.  On the front of the card there is a Spellbinders snowflake that I cut out of a sheet of double sided adhesive and sprinkled glitter all over it.  That is layered under a bunch of paper snowflakes shown in the photograph below.

Lots of layers of snowflakes!
(To see more detail, click on any of the pictures.)
CTMH Clear Sparkles adorn many of the Snowflakes and Brads
Please let me know if you have any questions by leaving me a comment.  Thank you for spending part of your day with me today. :-)
Beverly

Friday, December 30, 2011

Silhouette Cameo Snowflakes Card - No Patterned Paper!

Crystal Blue and White Cardstock
 The Silhouette Cameo cuts beautiful and intricate designs. I wanted to showcase the  pretty cuts by making a clean and simple card.    This card uses 2 colors of plain cardstock, one ink color, one stamp, and some ribbon and bling.  Easy!

CTMH Snow Flurries stamp used as a background stamp
 The card base is Crystal Blue CTMH Cardstock stamped with Crystal Blue ink using one stamp from the Snow Flurries set.  White Daisy cardstock was cut using a blade depth of 4 at a speed of 3 using the double cut option through the software linked to the Cameo.  For even more intricate cuts that I've used on upcoming projects, I slowed the speed to 2. This was with a new blade, btw.

Create A Shade Pearl Paint sprayed on White Cardstock
 After cutting the shapes, I sprayed them with a paint and water mixture to give the snowflakes a shimmery effect.  The picture above was taken with a flash to show off the pearlized look.


The final touch was to add some CTMH Clear and Bitty Sparkles to the snowflakes. The white organdy ribbon was threaded through a ribbon slide and  adhered to the front of the card.

Thank you for stopping by today!
Beverly

Monday, December 5, 2011

Frosted Designs Card Sketch Challenge # 7


Silhouette Cameo Star of David Lace Pattern
This great sketch from Diana Gonzalez seemed like a perfect one for me to try some new (to me) techniques using the Silhouette Cameo and software.  I purchased the Star of David Lace Pattern through the Silhouette store and resized it to make three different background papers.  I also captured the blue color and made the two large rings using their free software.  It is so awesome to be able to match colors exactly!

Card Sketch by Diana Gonzalez
Diana's sketch is so pretty!  I know this will be a sketch that I'll use in the future.  It is always fun to see how the other people on the design team use the sketch and I hope that you will visit their blogs to see what they came up with, too!  Many of them used some of the digital stamps from the prize sponsor, Sassy Studio.  Please visit Frosted Designs and enter in the challenge this week.

This standard size card is easy to mail
All of the shapes are popped off the card base with foam tape.  The oval with the stamped sentiment is a SU! punch.  The rest of the shapes were printed on my HP printer from the Silhouette software onto plain white cardstock.  After the printer puts registration marks onto the page, the Cameo can accurately line up the cutting lines to make perfect circles or whatever shapes you draw in the software.  Or it can cut purchased cut files very quickly.  On this card, I didn't use any purchased cut files.  I ended up fussy-cutting the large Star of David, but the rest were all cut with the Cameo.

Sentiment from CTMH set - Say It In Style Stamp Set D1283
The sentiment was stamped using Versamark Ink and then embossed with silver powder.  There are little self-adhesive jewels from CTMH called Clear Sparkles on the oval sentiment and on two of the edges, as shown on the sketch.  The hatpins were made by me using purchased beads.  The dark blue ones were pearls that I colored using Adirondack Alcohol ink as well coloring the top of the corsage pin.


Thank you so much for stopping by today!  
Beverly