
 |
Currently, my favorite tool in my crafting area is the Vagabond die cutting machine made by Sizzix. I have enjoyed using it for a variety of different quilting and paper crafting projects over the past few weeks. It continues to serve my purposes very well. However, I feel like the dies are sometimes a one-off purchase. This goes against my more frugal side. As I was looking at a beautiful die, designed to be a card front, I started thinking about other ways I can maximize that and some of the other dies in my collection. That is when the idea about easy paper piecing with die-cuts came to mind. As a bonus, there is a card that is made with paper piecing on the backside, too.


Because I did not need to have an entire cut of the image, I used small pieces over the design. Washi tape can be used to hold the paper in place if needed.

If you want to replace the background with different colors of paper, you would cut out the entire image. Piece the colors of the negative spaces back in and adhere to a card front. The picture above shows just two different pieced colors. The light blue is the card base. This is not a completed card, it is an example of how to use the negative cuts.
 |
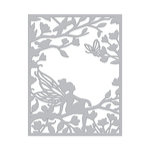
| Hero Arts Fairy Window Fancy Die cut out of vellum |
The fairy picture, above, does not have anything to do with paper piecing. But, I wanted to show another way to get a variety of colors using one die cut image. The base under the vellum piece was made using two different kinds of powder paint on Bristol paper, spritzed with water. The green is a shimmery Tonic product and the other colors are Ken Oliver's Color Burst.

The cards pictured in this post are all standard 5.5" x 4.25" mailable cards. Even though they are pieced, there is no extra bulk, and they can be run through the post office sorters.
 |
| Card made with Altenew's Layering Floral Cover Die A |
This next card die is from Altenew. The picture below shows the backside of the die-cut image with the different colors of pieces adhered to the back. The front is layered on a piece of vellum which is adhered to a standard white card.
 |
| Back of card with pieced papers as shadow outlines |
The next card is super simple to make. I am showing the individual pieces before they've been assembled. It was very easy to cut out the skirt and layer it.

Thank you for visiting today!
These are the supplies that are currently available that were used on these cards:


Scrapbook.com


Nice to see you posting again. I have a very similar die, and had thought to do the same thing!! Great minds.......
ReplyDeleteHi Sarah! Thanks for stopping by! I would love to see what you create. Please share if you get a chance.
Delete